
[vc_row][vc_column][vc_empty_space][vc_video link=”https://youtu.be/EOmYTxhlv7k”][vc_empty_space][vc_column_text]
Overview of the A.I. Gigapixel Interface
[/vc_column_text][vc_column_text]
This introductory level walkthrough is really easy to follow along with but you will need just a few things if you’d like to follow along with me:
1. Topaz A. I. Gigapixel. You’ll need A.I. Gigapixel downloaded and installed on your computer if you’d like to follow along during this tutorial. It’s free to download and you can activate a 30-day trial by following the steps here: A.I Gigapixel Help Center Article.
2. Any Image you want to Upscale. Grab any image to follow along and try it out for yourself.
3. About 5 minutes. This beginner’s level walkthrough will only take about 5 minutes to complete.
[/vc_column_text][vc_empty_space][/vc_column][/vc_row][vc_row][vc_column][/vc_column][/vc_row][vc_row css=”.vc_custom_1499750369090{padding-top: 20px !important;padding-bottom: 20px !important;}”][vc_column][vc_column_text]
Opening the Application and Logging in
[/vc_column_text][vc_row_inner][vc_column_inner width=”1/3″][vc_column_text]
Once you’ve downloaded and installed A.I. Gigapixel, you’ll be greeted with a login screen. You just need to log in using your Topaz Studio account, the same account you use to login to the Topaz Website.
[/vc_column_text][vc_empty_space][qodef_button size=”” type=”outline” target=”_blank” icon_pack=”” font_weight=”” text=”Topaz Account” link=”https://topazlabs.com/my-account/”][/vc_column_inner][vc_column_inner width=”2/3″][vc_single_image image=”493649″ img_size=”full” onclick=”link_image”][/vc_column_inner][/vc_row_inner][/vc_column][/vc_row][vc_row css=”.vc_custom_1499750369090{padding-top: 20px !important;padding-bottom: 20px !important;}”][vc_column][vc_row_inner][vc_column_inner width=”1/2″][vc_column_text]
After you log in you’ll be given a window to start a trial or buy the application, if you’d like to start a trial you can click the trial button to start a free 30-day trial. If you’ve already purchased the application you should go right to the next step.
[/vc_column_text][vc_empty_space][/vc_column_inner][vc_column_inner width=”1/2″][vc_single_image image=”493665″ img_size=”full” onclick=”link_image”][/vc_column_inner][/vc_row_inner][/vc_column][/vc_row][vc_row css=”.vc_custom_1499750369090{padding-top: 20px !important;padding-bottom: 20px !important;}”][vc_column][vc_column_text]
Opening an Image
[/vc_column_text][vc_row_inner][vc_column_inner width=”1/3″][vc_column_text]
After you’ve logged in you’ll be greeted with a window to add an image, you can drag and drop images into this window, or click the window to browse for the images you’d like to open. You can select multiple images or drag them into the application to add them to your Queue.
[/vc_column_text][vc_empty_space][/vc_column_inner][vc_column_inner width=”2/3″][vc_single_image image=”493750″ img_size=”full” onclick=”link_image”][/vc_column_inner][/vc_row_inner][/vc_column][/vc_row][vc_row css=”.vc_custom_1499750369090{padding-top: 20px !important;padding-bottom: 20px !important;}”][vc_column][vc_column_text]
The Image Queue
[/vc_column_text][vc_row_inner][vc_column_inner width=”1/2″][vc_column_text]
Once opened your image queue will list in the left side of the interface, showing a thumbnail and a file path. you can double click the images in the Queue to open them in your default photo viewer or click the trash can icon to remove images from the Queue.
[/vc_column_text][vc_empty_space][/vc_column_inner][vc_column_inner width=”1/2″][vc_single_image image=”493764″ img_size=”full” onclick=”link_image”][/vc_column_inner][/vc_row_inner][/vc_column][/vc_row][vc_row css=”.vc_custom_1499750369090{padding-top: 20px !important;padding-bottom: 20px !important;}”][vc_column][vc_column_text]
Enlarge Options
[/vc_column_text][vc_row_inner][vc_column_inner][vc_column_text]
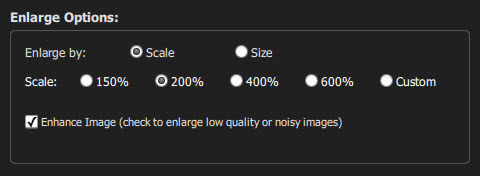 The first section of settings in A.I. Gigapixel is the Enlarge Options section. You can enlarge by scale by selecting the radial options for 200%, 400% etc. You can also enter a custom scale value ranging from 20% to 600% in size.
[/vc_column_text][vc_empty_space][/vc_column_inner][/vc_row_inner][vc_row_inner][vc_column_inner][vc_column_text]
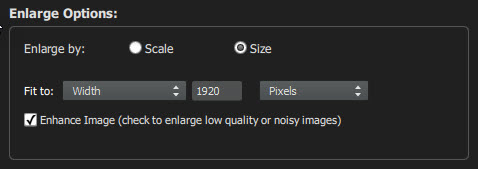 You can also enlarge by size which lets you input a custom value to size your image by width, height, or width and height and to size by pixels, centimeters, or inches. Using the width and height option will scale your image to fit the parameters you assign, fitting within the defined “box”. Your images will never be distorted or cropped and will always retain its original aspect ratio.
You also have the option to “Enhance Image” which will apply noise reduction post processing to improve the quality of noisy or highly compressed input images. This option shouldn’t be used on input images without significant noise or artifacting.
[/vc_column_text][vc_empty_space][/vc_column_inner][/vc_row_inner][/vc_column][/vc_row][vc_row css=”.vc_custom_1499750369090{padding-top: 20px !important;padding-bottom: 20px !important;}”][vc_column][vc_column_text]
Output Format
[/vc_column_text][vc_row_inner][vc_column_inner][vc_single_image image=”493833″ img_size=”full” onclick=”link_image”][vc_empty_space][vc_column_text]
The Output Format section determines the file types your processed images will be saved as. You can select JPG, TIFF, or PNG with additional options for image quality, color profile, or if you’re using TIFF bit depth.
You can also select to “Match the input format” which will keep your processed images file type, additionally, you can select whether to apply the settings to Raw images only or to all images processed. (if processing Raw images you need to select a format here, Gigapixel cannot output a raw file type).
[/vc_column_text][/vc_column_inner][/vc_row_inner][/vc_column][/vc_row][vc_row css=”.vc_custom_1499750369090{padding-top: 20px !important;padding-bottom: 20px !important;}”][vc_column][vc_column_text]
Output Name and Location
[/vc_column_text][vc_row_inner][vc_column_inner][vc_single_image image=”493847″ img_size=”full” onclick=”link_image”][vc_empty_space][vc_column_text]
The output name and location settings let you choose where to save your images and how they’ll be named. By default images are saved back to the source folder with the suffix “_output” added. By unchecking the “save to Input file location” checkbox you can specify a custom location to save the images to by clicking “browse”.
You can enter a custom prefix or suffix for your processed images by typing in the provided fields, and you can also check a box to preserve metadata for the upscaled images this will result in slightly slower processing.
[/vc_column_text][/vc_column_inner][/vc_row_inner][/vc_column][/vc_row][vc_row css=”.vc_custom_1499750369090{padding-top: 20px !important;padding-bottom: 20px !important;}”][vc_column][vc_column_text]
You’re Ready to Go!
[/vc_column_text][vc_row_inner][vc_column_inner][vc_single_image image=”493860″ img_size=”full” onclick=”link_image”][vc_empty_space][vc_column_text]
Once you have the settings you’d like for your batch you can click the start button and AI Gigapixel will begin working through your image queue, showing a blue progress bar on each image as it processes, and a green checkbox once the image is complete.
You’ll also notice under the file location the dimensions for your images original and processed sizes. Clicking on any of the images once processed will show you a preview of your processed image in your system’s default photo viewer.
[/vc_column_text][/vc_column_inner][/vc_row_inner][/vc_column][/vc_row][vc_row css=”.vc_custom_1534441729460{background-color: #333333 !important;}”][vc_column][vc_empty_space][vc_empty_space][mpc_icon_column preset=”mpc_preset_40″ layout=”style_2″ url=”url:https%3A%2F%2Ftopazlabs.com%2Fdownloads%23gigapixel|||” background_color=”#333333″ border_css=”border-color:#333333;border-style:solid;border-radius:0px;” padding_css=”padding:30px;” title_font_preset=”mpc_preset_1″ title_font_color=”#ffffff” title_font_size=”17″ title_font_line_height=”1.4″ title_font_transform=”uppercase” title_font_align=”center” title=”Try A.I. Gigapixel™ Free” title_margin_divider=”true” title_margin_css=”margin-bottom:8px;” content_font_preset=”mpc_preset_1″ content_font_color=”#ffffff” content_font_size=”14″ content_font_line_height=”1.5″ content_font_align=”center” hover_border_css=”border-color:#ffffff;border-radius:0px;” mpc_icon__transition=”slide-up” mpc_icon__icon_type=”image” mpc_icon__icon_image_size=”80×80″ mpc_icon__icon_image=”433947″ mpc_icon__background_color=”#ffffff” mpc_icon__border_css=”border-width:0px;border-color:#d472a5;border-style:solid;border-radius:20px;” mpc_icon__padding_css=”padding:10px;” mpc_icon__margin_divider=”true” mpc_icon__margin_css=”margin-bottom:20px;” mpc_icon__hover_icon_color=”#ffffff” mpc_icon__hover_background_color=”#d472a5″ mpc_icon__hover_border_css=”border-color:#ffffff;” mpc_divider__disable=”true” mpc_divider__width=”10″ mpc_divider__align=”left” mpc_divider__content_padding_divider=”true” mpc_divider__content_padding_css=”padding-top:0px;padding-right:0px;padding-bottom:0px;padding-left:0px;” mpc_divider__lines_color=”#dddddd” mpc_divider__padding_divider=”true” mpc_divider__padding_css=”padding-top:3px;padding-bottom:3px;”]
Get started with this awesome standalone batch upsampling application. You’ve got nothing to lose.
[/mpc_icon_column][mpc_textblock content_width=”100″ font_preset=”preset_4″ font_align=”center”]
[/mpc_textblock][vc_empty_space][/vc_column][/vc_row][vc_row][vc_column][vc_empty_space][vc_empty_space][vc_column_text]
Still Need Help?
[/vc_column_text][vc_empty_space][vc_row_inner gap=”25″][vc_column_inner width=”1/2″][vc_column_text]
Visit Our Forums!
You can post a question on the forums to get tips and assistance from other topaz users here: http://discuss.topazlabs.com
[/vc_column_text][/vc_column_inner][vc_column_inner width=”1/2″][vc_column_text]
Visit the Help Center
You can visit the help center to search for articles or submit a ticket here: http://help.topazlabs.com
[/vc_column_text][/vc_column_inner][/vc_row_inner][vc_empty_space][/vc_column][/vc_row]


3 thoughts on “A.I. Gigapixel walk through with Heath Robinson”
If you select “Inches” as a parameter you get a new input field for pixels/inch.
The default appears to be low.
If you are enlarging the image to print in a photo book should this be set to 300?
Cliff,
It would depend on your printer’s preferences but in general, yes 300 dpi is sufficient.
For sharpest output why would I not always select 6x regardless of what size print I expect to make? I need a deeper explanation not only of what options are available to me but when to use them.
Comments are closed.