Studio Apps
New
Web Apps


Enterprise

AI image and video enhancement built for enterprise and production workflows.
Studio Apps
New
Web Apps
Enterprise


Automatically identifies and removes blemishes from your entire photo. One click.

Wherever you go. Low light. Night sky. On-the-move. It’s your composition and lighting. Your mood and expression. Your technical decisions—aperture, shutter speed, ISO and focal length. And it’s all clearer than ever with Photo AI.

Extra sensor information equals higher-quality results, including detail previously unseen. Use “Raw Denoise” before exporting as a DNG raw file for processing in Lightroom or Camera Raw.
Feathers. Fur. Blades of grass. Zoom, upscale, and sharpen at any distance, without a loss of detail.

Drag panels to where they work best for you. Preview updates faster. Switch between your current edit and previous edits—all now faster than ever.

Use enhancements multiple times in one photo, with multiple selections, in any order you wish.
Enhance every photo with realistic, true-to-form detail. Built for pros.

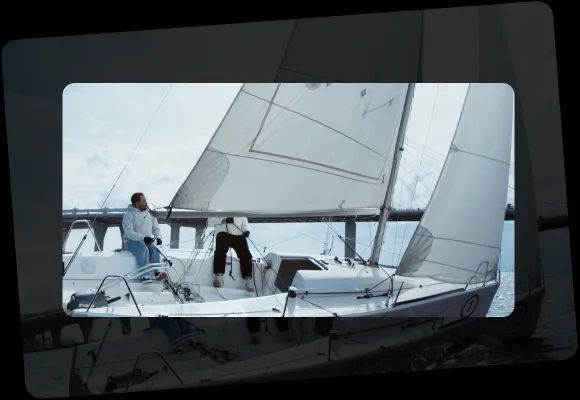
It’s the first-ever diffusion model for video upscaling, and now Starlight Mini is the first to do it locally. No cloud needed. No pay-per-render. Upscale low-res video to 4K with unimaginable quality without extra cost. Only in Video AI 7.
Match cameras with different frame rates, or achieve slow motion without changing camera settings. AI models generate new frames to make it all super smooth.

Frames are automatically rendered at the cursor position, with changes shown immediately.


Upscale to 16K and fix compression artifacts. Trained with millions of video frames, Video AI intelligently understands the difference between noise and detail.
Smooth camera movement and reduce smearing effect. Stabilize the frame and recover detail, keeping the focus on your subject, not on the camera shake.
Studio grade AI for video professionals and those who need a commercial license.


Take any image to 16X scale for the largest possible prints, posters, and billboard-size projects. Crop. Zoom in. Maximize photos, images, and AI-rendered art.

Turn your digital art into high-resolution prints. Achieve razor-sharp images while also scaling for large-format printing.

Studio-grade AI upscaling for pros, plus commercial licensing.


Work on confidential and protected images and video without ever uploading to a server. Local processing in all Topaz products guarantees your work remains secure, while making for lightning-fast processing, too.
Get the fastest possible processing times with the latest generative AI models. Cloud rendering takes the pressure off your hardware and allows the cloud to do the work for you.

What could take upwards of 30 minutes now happens in just a few. Cloud rendering is an instant boost to see your results in a fraction of the time.
*1hr of 1080p footage, upscaled to 4K on a 4090 RTX GPU (Windows, Ryzen 7900X, RTX 4090, 64 GB RAM), an M4 Max (Mac, 64 GB RAM), and in the cloud with Topaz Cloud Rendering.

Multiple images or videos. All rendered at once. Get your queue loaded, then sit back and watch your images complete, or jump to other tasks.

Cloud rendering takes the pressure off your hardware’s performance, and puts it on the cloud. No need to upgrade your machine to use the new, more complex models.
A seamless integration into your current setup. Use it as a plugin for tight workflow integration.
Our products work directly on your Mac or PC. Use the optimized standalone app to batch process jobs in sequence.
We’ve partnered with major hardware manufacturers like Nvidia, AMD, and Intel to make our products run as fast as possible on your computer.
© 2005 - 2024 Topaz Labs. All rights reserved.