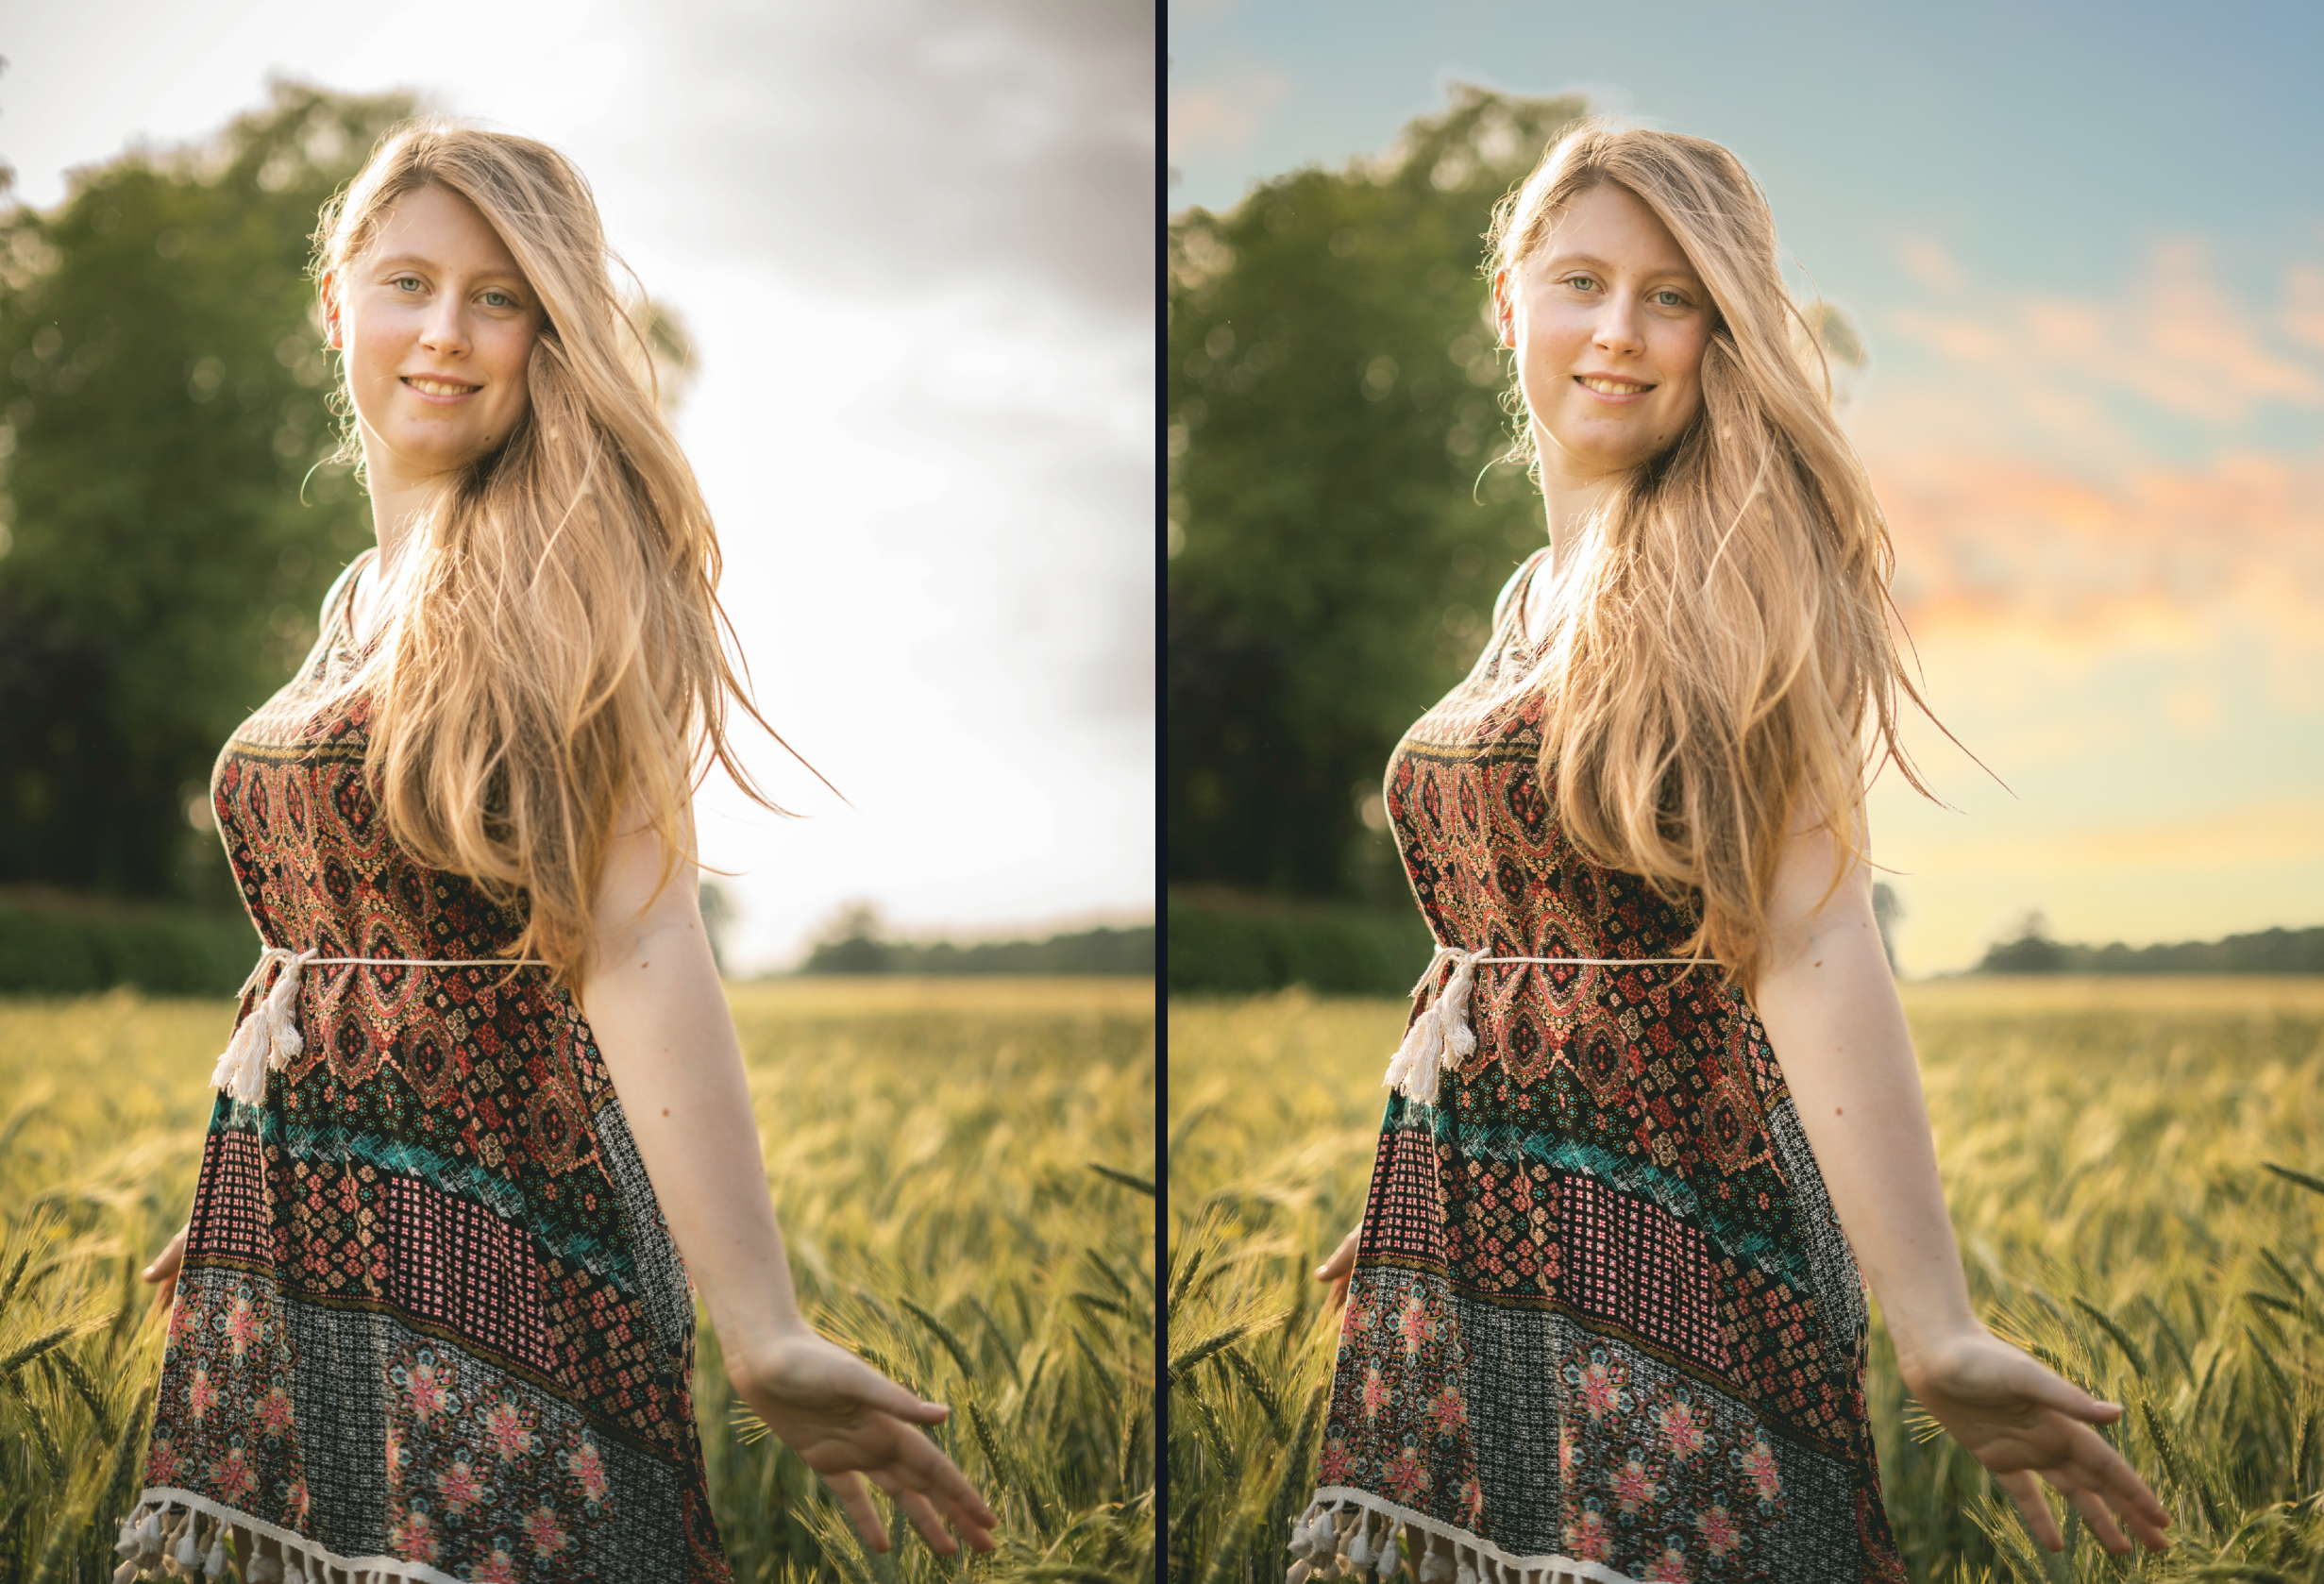

Replacing the background of an image to create a composite photograph can result in stunning, creative works of art. Whether you want to completely replace the sky to change the mood of your photo, or totally isolate objects for your graphic design projects, your first step will be to create a mask.
A mask simply helps you select a portion of your image. After masking your image, you can can easily change background colors, make transparent images, or replace portions of your image without ever deleting a pixel from your original photo. Masking can require a lot of precision skill and effort to carefully refine complicated selections, like hair and fur.
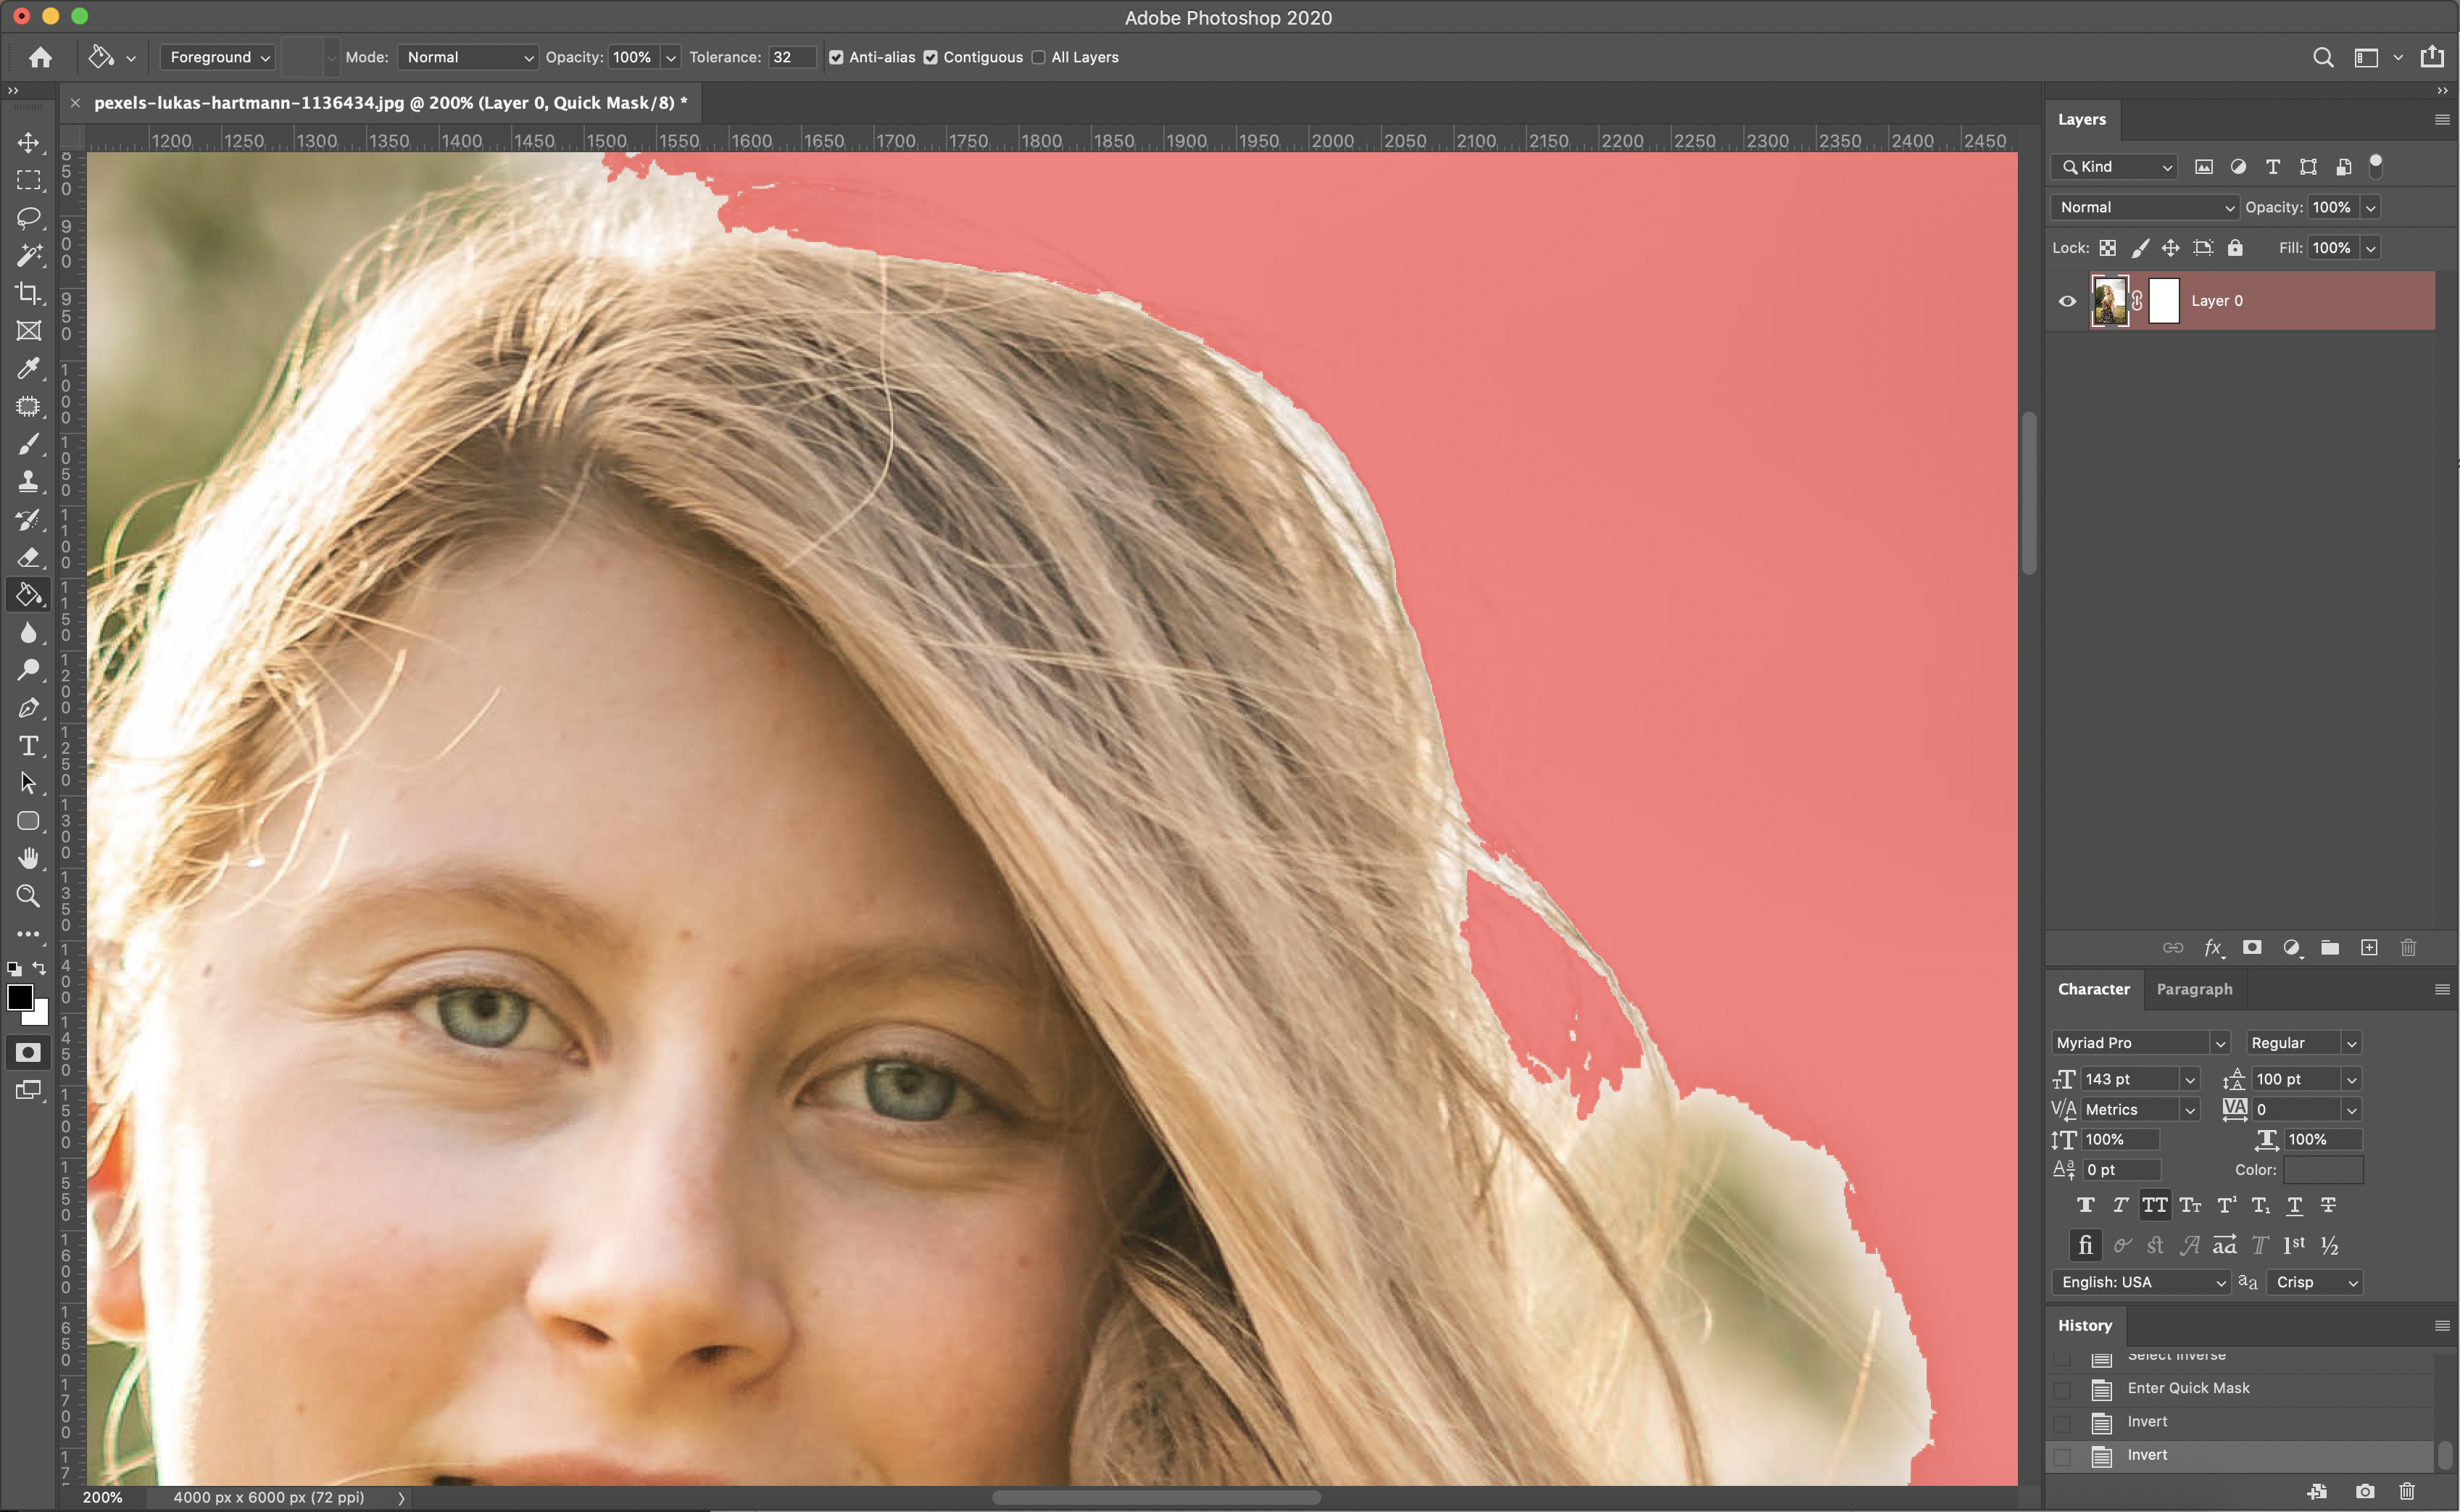
If you’ve ever tried to replace the background of an image in Photoshop, you know how tedious this process can be. Even with Photoshop’s magic wand and quick mask tools, you’ll still find yourself zooming in at 1200% and carefully clicking away pixel-by-pixel to get a perfect mask.
The problem with masking in Photoshop is that isolating fine objects is time-consuming. You’ll need to switch through a variety of brushes and ideally use a digital drawing tablet to perfectly fade your brush strokes.
In the image above, you can see what you have to work with when you mask an image in Photoshop. Attempting to isolate the background from the model’s individual strands of hair could take hours to get just right.
Mask AI solves the problem of complicated image masks. Using the power of sophisticated neural networks, Mask AI can identify the content of your photo and make the most accurate masks in mere seconds. Finally, you can let your computer do all the complicated masking work for you, so you can complete your project in less time.
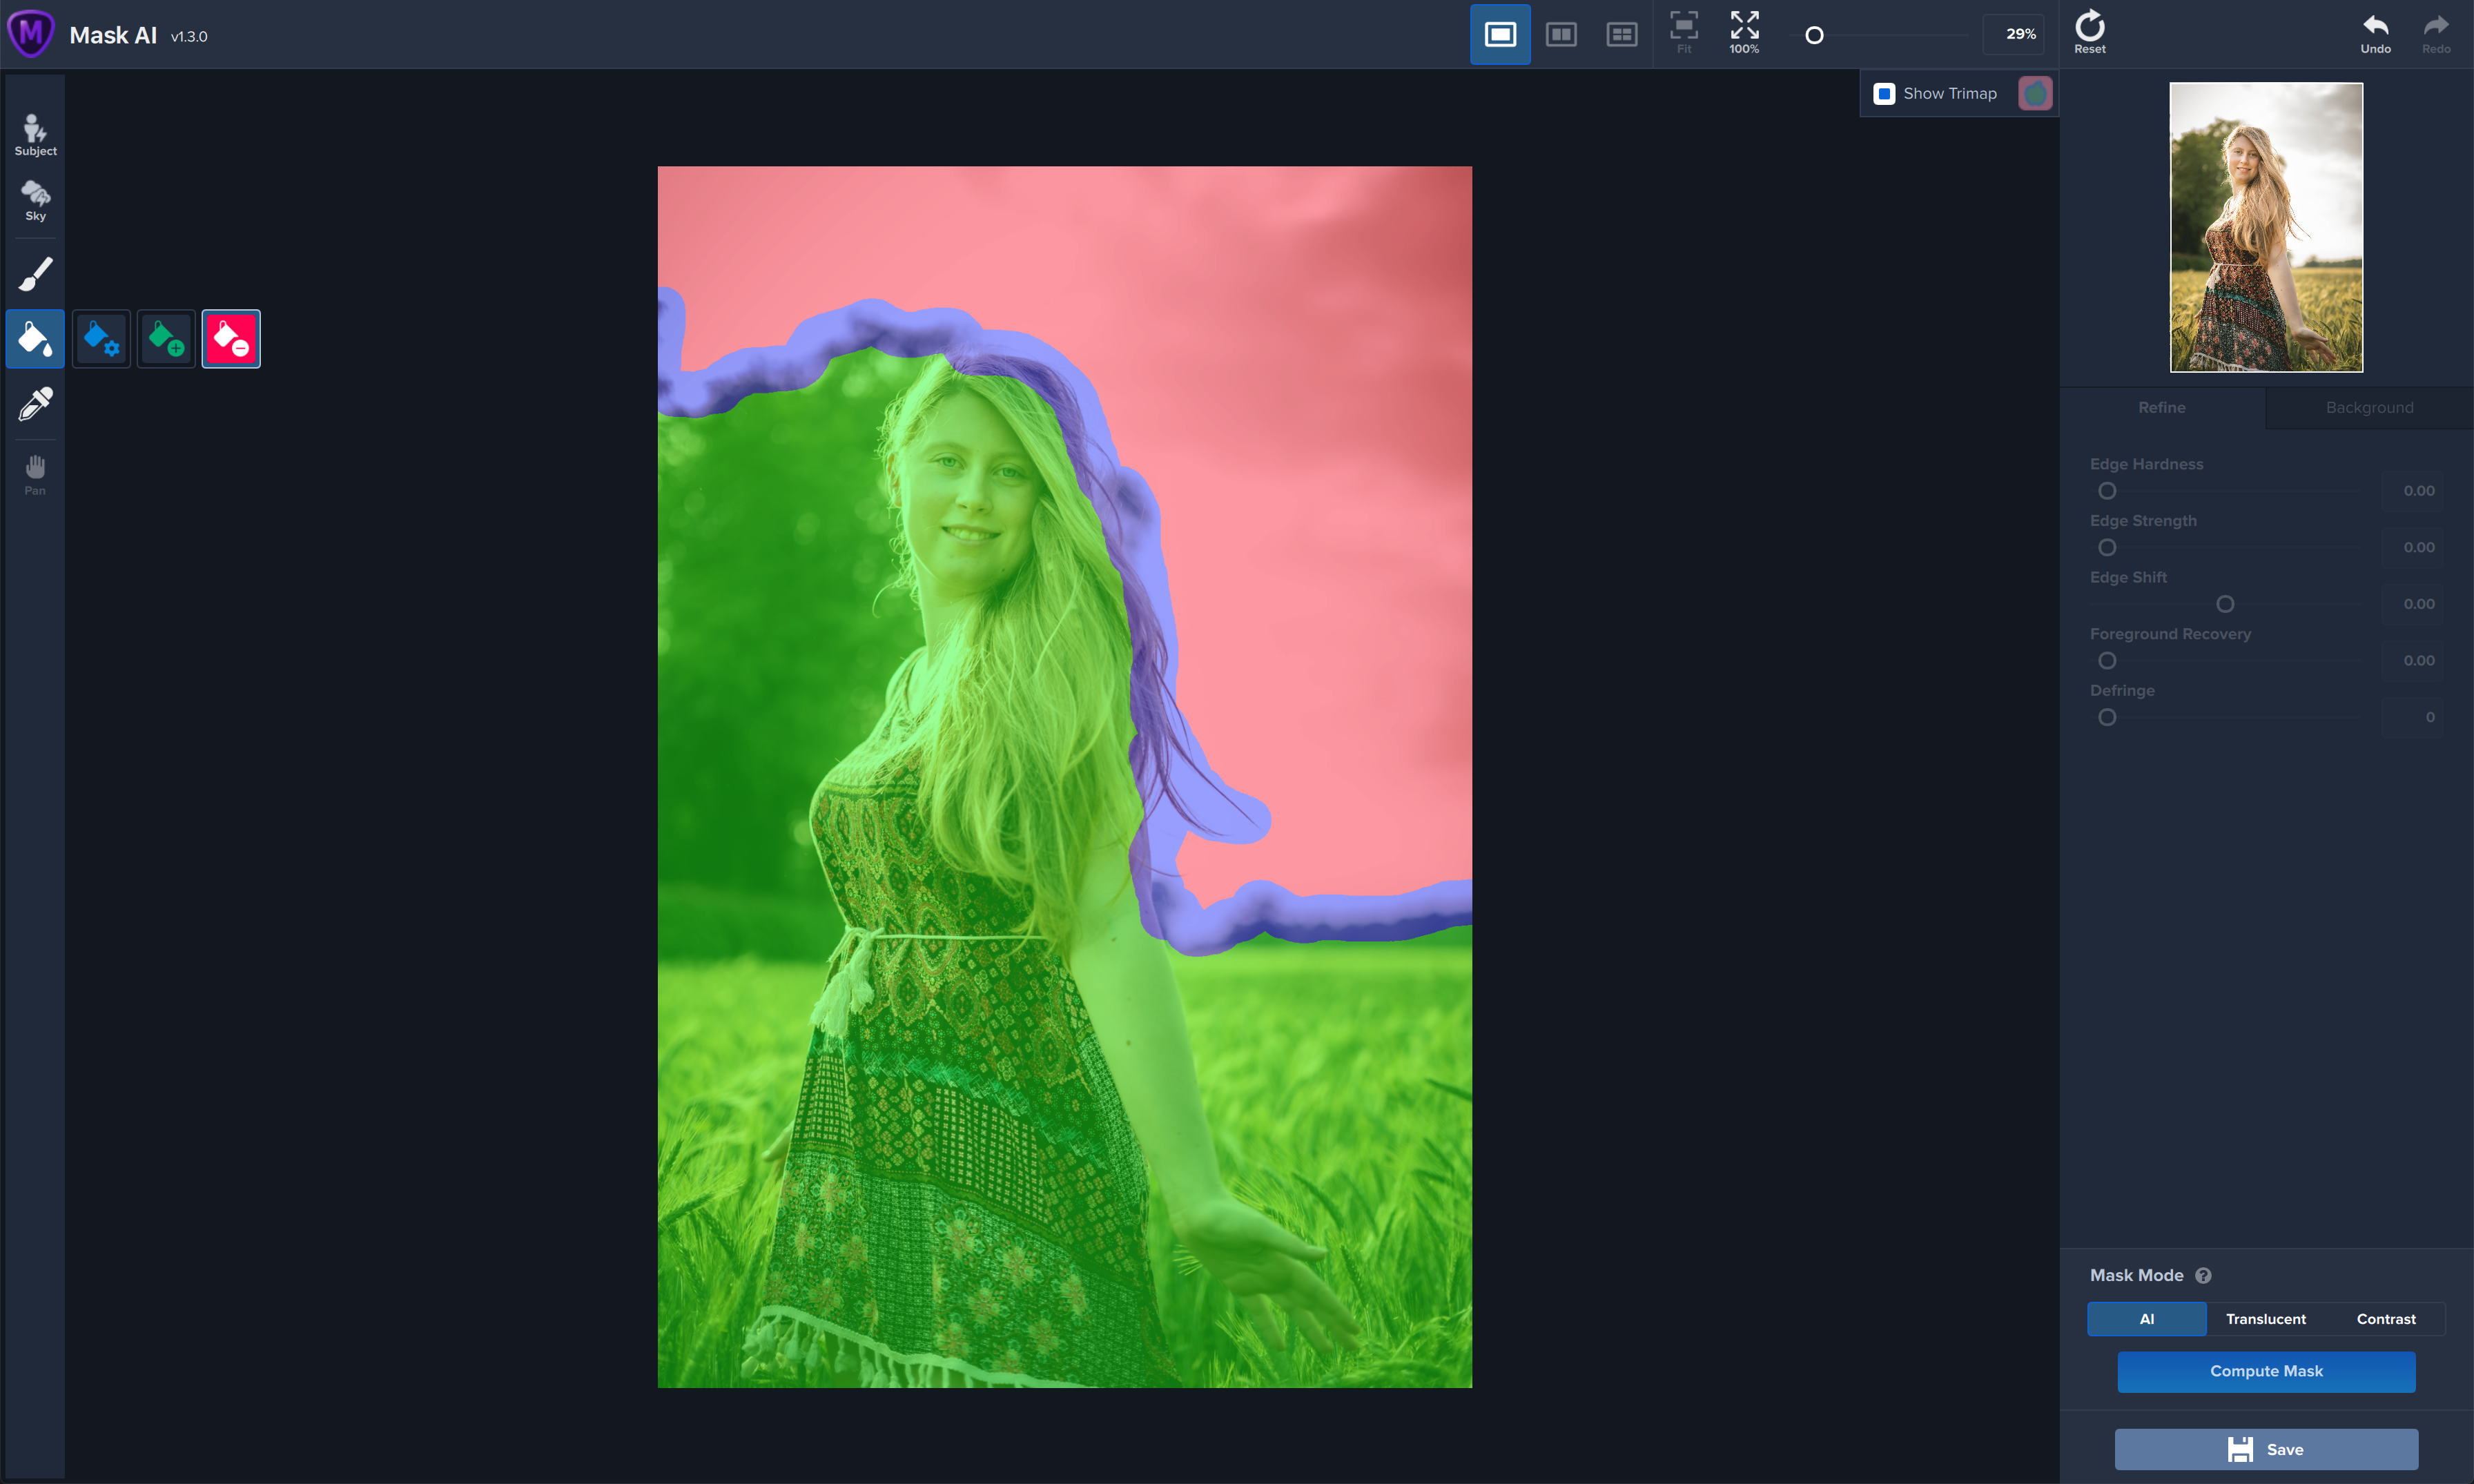
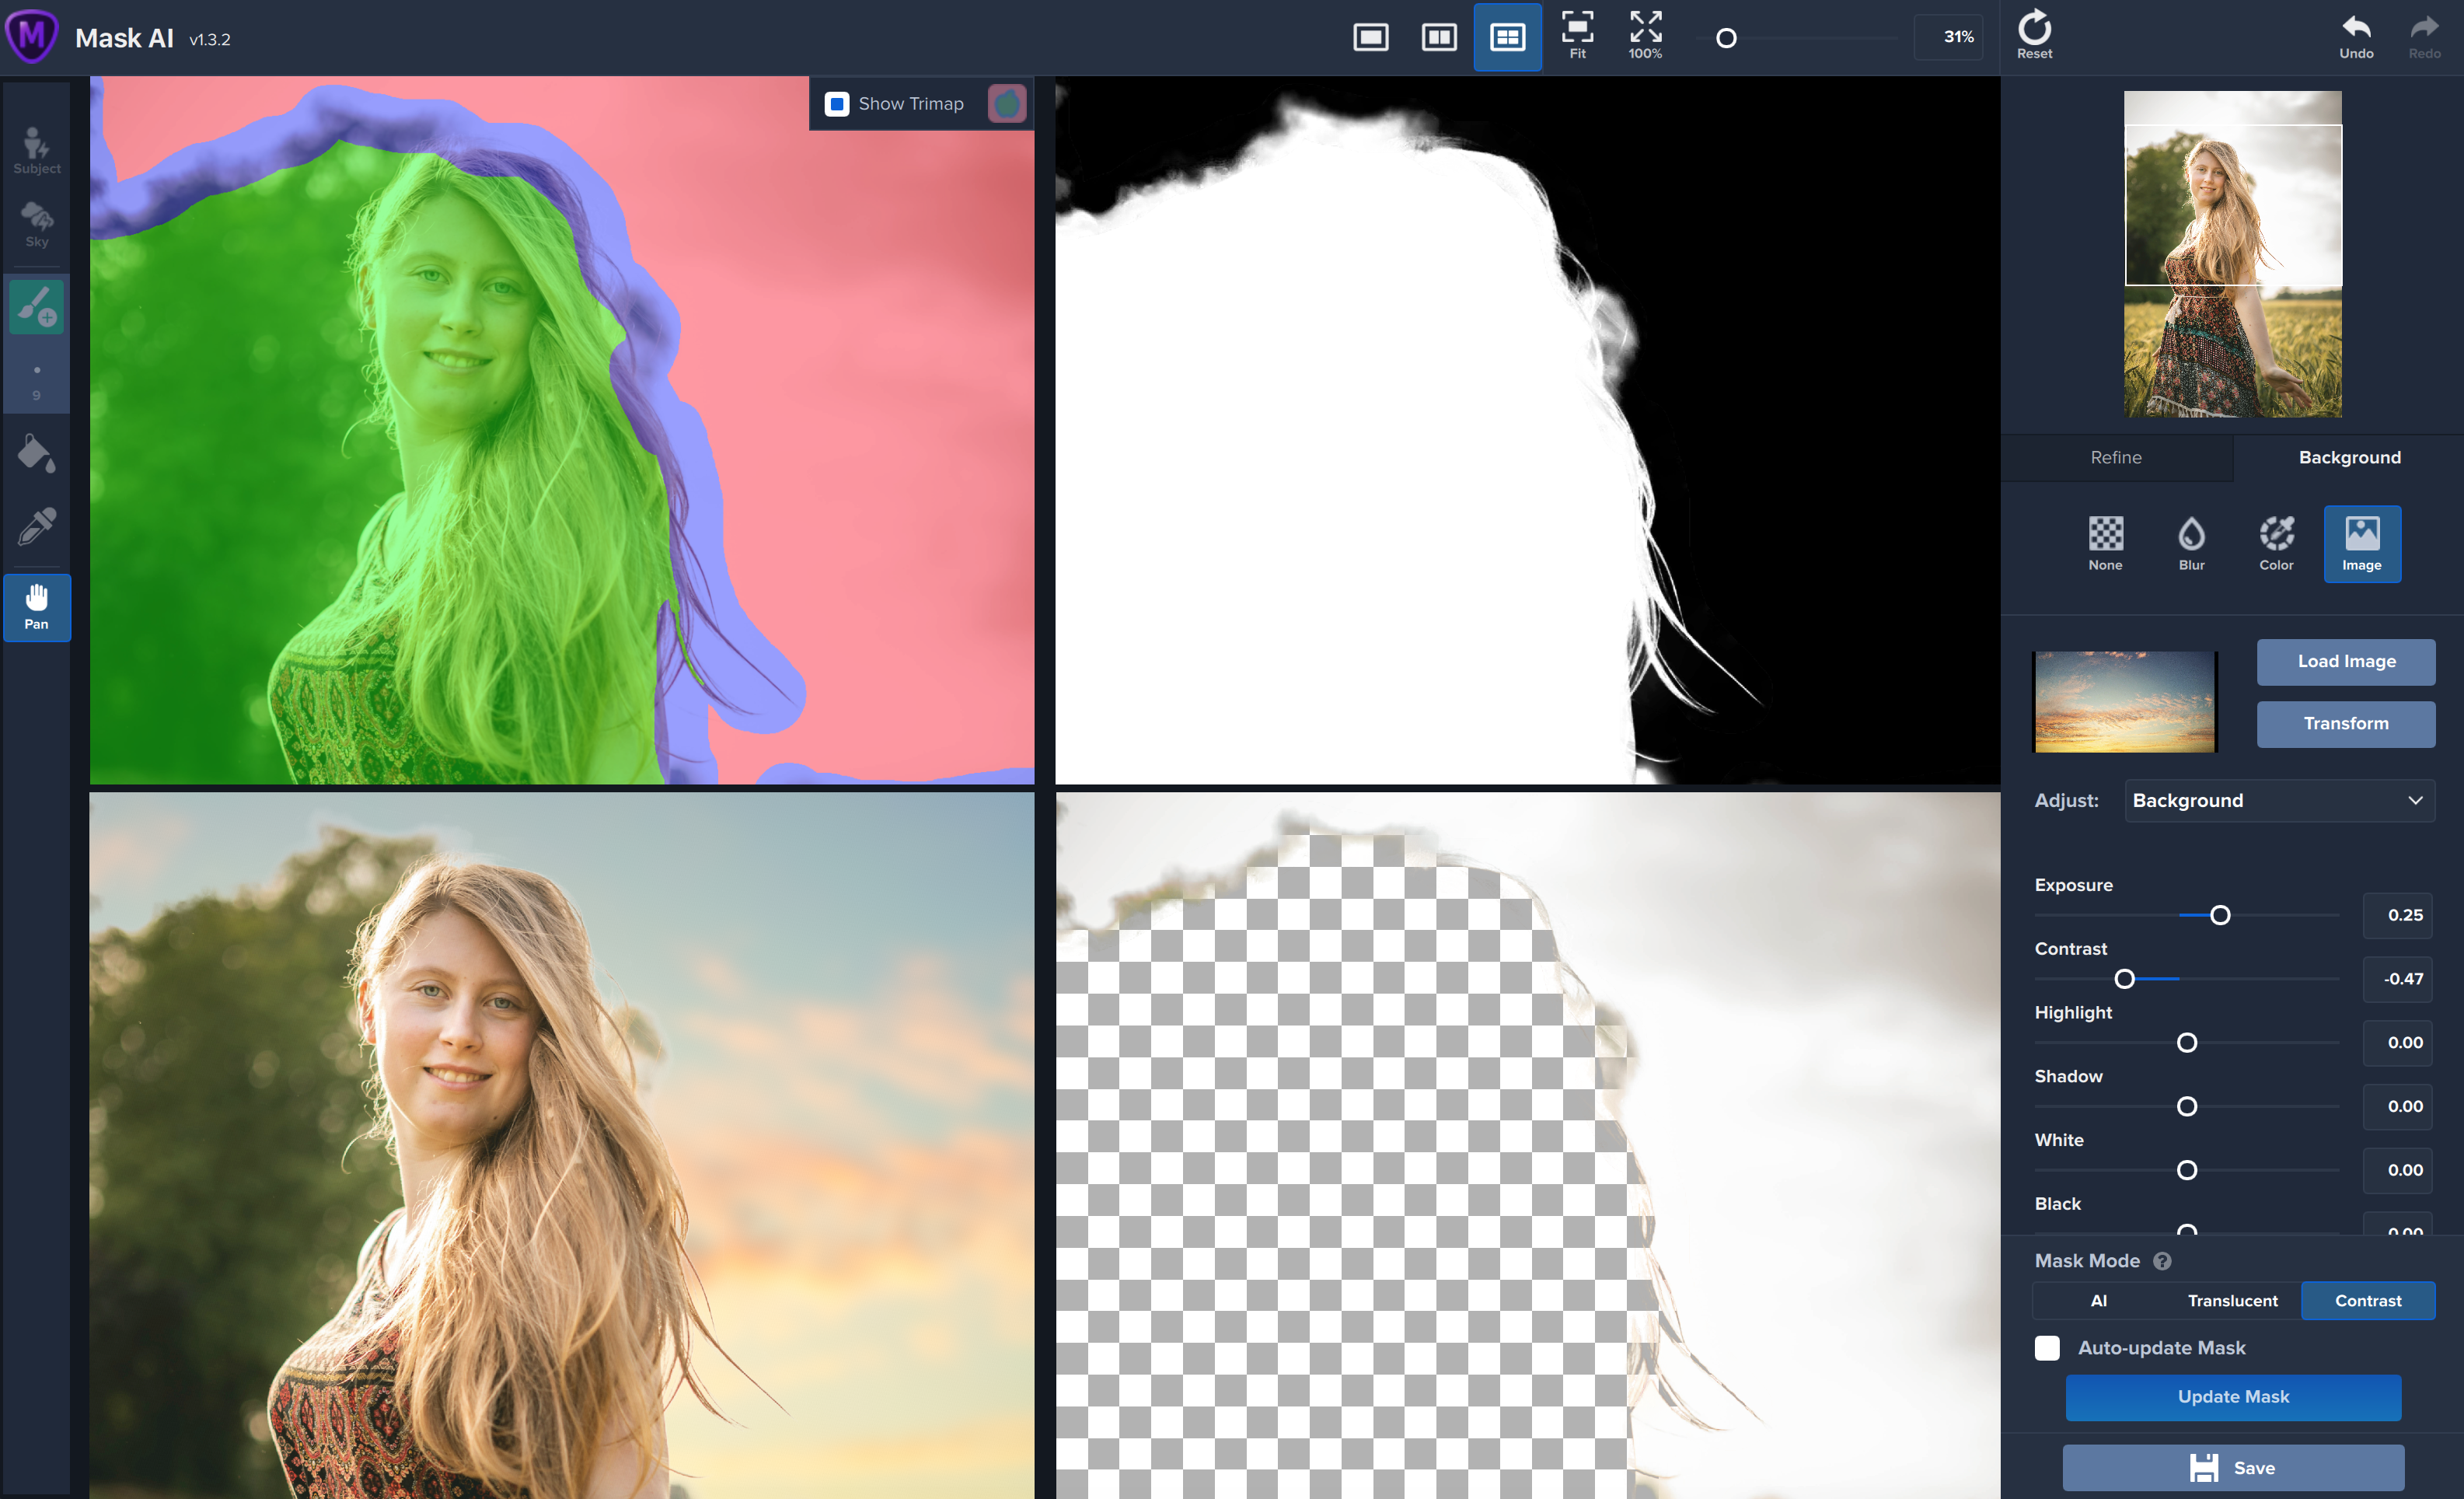
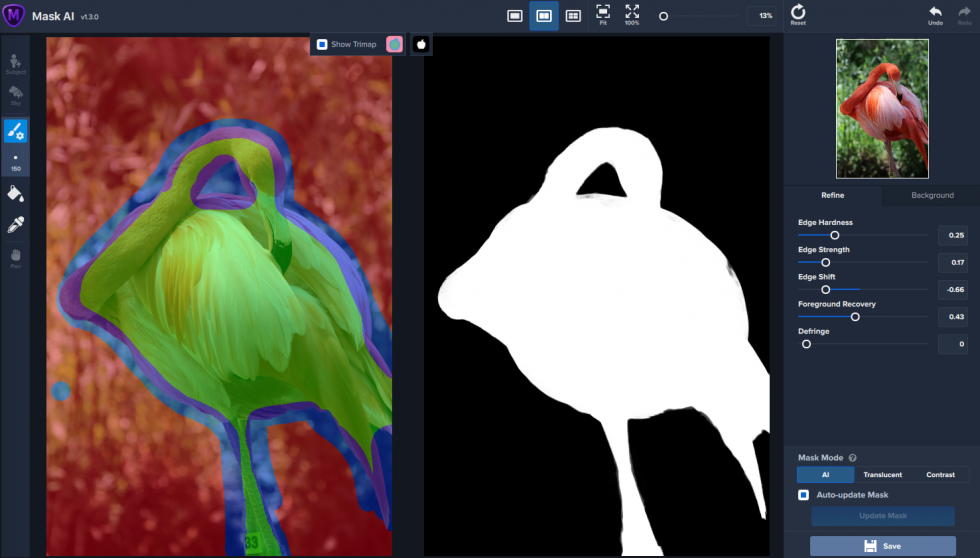
All it takes is a quick application of the trimap to compute a mask. Paint a blue line where you’d like the application to “compute” the mask, and drop a red paint bucket on the area you’d like removed. It’s that simple.
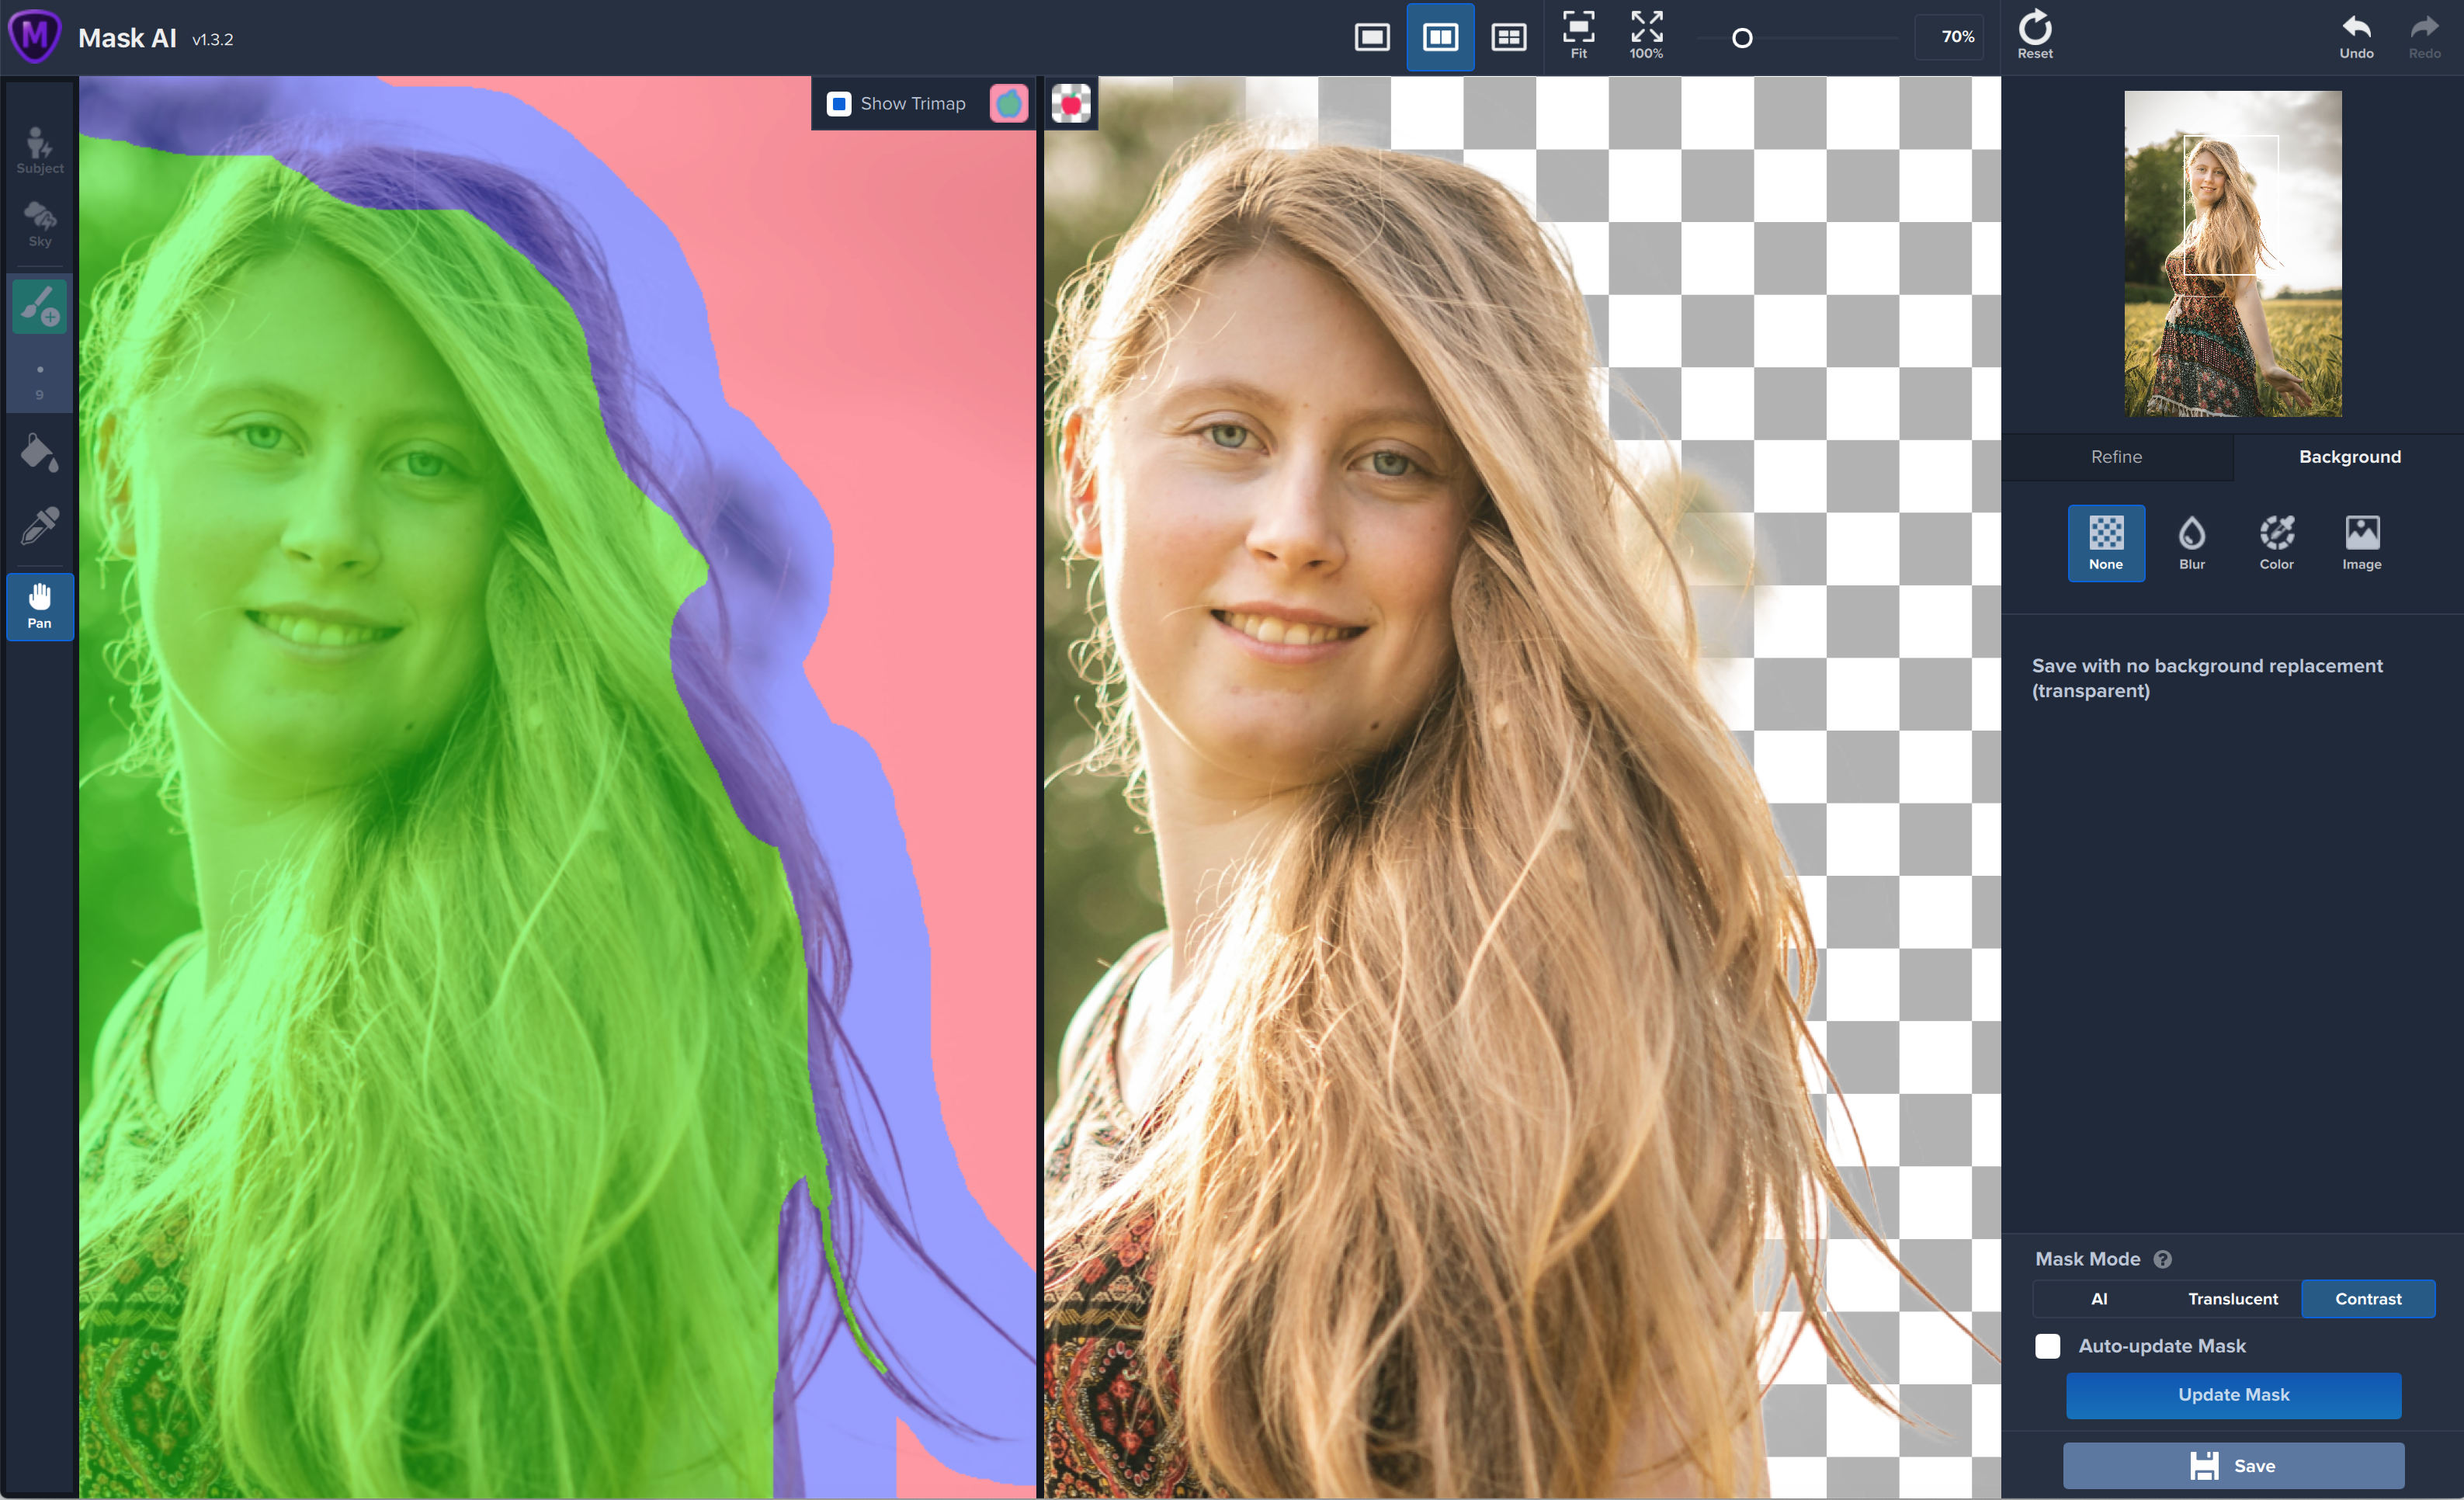
It only takes a moment for Mask AI to compute your mask, and just like that, your background is removed and details are preserved.
If necessary, you can tidy up the brush strokes, or refine the mask using sliders like Edge Strength and Foreground Recovery to get your mask just how you want it.
Mask AI has background replacement built-in, so you can finish your project without ever leaving the app. You can easily apply a solid color background, blur the existing background, or import a new background altogether.
Try Mask AI totally free for 30-days, no credit card or commitment required. Mask AI works as a standalone application for Mac or PC, or as a Photoshop plugin to help keep your workflow running smoothly.
Buy Mask AI today and get 15% off with coupon code MASKBETTER
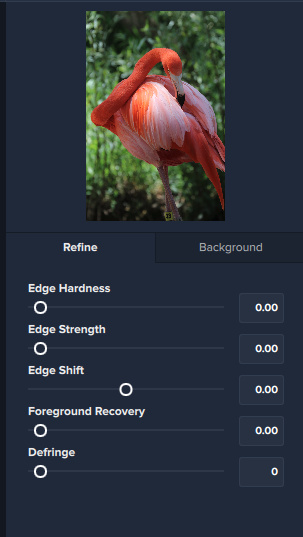
Use the post-processing sliders to perfect your mask quickly. The Edge Hardness, Shift or Strength sliders come in handy if you want to add more sharpness to a rocky landscape, or perhaps soften the edges for a portrait.
The Edge hardness slider comes in handy if you want to add more sharpness to a rocky landscape, or perhaps soften the edges for a portrait.
The Edge Strength slider measures the local contrast across the edge and it can offer you a more defined edge or something feathered or slightly out of focus.
Find written and video tutorials to guide you through creative processes in Topaz software. Start creating a masterpiece today!
Got a question? We’ve got answers. Find troubleshooting, tips, and more, or contact our Support Team.
Mask AI is an intelligent tool that allows you to create a mask quickly and accurately by using the power of AI technology. Compared to Photoshop, Mask AI doesn’t need tedious brushwork to get a high-quality mask. And there’s no need to learn complicated icons and tools. With Mask AI you only need to roughly outline your subject in blue, one click fills what you want to cut, one click fills what you want to keep, and press “Compute Mask”. It’s really that simple. Our neural network has been trained to distinguish tough edges, so you can get a great mask on the first attempt.
You should use Mask AI anytime you need a mask in your workflow especially challenging and detailed masks. It can be a pain to make a good cut-out in Photoshop, and it can take up an entire day’s work. Mask AI’s intuitive color-coded system reduces it to 4 simple steps: keep, cut, compute, and replace.
Mask AI functions as a standalone application or as a plugin for Photoshop and Topaz Labs Studio 2
Mask AI includes machine learning for a more accurate mask with less refining required and less user input (an answer to all photographers’ prayers!). We’ve built Mask AI from the ground up to include our latest technology, so you can power up your workflow. Here are a few things we think you’ll enjoy:
1. The Auto-Trimap tools: Our unique Trimap technology provides you with a quick way to let the program know what you’d like to mask. There is a Auto-Detect Subject and Auto-Detect Sky. Auto-Detect Subject will quickly cut away the background, keep the subject and determine what needs to be computed around the subject. Auto-Detect Sky will cut away the sky for easy sky replacement.
A word of advice: Be sure to check over the auto-trimap before hitting “Compute”. There may be areas the program missed. Also, please be aware the auto-trimap will not detect every subject.
The AI mode is the ideal mode for more complex masking tasks, like trees, hair, fur, or any image containing a lot of details.
The Translucent mode is a special AI mode perfect for fabrics and semi-transparent materials such as veils or mesh. Please note this mode is not meant to work on glass objects because of its reflective qualities.
The Contrast mode it great for simpler subjects with simpler backgrounds, which have little contrast separation between foreground and background. For example, objects with straight lines and buildings.
MASK (Blue) – Region for AI to draw the mask edge.
KEEP (Green) – Region you define as the foreground. This is preserved.
CUT (Red) – Region you define as the background. This is removed.
The same tools used to create the Trimap will help you refine your mask! The Red cut brush will help you eliminate areas, the Green keep brush will help you brush back in areas you want to retain, and the Blue compute brush will compute a certain area again. When refining, you’ll have the option to uncheck “Auto-update mask with changes”, and make brush strokes without the program computing after each stroke. Once you’re finished making refinement strokes, you can then select “Update Mask.” This is purely a user preference, so you can select what fits your workflow.
The Color Range tool can be used to select the color range you want to Keep or Cut from the image. It can be used to construct your mask or as a refining tool. If you use it to construct your mask you use the Keep or Cut brush and paint over the image after picking a color. If you are going to use it as a refinement tool, once you have computed your mask, you select a color and then use the Keep or Cut to refine the edges of the mask.
Windows: Windows 7, 8, 10 (64-bit only)
*As of Jan 14, 2020, Microsoft has ended its support for Windows 7.
Mac: macOS version 10.12 (Sierra) and above
We currently do not support Linux-based operating systems.
Your system’s graphic drivers need to be fully up to date, which you can accomplish by following this guide:
Our apps also require OpenGL version 3.3 or later.
| Intel | AMD | |
| Minimum | Intel i5 or equivalent (3.0GHz and above) | Ryzen 5 or equivalent (3.0GHz and above) |
| Recommended | Intel i7 or greater (4GHz and above) | Ryzen 7 or greater (4GHz and above) |
| Nvidia | AMD | |
| Minimum | 2GB of dedicated VRAM (GT 740 or greater) | 2GB of dedicated VRAM (Radeon 5870 or greater) |
| Recommended | 4GB of dedicated VRAM (GTX 970 or greater) | 4GB of dedicated VRAM (Radeon RX 460 or greater) |
| Optimal | 8GB of dedicated VRAM (GTX 1080 or greater) | 8GB of dedicated VRAM (Radeon RX 580 or greater) |
-We do not support Intel HD Graphics 4600 or lower.
Minimum: 8GB
Recommended: 16GB
Optimal: 32GB
A monitor that outputs at a resolution of at least 1024 x 768 is recommended.
You can find Mask AI on the Topaz website at topazlabs.com/mask-ai. To purchase, head to the Topaz Store.
First, if you are new to Topaz Labs, create an account on the Topaz Labs My Account Page. Next simply download Mask AI from the Topaz Labs Downloads Page, login using your account information, and select “Start Trial” to begin your free 30-day trial.
Find written and video tutorials to guide you through creative processes in Topaz software. Start creating a masterpiece today!
Got a question? We’ve got answers. Find troubleshooting, tips, and more, or contact our Support Team.
 Adjust AI
 Gigapixel AI
 Local Image Bundle
$68.00 / month
Local Image Bundle
$68.00 / month
 Topaz B&W Effects
$59.99
Topaz B&W Effects
$59.99
 Topaz Lens Effects
$79.99
Topaz Lens Effects
$79.99
© 2005 - 2025 Topaz Labs. All rights reserved.

