Posted on 125 Comments

A.I. Gigapixel – An Inside Story

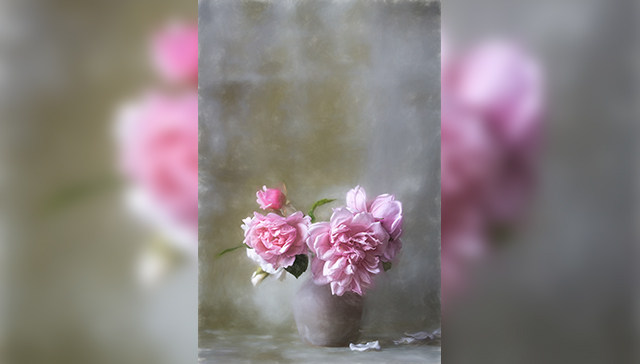
[vc_row][vc_column][vc_single_image image=”440187″ img_size=”large” add_caption=”yes” onclick=”link_image”][vc_column_text]

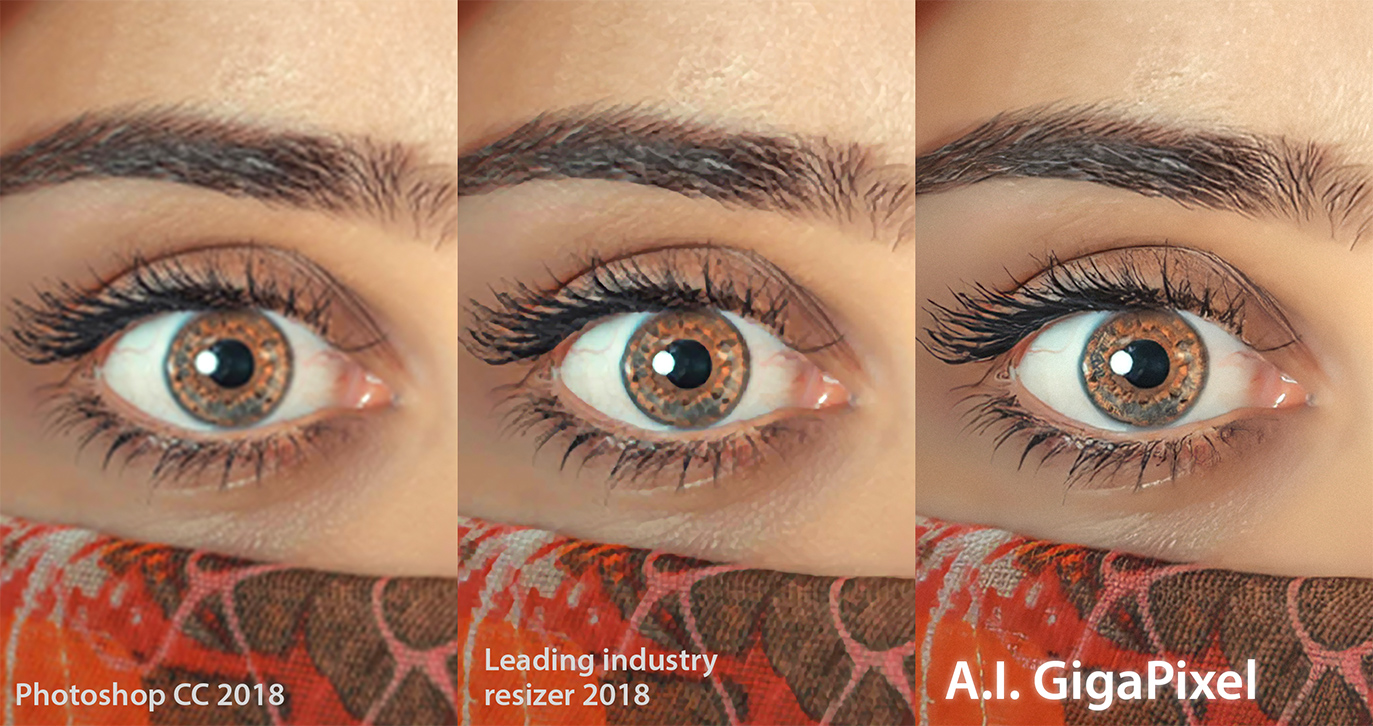
I still vividly remember the day I was blown away when I discovered an enlarged photo similar to the one above.  I was reading a paper about deep-learning based super-resolution. In the paper, 400% enlarged photos had crisp edges, few artifacts, and — never seen before — rich detail!

As the first company to use super-resolution technology in commercial products, we keep track of all major research in this area. Theoretically, there is no way to perfectly recreate a high-resolution image from only a low-resolution image. The amazing breakthrough of this particular paper is that it uses artificial intelligence (A.I.) to fill in those missing pieces that cannot be directly computed.  A neural network is exposed to a large number of high-resolution and low-resolution image pairs.  This network gradually learns to synthesize plausible detail in the enlarged image based what it has seen.

[/vc_column_text][vc_column_text]

Everybody was excited. We wanted to let our users enjoy this revolutionary development. But wait, in this age of good digital cameras, does anyone even need more pixels?  It turns out many people do. People that develop large prints want more DPI. Photos from drones or phone cameras can be improved.

We immediately put a team together and planned to develop a product quickly. Within weeks, Chris, our youngest developer, had an app prototype and Dr. Acharjee developed the initial neural network.   However, things started to go off-track. Weeks turned into months. We had a great challenge on our hands.

First,  the published method was great for small, high-quality test images, but failed on real camera photos.  We had to develop a method robust enough for real digital camera raw/jpeg images.

Then there is the issue of speed —  or rather, the lack of it. It took many hours to enlarge just one raw image since over 4 million calculations were needed to enlarge just one pixel.  We had to find a new neural network architecture that not only produced the high-quality result but required much less computation.


[/vc_column_text][vc_column_text]

Even so,  a regular PC would still take a few hours to enlarge a large image. Dr. Acharjee had to develop a customized GPU neural network engine to take advantage of the computational power of your graphics card. Now it takes a laptop (with integrated graphics) 20 minutes, or high-end desktop GPU a few minutes per image.  We started to see the possibilities unravel before our eyes.

In the end, Chris made it into an image batch processor so that it could run in the background. Since there is no need for parameter tuning, batch processing is actually a better workflow for image enlargement.


Over a year after that day, with countless hours of frustration and joy, we present A.I. Gigapixel. It is still very slow on most laptops, but we are making it available so that you can enjoy the latest A.I. technology without delay. We are still tweaking and training new variations of our neural networks as I am writing this (it takes at least a week for us to know if the tweak is better or worse), and we will continue to release updates whenever better results are achieved. (Edit 10/04/2018 – We has since released A.I. Gigapixel V2 which had increased processing speed 3 to 5 time!)


I hope you find A.I. Gigapixel useful. There is so much hype nowadays about A.I., but Topaz Labs is the only company that has actually delivered A.I. based desktop photo processing application(*). We’ve already released A.I. Remix to change photos into paintings, A.I. Clear to remove photo noise, and now we hope A.I. Gigapixel can help you a little more in your pursuit of artistry.

Thank you for reading. Please give your feedback in the comments section.  If you have any questions you can reach out to our support system here.

Albert Yang, CEO Topaz Labs

(*) there are other deep-learning based photo processing products, all of them run on cloud servers instead of on laptop/desktop computers.

[/vc_column_text][/vc_column][/vc_row][vc_row][vc_column][vc_empty_space][vc_text_separator title=”About the Author” border_width=”2″][vc_empty_space][/vc_column][/vc_row][vc_row][vc_column width=”1/3″][vc_single_image image=”369676″ img_size=”medium”][/vc_column][vc_column width=”2/3″][vc_column_text]

About Albert Yang

Albert Yang founded Topaz Labs over 10 years ago, to form a company that adopts and implements the latest technology to introduce cutting-edge tools to the Photo market. With over 30 years of programming experience, he’s proud to offer his technical expertise to our users as the primary developer of our latest tools.

[/vc_column_text][/vc_column][/vc_row][vc_row][vc_column][vc_empty_space][vc_empty_space][/vc_column][/vc_row][vc_row css=”.vc_custom_1534441729460{background-color: #333333 !important;}”][vc_column][mpc_icon_column preset=”mpc_preset_40″ layout=”style_2″ url=”url:https%3A%2F%2Ftopazlabs.com%2Fdownloads%23gigapixel|||” background_color=”#333333″ border_css=”border-color:#333333;border-style:solid;border-radius:0px;” padding_css=”padding:30px;” title_font_preset=”mpc_preset_1″ title_font_color=”#ffffff” title_font_size=”17″ title_font_line_height=”1.4″ title_font_transform=”uppercase” title_font_align=”center” title=”Try A.I. Gigapixel™ Free” title_margin_divider=”true” title_margin_css=”margin-bottom:8px;” content_font_preset=”mpc_preset_1″ content_font_color=”#ffffff” content_font_size=”14″ content_font_line_height=”1.5″ content_font_align=”center” hover_border_css=”border-color:#ffffff;border-radius:0px;” mpc_icon__transition=”slide-up” mpc_icon__icon_type=”image” mpc_icon__icon_image_size=”80×80″ mpc_icon__icon_image=”433947″ mpc_icon__background_color=”#ffffff” mpc_icon__border_css=”border-width:0px;border-color:#d472a5;border-style:solid;border-radius:20px;” mpc_icon__padding_css=”padding:10px;” mpc_icon__margin_divider=”true” mpc_icon__margin_css=”margin-bottom:20px;” mpc_icon__hover_icon_color=”#ffffff” mpc_icon__hover_background_color=”#d472a5″ mpc_icon__hover_border_css=”border-color:#ffffff;” mpc_divider__disable=”true” mpc_divider__width=”10″ mpc_divider__align=”left” mpc_divider__content_padding_divider=”true” mpc_divider__content_padding_css=”padding-top:0px;padding-right:0px;padding-bottom:0px;padding-left:0px;” mpc_divider__lines_color=”#dddddd” mpc_divider__padding_divider=”true” mpc_divider__padding_css=”padding-top:3px;padding-bottom:3px;”]

Get started with this awesome standalone batch upsampling application. You’ve got nothing to lose.

[/mpc_icon_column][mpc_textblock content_width=”100″ font_preset=”preset_4″ font_align=”center”]

[qodef_icon icon_pack=”font_awesome” fa_icon=”fa-gears” size=”qodef-icon-medium” custom_size=”” type=”normal” border_radius=”” shape_size=”” icon_color=”” border_color=”” border_width=”” background_color=”” hover_icon_color=”” hover_border_color=”” hover_background_color=”” margin=”” icon_animation=”” icon_animation_delay=”” link=”” anchor_icon=”” target=”_self”]System Requirements


[/mpc_textblock][vc_empty_space][/vc_column][/vc_row]

Posted on 7 Comments

New Features in Topaz Studio – Batch Processing!

[vc_row css=”.vc_custom_1499750369090{padding-top: 20px !important;padding-bottom: 20px !important;}”][vc_column][vc_empty_space][vc_column_text]

Introducing Batch Processing, now in Studio

[/vc_column_text][vc_empty_space][vc_column_text]

What is Batch Processing?

Batch Processing is a function that allows you to process multiple images at once and apply the same effect, adjustments, and settings to each image that you process. If you have a workflow or a few steps you find yourself repeating, it’s a great way to speed up your workflow and cut down on repetitive tasks while you’re editing.[/vc_column_text][vc_empty_space][mpc_divider preset=”mpc_preset_18″ content_type=”title” content_border_css=”border-width:1px;border-color:#e0e0e0;border-style:solid;” content_padding_divider=”true” content_padding_css=”padding-top:5px;padding-right:15px;padding-bottom:5px;padding-left:15px;” font_preset=”mpc_preset_1″ font_color=”#888888″ font_size=”16″ font_line_height=”1″ font_transform=”uppercase” font_align=”left” title=”Instructions” icon_type=”character” icon_character=”M” icon_color=”#76bdcc” icon_size=”30″ lines_color=”#e0e0e0″ padding_divider=”true”][/vc_column][/vc_row][vc_row css=”.vc_custom_1499750369090{padding-top: 20px !important;padding-bottom: 20px !important;}”][vc_column][vc_column_text]

Step 1: Choose your Batch Processing settings

[/vc_column_text][vc_column_text]Before you actually begin batching, you’ll want to decide the settings you want to apply to your images, this can be a one-click effect or a custom adjustment stack, the possibilities are nearly endless.[/vc_column_text][vc_empty_space][vc_row_inner][vc_column_inner width=”1/3″][vc_column_text]For the sake of simplicity, I’m going to start with a premade effect, click into the Studio category, and select the monochrome subcategory, then click on the effect “Black and White Photograph”.[/vc_column_text][vc_empty_space][/vc_column_inner][vc_column_inner width=”2/3″][mpc_carousel_slider preset=”mpc_preset_0″ loop=”true” auto_slide=”true” delay=”1500″ images=”420475,420476″ height=”450″ gap=”10″ font_preset=”mpc_preset_1″ font_color=”#888888″ font_size=”20″ font_line_height=”1.5″ font_align=”center” second_font_color=”#555555″ background_color=”rgba(255,255,255,0.7)” counter_padding_css=”padding:15px;” image_size=”large” image_opacity=”100″ image_hover_opacity=”100″ mpc_navigation__preset=”mpc_preset_19″][/vc_column_inner][/vc_row_inner][/vc_column][/vc_row][vc_row css=”.vc_custom_1499750369090{padding-top: 20px !important;padding-bottom: 20px !important;}”][vc_column][vc_column_text][vc_empty_space][vc_column_text]

Step 2: Open Batch Processing

[/vc_column_text][vc_empty_space][vc_row_inner][vc_column_inner width=”1/2″][vc_column_text]Now that we have the settings we’d like to apply to our batch of images, we need to set up our batch processing, open the batch processing window by clicking the “File” menu and selecting the “Batch Process” option.[/vc_column_text][vc_empty_space][/vc_column_inner][vc_column_inner width=”1/2″][vc_single_image image=”420490″ img_size=”full” onclick=”link_image”][/vc_column_inner][/vc_row_inner][vc_empty_space][vc_row_inner][vc_column_inner width=”1/2″][vc_column_text]The Batch Processing menu has a lot of different options to give you control over the files you process and how they are handled:

  • Source Folder Settings: This determines what images the program batches.
  • Destination Folder Settings: This Determines where your processed images are saved.
  • File Naming: This determines how processed images are named when they are saved.
  • File Save Options: These settings set the types of files that you save once they are batched.
  • File Sizing: These settings let you resize your batched images automatically
  • Hide Application Checkbox: This lets you process images in the background so you can still use your machine while batching.

[/vc_column_text][vc_empty_space][/vc_column_inner][vc_column_inner width=”1/2″][vc_single_image image=”420502″ img_size=”full” onclick=”link_image”][/vc_column_inner][/vc_row_inner][vc_empty_space][/vc_column][/vc_row][vc_row css=”.vc_custom_1499750369090{padding-top: 20px !important;padding-bottom: 20px !important;}”][vc_column][vc_column_text][vc_empty_space][vc_column_text]

Step 3: Choose your Input Folder

[/vc_column_text][vc_column_text]So let’s get started by selecting the source folder that contains the images we want to process. It’s important to note that any images that are in this folder are going to be processed, so you likely don’t want to select your entire photo library.

Click the “Choose” button to select a source folder.[/vc_column_text][vc_single_image image=”420525″ img_size=”full” onclick=”link_image”][vc_empty_space][vc_row_inner][vc_column_inner width=”1/3″][vc_column_text]I’ve already set up a “batching in” folder with the images I want to process. So I’ll select the batching folder then click “select folder. You can navigate to the source folder of your choosing, just remember that you’re selecting the folder and not specific files.[/vc_column_text][vc_empty_space][/vc_column_inner][vc_column_inner width=”2/3″][vc_single_image image=”420526″ img_size=”full” onclick=”link_image”][/vc_column_inner][/vc_row_inner][vc_column_text]If your source folder contains other folders that you want to process as well, you can select the “Include subfolders” option. Just note that this will process all subfolders and image files in those folders.[/vc_column_text][vc_empty_space][/vc_column][/vc_row][vc_row css=”.vc_custom_1499750369090{padding-top: 20px !important;padding-bottom: 20px !important;}”][vc_column][vc_column_text][vc_empty_space][vc_column_text]

Step 4: Set your Output Folder

[/vc_column_text][vc_column_text]Now that we have the source folder set we want to set up the destination folder where we will save the processed images. Click the “Choose” button under the destination settings window to set your destination folder.[/vc_column_text][vc_single_image image=”420529″ img_size=”full” onclick=”link_image”][vc_empty_space][vc_row_inner][vc_column_inner width=”1/3″][vc_column_text]Just like you did with your source folder, you want to navigate to the folder where you’d like to save the images that you process. I’ve already set up a “batching out” folder so i’ll select that and click “Select Folder”.[/vc_column_text][vc_empty_space][/vc_column_inner][vc_column_inner width=”2/3″][vc_single_image image=”420531″ img_size=”full” onclick=”link_image”][/vc_column_inner][/vc_row_inner][vc_row_inner][vc_column_inner][vc_column_text]NOTE: If you select an output folder that contains files you’ll see the warning on the right letting you know that there is a potential for overwriting files, if you continue and you haven’t changed your batch settings to something new from the last time you batched, you will overwrite those files. This message serves as your only warning.[/vc_column_text][vc_empty_space height=”16px”][vc_single_image image=”420574″ img_size=”full” alignment=”center” onclick=”link_image”][vc_empty_space][/vc_column_inner][/vc_row_inner][vc_column_text]If you chose the “include subfolder” option in the source menu you can also select an option here to “keep source folder structure” to create the exact same subfolders and sort files into them as you have set up in your source folder.[/vc_column_text][vc_empty_space][/vc_column][/vc_row][vc_row css=”.vc_custom_1499750369090{padding-top: 20px !important;padding-bottom: 20px !important;}”][vc_column][vc_column_text][vc_empty_space][vc_column_text]

Step 5: Set Naming and File Options for Batched Files

[/vc_column_text][vc_empty_space][vc_row_inner][vc_column_inner width=”1/3″][vc_column_text]Topaz Studio contains a lot of different naming options that allows you to customize how your batching files are named. Choose from the drop-down options to string together the naming conventions you want including original filenames, dates, and serial numbers.[/vc_column_text][/vc_column_inner][vc_column_inner width=”2/3″][vc_single_image image=”420542″ img_size=”full” onclick=”link_image”][/vc_column_inner][/vc_row_inner][vc_column_text]You can preview how your output file name will look in the example above the dropdown.[/vc_column_text][vc_empty_space][/vc_column][/vc_row][vc_row css=”.vc_custom_1499750369090{padding-top: 20px !important;padding-bottom: 20px !important;}”][vc_column][vc_column_text][vc_empty_space][vc_column_text]

Step 6: Set File Save Options

[/vc_column_text][vc_column_text]By default, Topaz Studio will maintain your file formats and settings when you batch process, with the exception of RAW files (since you can’t save out a raw image.)[/vc_column_text][vc_empty_space][vc_row_inner][vc_column_inner width=”1/3″][vc_column_text]If you’d like to convert all the processed files to one format, simply uncheck the “Apply to RAW files only” option. THen select the settings you’d like all your files converted to. Conversion options include TIFF, JPEG, and PNG.[/vc_column_text][/vc_column_inner][vc_column_inner width=”2/3″][vc_single_image image=”420564″ img_size=”full” onclick=”link_image”][/vc_column_inner][/vc_row_inner][vc_column_text]You can also set image quality options and the color profile you’d like your images saved as. (Studio supports a wide variety of RGB colorspaces).[/vc_column_text][vc_empty_space][/vc_column][/vc_row][vc_row css=”.vc_custom_1499750369090{padding-top: 20px !important;padding-bottom: 20px !important;}”][vc_column][vc_column_text][vc_empty_space][vc_column_text]

Step 7: Set Resize Options (optional)

[/vc_column_text][vc_column_text]If you’d like to resize your image you can check the “Resize to fit” checkbox. Then click the drop-down to decide if you want the image to fit within a box defined by width and height, or by height or width alone.  Then enter the values you’d like your image sized to. (If you choose height or width alone, your images will maintain their aspect ratio to the specified size.)[/vc_column_text][vc_empty_space][vc_row_inner][vc_column_inner width=”1/3″][vc_column_text]You can set your output to measure by pixels, inches, or centimeters. You can also set your image resolution or pixel density to pixels per inch or pixels per centimeter.[/vc_column_text][/vc_column_inner][vc_column_inner width=”2/3″][vc_single_image image=”420572″ img_size=”full” onclick=”link_image”][/vc_column_inner][/vc_row_inner][vc_empty_space][/vc_column][/vc_row][vc_row css=”.vc_custom_1499750369090{padding-top: 20px !important;padding-bottom: 20px !important;}”][vc_column][vc_column_text][vc_empty_space][vc_column_text]

Step 7: Start Batching!

[/vc_column_text][vc_empty_space][vc_row_inner][vc_column_inner width=”1/2″][vc_column_text]We’ll go ahead and check the “Hide application window while batching” option and click the “OK” button to start batching. Topaz Studio will minimize the interface and leave a progress window on the screen while the application batches your images.

If you’d like to leave the interface up during batching you can uncheck the box. Once batching is complete, this window will close and the interface will open again on your original image.[/vc_column_text][/vc_column_inner][vc_column_inner width=”1/2″][vc_single_image image=”420573″ img_size=”full” onclick=”link_image”][/vc_column_inner][/vc_row_inner][vc_empty_space][vc_column_text]And thats it! If you check your output folder you specified you’ll see all the images that Studio has processed for you, and any relevant subfolder structures you wanted to keep.

Thanks for reading and happy batching.[/vc_column_text][vc_empty_space][/vc_column][/vc_row][vc_row][vc_column][vc_column_text]

Further Questions and Notes About Batching

[/vc_column_text][vc_empty_space][mpc_icon_column preset=”mpc_preset_20″ layout=”style_3″ alignment=”left” background_color=”#f2f2f2″ border_css=”border-radius:0px;” padding_css=”padding:25px;” title_font_preset=”mpc_preset_1″ title_font_color=”#555555″ title_font_size=”17″ title_font_line_height=”1.4″ title_font_transform=”uppercase” title_font_align=”left” title=”Masking and Batching in Topaz Studio” title_margin_divider=”true” title_margin_css=”margin-bottom:8px;” content_font_preset=”mpc_preset_1″ content_font_color=”#a5a5a5″ content_font_size=”14″ content_font_line_height=”1.5″ content_font_align=”left” hover_border_css=”border-radius:0px;” mpc_icon__transition=”slide-down” mpc_icon__icon=”fa fa-paint-brush” mpc_icon__icon_color=”#ffffff” mpc_icon__icon_size=”36″ mpc_icon__background_color=”#75cdde” mpc_icon__border_css=”border-width:0px;border-color:#f3f3f3;border-style:solid;border-radius:50px;” mpc_icon__padding_css=”padding:10px;” mpc_icon__margin_divider=”true” mpc_icon__margin_css=”margin-top:-2px;margin-right:20px;margin-bottom:0px;margin-left:0px;” mpc_icon__hover_icon_color=”#ffffff” mpc_icon__hover_background_color=”#555555″ mpc_icon__hover_border_css=”border-color:#f3f3f3;” mpc_divider__disable=”true” mpc_divider__width=”10″ mpc_divider__align=”left” mpc_divider__content_padding_divider=”true” mpc_divider__content_padding_css=”padding-top:0px;padding-right:0px;padding-bottom:0px;padding-left:0px;” mpc_divider__lines_color=”#dddddd” mpc_divider__padding_divider=”true” mpc_divider__padding_css=”padding-top:3px;padding-bottom:3px;”]It’s important to note that any custom masks that you’ve applied to your adjustments or your overall effect when you’re setting up your first image for batching, will persist to all batched images.

  • Brush, Spot, and Gradient masks will retain the same selected areas as your initial image.
  • Luminosity and Color selections will use the same selections for applying the mask, but the selected area will adapt based on those settings. (e.g. if you select white as a reveal mask, all white areas in any processed image will have that area revealed as well)

It allows for some neat creative applications if prepared for but can give confusing results if you’re not expecting it.[/mpc_icon_column][vc_empty_space height=”16px”][mpc_icon_column preset=”mpc_preset_20″ layout=”style_3″ alignment=”left” background_color=”#f2f2f2″ border_css=”border-radius:0px;” padding_css=”padding:25px;” title_font_preset=”mpc_preset_1″ title_font_color=”#555555″ title_font_size=”17″ title_font_line_height=”1.4″ title_font_transform=”uppercase” title_font_align=”left” title=”Not seeing the Batch Process option in Topaz Studio?” title_margin_divider=”true” title_margin_css=”margin-bottom:8px;” content_font_preset=”mpc_preset_1″ content_font_color=”#a5a5a5″ content_font_size=”14″ content_font_line_height=”1.5″ content_font_align=”left” hover_border_css=”border-radius:0px;” mpc_icon__transition=”slide-down” mpc_icon__icon=”fa fa-search” mpc_icon__icon_color=”#ffffff” mpc_icon__icon_size=”36″ mpc_icon__background_color=”#75cdde” mpc_icon__border_css=”border-width:0px;border-color:#f3f3f3;border-style:solid;border-radius:50px;” mpc_icon__padding_css=”padding:10px;” mpc_icon__margin_divider=”true” mpc_icon__margin_css=”margin-top:-2px;margin-right:20px;margin-bottom:0px;margin-left:0px;” mpc_icon__hover_icon_color=”#ffffff” mpc_icon__hover_background_color=”#555555″ mpc_icon__hover_border_css=”border-color:#f3f3f3;” mpc_divider__disable=”true” mpc_divider__width=”10″ mpc_divider__align=”left” mpc_divider__content_padding_divider=”true” mpc_divider__content_padding_css=”padding-top:0px;padding-right:0px;padding-bottom:0px;padding-left:0px;” mpc_divider__lines_color=”#dddddd” mpc_divider__padding_divider=”true” mpc_divider__padding_css=”padding-top:3px;padding-bottom:3px;”]Batch processing is only available in version 1.11.5 or later. If you’re running an earlier version you can update to the latest on the downloads page.[/mpc_icon_column][vc_empty_space][/vc_column][/vc_row]

Posted on 15 Comments

Delicate Pastels with Topaz Studio

In today’s tutorial, we’re going to look into an effect that we’ve been getting a lot of questions about; and honestly, it had us scratching our heads for a while. This image was inspired by @Lizzy_Pe_ on instagram, and ‘Jammie Jam’ of our facebook group.

Lizzy_Pe_ kindly sent me a more in-depth explanation of her work, so expect another tutorial later explaining a more advanced version of this technique; but for now, we’re going to do the short and sweet version.

Let’s Get Started

We’re going to start with an image of delicate roses in a vase. The background seems extremely rough in comparison to the flowers. It seems to drown them out to the point that you almost lose how delicate the roses are, and completely miss the rose petals at the bottom. We’re going to soften the background and give the entire image a soft, pastel-like, almost impressionistic, style while accentuating the flower’s colors, and bringing out the petals at the bottom.

We’ll be doing all this with a single pre-saved effect (Pastel ll), two adjustments (Precision Detail and Bloom), and controlling each with masks and opacity.

Impression

After opening your image (by either dragging and dropping directly into Topaz Studio, or selecting the “Open” button in the middle of the screen), open the Effect Panel on the left side of the screen.

This panel allows you to select from a variety of pre-saved effects created not just by the team at Topaz Labs, but also the artist community of Topaz users. We’re going to go into the “Impression” drop down, and select “Charcoal and Pastel”.

Scroll down the list until you see “Pastel ll” click this effect, and it will be automatically applied to your image.

Now we need to personalize this just a bit to bring out the flower’s detail while still keeping them soft and delicate.

We’re not going to change any of the settings, but we are going to play with the mask tool.

Click the mask icon (the white square between the adjustment name and the eye ball icon) which will open up the masking section options. Click the brush tool, and make sure the black box below it is selected. Now mask out all of the roses, except the pink bud in the background. Make sure you get all the little leaves as well, and don’t forget the petals on the floor!

But, we’re not done with this mask yet!

Go to the hamburger menu, between the invert and reset mask, and select “Copy Mask”. We’re about to edit this mask to bring through the softness of Impression, BUT, we need the original mask for a later adjustment. So, we will copy it so we have it for later use.

After copying the mask, click the “Adjust” button (it looks like 3 gears, at the bottom of the masking section) to reveal a hidden menu that allows you to control certain aspects of how your mask is applied.

  • “Feather” softens the edges of your mask.
  • “Expand Mask” brings the edges of your mask in, or expands them to cover more of the image than previously selected.
  • “Contrast” controls the difference of lightness or darkness of the mask in relation to the background.
  • “Density” controls the depth of lightness or darkness within the mask.

We’re going to control the density on this occasion and set it to 0.54, then click “Done”.

  1. Density: 0.54

Now we’re going to move on to the next adjustment.

Precision Detail

This is one of my FAVORITE adjustments in Topaz Studio, and I literally use it on EVERYTHING!

I’ll explain each of the adjustments at the end of this tutorial.

Go to “Adjustments” and select “Precision Detail”. We’re only going to edit the “Overall” section in the Detail menu and Lighting at the bottom.

Before we start, I ONLY want this adjustment to affect the flowers. Remember the mask we copied from the previous adjustment? We’re about to use it. Click the masking icon, between the adjustment name and the eye icon, then go to the hamburger menu below in the masking section and select “Paste mask”.

Now, we don’t want this to effect the background, so we’re going invert it by clicking the icon between the eye icon and the hamburger menu in the masking section.

This changes the mask on the flowers to white and the background to black ensuring that the roses are the ONLY things effected.

Detail:

  1. Overall Small Detail: 0.33
  2. Overall Small Detail Boost: 0.21
  3. Overal Medium Detail: 19
  4. Overall Medium Detail Boost: 0.23
  5. Overall Large Detail: 0.20
  6. Overall Large Detail Boost: 13
  7. Sharpen: 0.12

This allows the shadows and highlights to really pop in these flowers and brings out details in the folds that weren’t visible before.

Lighting:

  1. Midtones: 0.19
  2. Shadows: 0.23
  3. Highlights: 0.26
  4. Blackpoint: 0.26
  5. Highlight: 0.32

These settings exaggerate the highlights and the shadows a bit more; but we lost a bit of the softness we were trying to keep in this photos. To fix this, go to the “Opacity” setting and bring it to 0.61

  1. Opacity: 0.61

These setting really allow the detail in the flowers to come through, but it still looks a little dark and I feel it could be a bit more ethereal, so we’re going to add the Bloom adjustment.

Bloom

Go to “Adjustments” and select “Bloom”. After making this selection it should automatically open the drop down menu upon application. We’re going to edit these settings to put a little more brightness into the photo; but ALSO give it more of the ethereal feel we’re looking for in this photo.

  1. Strength: 0.39
  2. Threshold: 0.26
  3. Bloom Size: 0.54

With the addition of that adjustment that completes this tutorial.

Let me take a little time, now that we’re done and explain these adjustments and what exactly it is that they do.

Impression:

Impression is a very artistic adjustment. From delicate oil paint to rough sketches impression allows you to control your brush size, amount of paint applied, how messy or clean your strokes are, even your painting progress so you can make your image look like a completed painting or like you just started putting paint to canvas. This adjustment even gives additional options to control, the color and lighting of the painting, even add a texture of the “canvas” your image is “placed”. Impression really gives you the freedom to explore your creativity and turn photos into paintings in a snap.

Precision Detail:

Precision Detail hones in and brings out the fine details of your images allowing you to adjust the amount of of small, medium, and large details. This adjustment goes a step further by separately controlling the detail with in the highlights and the shadows Independently, giving your images a more dramatic effect, or toning down overpowering details in your image.

Bloom:

the concept behind Bloom is to soften the lighting in an image. It gives a little bit of ethereal soft lighting to soften a harsh light, or further enhance an already delicate image