[vc_row][vc_column][vc_empty_space][vc_column_text]Tutorial created with Topaz Studio V1.0.8[/vc_column_text][vc_empty_space height=”15px”][vc_column_text]
What is the DeHaze Adjustment?
[/vc_column_text][vc_empty_space height=”15px”][vc_column_text]The Topaz Studio DeHaze Adjustment is one of my favorite adjustments. I love that it is super easy to use with only two sliders, but is extremely effective at removing haze, fog, or smoke. I suggest using it on every nature or landscape image. DeHaze does an amazing job at breathing life back into photos. I’m always amazed at how vibrant it makes my images. Even haze that adds a color cast can be easily handled by this adjustment.
About the DeHaze Adjustment. The Topaz Studio DeHaze Adjustment rejuvenates your images it allows you to recover contrast and saturation without the addition of artifacts and color fringing.
How it works. The DeHaze Adjustment does all the heavy lifting for you. Our intelligent algorithm searches for the darkest point of your image and assumes this should be a true black. Using this assumption, the DeHaze adjustment then makes a tailored filter that mathematically reverses the affect that atmospheric haze has on your image. The result is an image that has rejuvenated saturation and contrast without artifacts.[/vc_column_text][/vc_column][/vc_row][vc_row][vc_column][vc_empty_space][vc_column_text]
Free Download
[/vc_column_text][vc_empty_space height=”15px”][vc_column_text]The DeHaze Adjustment is available within Topaz Studio as a Pro Adjustment. While Pro Adjustments are not free, Topaz Studio is completely free and there are limited functionality within the DeHaze Adjustment that is completely free. You can also try all the unlocked functionality for 30 days, completely commitment free. If you’d like to follow along with the DeHaze Adjustment, you can click the links below to download Topaz Studio.[/vc_column_text][vc_empty_space height=”15px”][vc_row_inner][vc_column_inner width=”1/2″][vc_btn title=”Windows” shape=”square” color=”primary” align=”center” button_block=”true” link=”url:https%3A%2F%2Ftopazlabs.com%2Fproduct%2Fdehaze%2Fref%2F47%2F%3Fcampaign%3DDeHaze_07%2F2016_Blog_DeHazePDP|||”][/vc_column_inner][vc_column_inner width=”1/2″][vc_btn title=”Mac” shape=”square” color=”primary” align=”center” button_block=”true” link=”url:https%3A%2F%2Ftopazlabs.com%2Fproduct%2Fdehaze%2Fref%2F47%2F%3Fcampaign%3DDeHaze_07%2F2016_Blog_DeHazePDP|||”][/vc_column_inner][/vc_row_inner][/vc_column][/vc_row][vc_row][vc_column][vc_empty_space][vc_column_text]
What We Will Cover in This Tutorial
[/vc_column_text][vc_empty_space height=”15px”][vc_column_text]1. About the DeHaze Adjustment
2. The DeHaze Adjustment Basic Usage
3. Advanced Usage[/vc_column_text][/vc_column][/vc_row][vc_row][vc_column][vc_empty_space][vc_column_text]
Reading not your Thing? Watch the Full Tutorial!
[/vc_column_text][vc_column_text]If you’d like a more hands on approach to learning the DeHaze Adjustment, check out this short tutorial video. Hope you enjoy.[/vc_column_text][vc_empty_space height=”15px”][vc_video link=”https://youtu.be/VdXV_Fv9_8g”][vc_empty_space][/vc_column][/vc_row][vc_row][vc_column][vc_column_text]
1. What is the DeHaze Adjustment?
[/vc_column_text][vc_row_inner][vc_column_inner width=”2/3″][vc_empty_space height=”15px”][vc_single_image image=”55197″ img_size=”large” onclick=”link_image”][/vc_column_inner][vc_column_inner width=”1/3″][vc_empty_space][vc_empty_space][vc_empty_space][vc_column_text]We wanted to make the removal of fog, haze, or smoke as easy as possible. DeHaze features 2 sliders. After applying the DeHaze Adjustment to your image, you will see a 2 slider panel pop up in the adjustments panel (If you don’t, click the blue Try Pro link at the bottom of the panel).[/vc_column_text][/vc_column_inner][/vc_row_inner][vc_empty_space][/vc_column][/vc_row][vc_row][vc_column][vc_column_text]
Breakdown of the Sliders
[/vc_column_text][vc_row_inner][vc_column_inner width=”1/4″][vc_empty_space height=”15px”][vc_single_image image=”55208″ img_size=”large” onclick=”link_image”][/vc_column_inner][vc_column_inner width=”3/4″][vc_empty_space][vc_empty_space][vc_column_text]
The sliders and what they do:
1. Strength:
This slider controls the overall strength. The poorer the air quality or the farther distance between you and your subject matter, the stronger strength you will want to use.
2. Suppress Artifacts:
When increasing the Strength slider in the DeHaze Adjustment, you may notice some image artifacts occurring. Increasing the value of the Suppress Artifacts slider will increase the amount of artifacts that are blocked out to ensure a clean and natural appearance.[/vc_column_text][/vc_column_inner][/vc_row_inner][vc_empty_space][/vc_column][/vc_row][vc_row][vc_column][vc_column_text]
Open Your Image
[/vc_column_text][vc_empty_space height=”15px”][vc_row_inner][vc_column_inner width=”2/3″][vc_empty_space height=”15px”][vc_single_image image=”55206″ img_size=”full” alignment=”center” onclick=”link_image”][/vc_column_inner][vc_column_inner width=”1/3″][vc_empty_space][vc_empty_space][vc_column_text]Before we get started, you’ll want to open an image. If this is your first time opening Topaz Studio, you’ll notice that there is a lot of empty fields. This is because you’ll need to open an image to get started! There is more than one way that you can open an image .
- Drag and drop an image from your computer into the program.
- Click Open (located in the Canvas) and navigate through your files. Select an image and click Open.
- Click Open in the menu bar. Select an image and click Open.
- Go to Menu > File > Open Image… and then select an image and click Open.
- Use your shortcut keys (such as Command O or Control O).
[/vc_column_text][/vc_column_inner][/vc_row_inner][vc_empty_space][/vc_column][/vc_row][vc_row][vc_column][vc_column_text]
Apply the DeHaze Adjustment to Your Image
[/vc_column_text][vc_row_inner][vc_column_inner width=”2/3″][vc_empty_space height=”15px”][vc_single_image image=”55218″ img_size=”large” onclick=”link_image”][/vc_column_inner][vc_column_inner width=”1/3″][vc_empty_space][vc_empty_space][vc_column_text]After you have successfully opened an image, you will want to apply the DeHaze Adjustment. This can be done one of two ways:
- Clicking Adjustments > DeHaze from the top Menu Bar.
- Clicking More > DeHaze from the Adjustment tool bar located on the right-hand side of your workspace.
[/vc_column_text][/vc_column_inner][/vc_row_inner][vc_empty_space][/vc_column][/vc_row][vc_row][vc_column][vc_column_text]
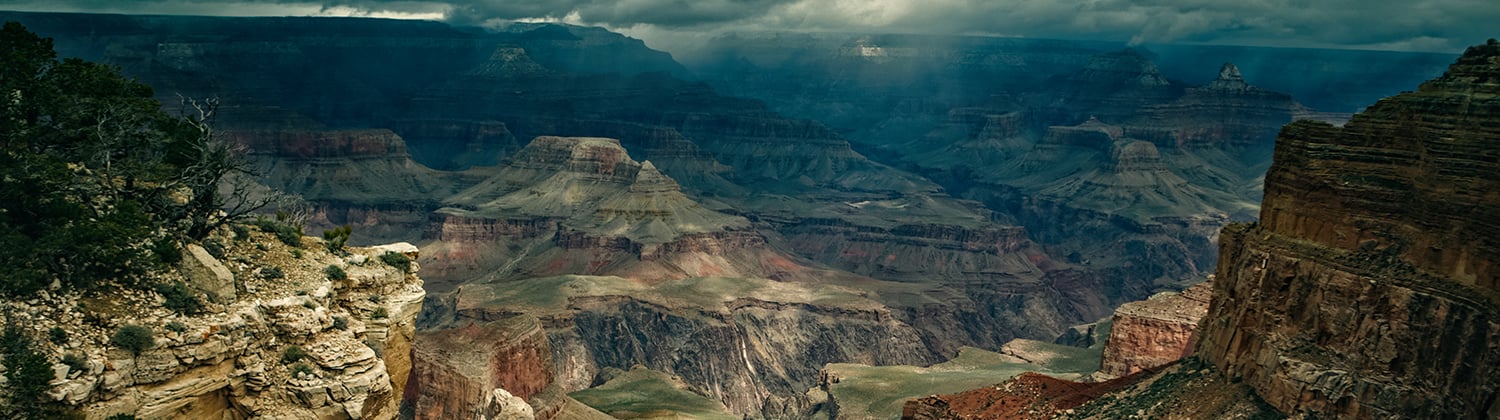
2. How to use DeHaze
[/vc_column_text][vc_row_inner][vc_column_inner width=”2/3″][vc_empty_space height=”15px”][vc_single_image image=”55227″ img_size=”large” alignment=”center” onclick=”link_image”][/vc_column_inner][vc_column_inner width=”1/3″][vc_empty_space][vc_empty_space][vc_column_text]After I added the DeHaze Adjustment, I increased the strength until I was satisfied. The canyon area of the photo was pretty hazy, so I turned the strength up pretty high. No matter what, I always add at least a touch of the Suppress Artifacts Slider. Just in the event that I end up using this in a large format later on. There can be some small artifacts that you can miss.[/vc_column_text][/vc_column_inner][/vc_row_inner][vc_empty_space][/vc_column][/vc_row][vc_row][vc_column][vc_column_text]
The Settings
[/vc_column_text][vc_row_inner][vc_column_inner width=”1/4″][vc_empty_space height=”15px”][vc_single_image image=”55229″ img_size=”large” onclick=”link_image”][/vc_column_inner][vc_column_inner width=”3/4″][vc_empty_space][vc_empty_space][vc_column_text]Here are the settings I used for the DeHaze Adjustment. These settings are great for an image that has fairly heavy haze, and not a lot of artifacts are created with the adjustment. Typically, I don’t find myself using the DeHaze Adjustment above about 0.5-0.6.[/vc_column_text][/vc_column_inner][/vc_row_inner][vc_empty_space][vc_column_text]
The Before and After:
[/vc_column_text][vc_empty_space height=”15px”][vc_column_text]I love how the DeHaze Adjustment was able to completely transform this image. It went from something that I wouldn’t stop and look twice at to a very moody image.[/vc_column_text][vc_empty_space height=”15px”][vc_row_inner][vc_column_inner width=”1/2″][vc_single_image image=”55232″ img_size=”large” alignment=”center” onclick=”link_image”][vc_empty_space height=”15px”][vc_column_text]
Before
[/vc_column_text][/vc_column_inner][vc_column_inner width=”1/2″][vc_single_image image=”55233″ img_size=”large” alignment=”center” onclick=”link_image”][vc_empty_space height=”15px”][vc_column_text]
After
[/vc_column_text][/vc_column_inner][/vc_row_inner][vc_empty_space][/vc_column][/vc_row][vc_row][vc_column][vc_column_text]
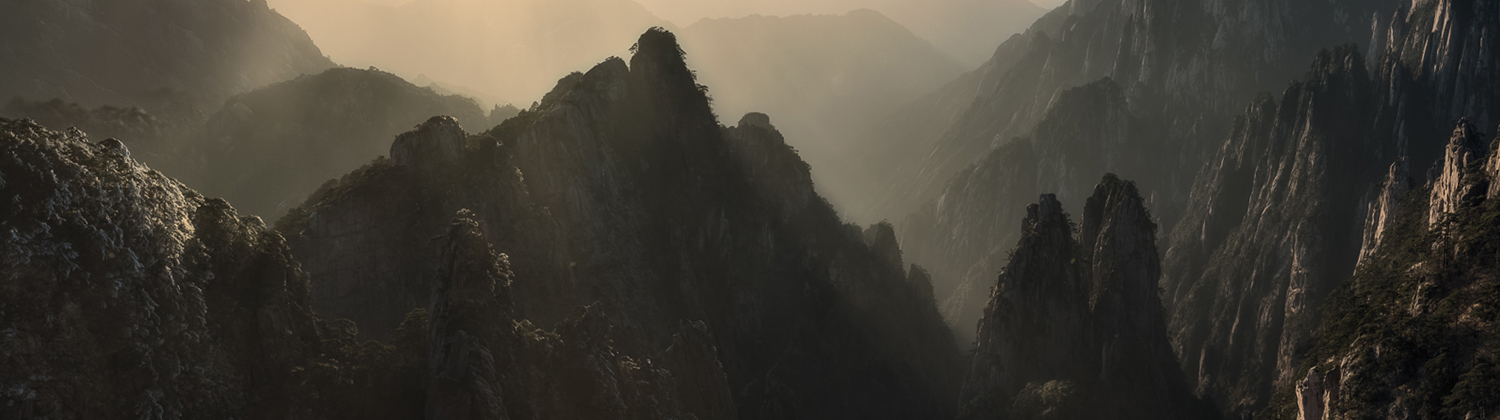
3. Advanced Usage
[/vc_column_text][vc_empty_space height=”15px”][vc_row_inner][vc_column_inner width=”1/4″][vc_empty_space height=”15px”][vc_empty_space height=”15px”][vc_single_image image=”55242″ img_size=”large” onclick=”link_image”][/vc_column_inner][vc_column_inner width=”3/4″][vc_column_text]For the first part of this tutorial, I simply wanted to familiarize you with the DeHaze adjustment. For this next image, we are going to do a little more of an advanced workflow using some of Topaz Studio’s additional functionality. We will be using multiple DeHaze Adjustments and Topaz Studio’s integrated masking.
Built in Functionality. Topaz Studio has a lot of functionality that allows you to perfect how each adjustment affects your image. The functionality is built right into the header next to its name. You will find adjustment level masking, an opacity slider, 28 blending modes, and the ability to duplicate the adjustment![/vc_column_text][/vc_column_inner][/vc_row_inner][vc_empty_space height=”15px”][/vc_column][/vc_row][vc_row][vc_column][vc_column_text]
Add DeHaze to Your Image
[/vc_column_text][vc_row_inner][vc_column_inner width=”2/3″][vc_empty_space height=”15px”][vc_single_image image=”55235″ img_size=”large” alignment=”center” onclick=”link_image”][/vc_column_inner][vc_column_inner width=”1/3″][vc_empty_space][vc_empty_space][vc_empty_space][vc_column_text]Again, I added the DeHaze Adjustment and increased the strength. For this image, I will remove the haze in a two step process. For the first layer, we are going to focus on the area with heavy haze off in the distant (the area inside the blue box).[/vc_column_text][/vc_column_inner][/vc_row_inner][vc_empty_space][/vc_column][/vc_row][vc_row][vc_column][vc_column_text]
The Settings
[/vc_column_text][vc_row_inner][vc_column_inner width=”1/4″][vc_empty_space height=”15px”][vc_single_image image=”55236″ img_size=”large” onclick=”link_image”][/vc_column_inner][vc_column_inner width=”3/4″][vc_empty_space][vc_empty_space][vc_empty_space][vc_column_text]Here are the settings I used for the first DeHaze Adjustment.[/vc_column_text][/vc_column_inner][/vc_row_inner][vc_empty_space][vc_column_text]
Adjustment Level Masking
[/vc_column_text][vc_empty_space height=”15px”][vc_row_inner][vc_column_inner width=”1/6″][vc_empty_space height=”15px”][vc_empty_space height=”15px”][vc_single_image image=”46805″ img_size=”large” alignment=”center” onclick=”link_image”][/vc_column_inner][vc_column_inner width=”5/6″][vc_column_text]Next, I am going to mask out the foreground of the DeHaze Adjustment because I feel like it is too strong on the less hazy foreground. I’m going to use the adjustment level masking to accomplish this task. To do so, just click on the adjustment level masking icon in the adjustment panel (shown on the left).
Not familiar with masking? If you aren’t very familiar with masking, I suggest you check out this masking tutorial over the Topaz Studio Masking here. [/vc_column_text][/vc_column_inner][/vc_row_inner][vc_empty_space][vc_column_text]
Mask out the Foreground
[/vc_column_text][vc_row_inner][vc_column_inner width=”2/3″][vc_empty_space height=”15px”][vc_single_image image=”55240″ img_size=”large” alignment=”center” onclick=”link_image”][/vc_column_inner][vc_column_inner width=”1/3″][vc_empty_space][vc_empty_space][vc_column_text]I chose to use the brush mask to brush out the rocky foreground. I had the mask density set to 0.00 and had the brush size set fairly large at 0.67. I would suggest to keep your mask density very close to 0.00, but you can choose the brush size dependent on what you need to mask out. All you have to do is simply brush on the canvas and we do all the heavy lifting for you![/vc_column_text][/vc_column_inner][/vc_row_inner][vc_empty_space][vc_column_text]
Add an Enhancement
[/vc_column_text][vc_empty_space height=”15px”][vc_row_inner][vc_column_inner width=”1/6″][vc_single_image image=”55245″ img_size=”large” onclick=”link_image”][/vc_column_inner][vc_column_inner width=”5/6″][vc_column_text]Next, you are going to add an Enhancement to your image. Enhancements are the same as Adjustments, but they only effect one adjustment instead of the overall image. To add an Enhancement to an image, you will click the plus sign that is located at the very bottom of each individual adjustment panel in the right-hand corner (icon is shown to the left).[/vc_column_text][/vc_column_inner][/vc_row_inner][vc_empty_space][vc_row_inner][vc_column_inner width=”2/3″][vc_empty_space height=”15px”][vc_single_image image=”55246″ img_size=”large” alignment=”center” onclick=”link_image”][/vc_column_inner][vc_column_inner width=”1/3″][vc_empty_space][vc_empty_space][vc_empty_space][vc_column_text]You are going to add a Basic Adjustment as an enhancement. While I think that the DeHaze Adjustment did a great job of removing the haze, I think the blue is a little too saturated. We are going to use the Basic Adjustment to reduce the saturation and create a much more natural looking sky.[/vc_column_text][/vc_column_inner][/vc_row_inner][vc_empty_space][vc_column_text]
Reduce the Saturation in the Basic Adjustment
[/vc_column_text][vc_empty_space height=”15px”][vc_row_inner][vc_column_inner width=”2/3″][vc_empty_space height=”15px”][vc_single_image image=”55249″ img_size=”large” alignment=”center” onclick=”link_image”][/vc_column_inner][vc_column_inner width=”1/3″][vc_empty_space][vc_empty_space][vc_empty_space][vc_column_text]After you get the Basic Adjustment added, just lower the saturation slider to reduce the saturation of only the sky area. I set mine to -0.37 for this image. I left everything else untouched.[/vc_column_text][/vc_column_inner][/vc_row_inner][vc_empty_space][vc_column_text]
Add the Second DeHaze Adjustment
[/vc_column_text][vc_row_inner][vc_column_inner width=”2/3″][vc_empty_space height=”15px”][vc_single_image image=”55252″ img_size=”large” alignment=”center” onclick=”link_image”][/vc_column_inner][vc_column_inner width=”1/3″][vc_empty_space][vc_empty_space][vc_empty_space][vc_column_text]For the second DeHaze Adjustment, we are going to focus on removing the haze on the rocky foreground (blue box). So go ahead and add a second DeHaze Adjustment. You will see it populate with the default parameters in the adjustment panel.[/vc_column_text][/vc_column_inner][/vc_row_inner][vc_empty_space][vc_column_text]
The Settings
[/vc_column_text][vc_row_inner][vc_column_inner width=”1/4″][vc_empty_space height=”15px”][vc_single_image image=”55253″ img_size=”large” onclick=”link_image”][/vc_column_inner][vc_column_inner width=”3/4″][vc_empty_space][vc_empty_space][vc_column_text]Here are the settings I used for the second DeHaze Adjustment.[/vc_column_text][/vc_column_inner][/vc_row_inner][vc_empty_space][vc_column_text]
Copy, Paste, and Invert Your Mask
[/vc_column_text][vc_empty_space height=”15px”][vc_row_inner][vc_column_inner width=”1/3″][vc_single_image image=”55265″ img_size=”large” onclick=”link_image”][/vc_column_inner][vc_column_inner width=”2/3″][vc_column_text]Instead of having to redo your mask, you can copy and paste masks. All you have to do is click the adjustment more icon (three horizontal lines) and select copy mask. On the second DeHaze Adjustment, you are going to click the same icon and paste the mask. After you have pasted the mask, you are going to open the second DeHaze Adjustment’s masking panel. Click invert to switch the mask to allow it to only affect the foreground. You may have to slightly touch up the mask to perfect it, but it is much faster than completely redoing![/vc_column_text][/vc_column_inner][/vc_row_inner][vc_empty_space][/vc_column][/vc_row][vc_row][vc_column][vc_column_text]
Before and After
[/vc_column_text][vc_empty_space height=”15px”][vc_row_inner][vc_column_inner width=”1/2″][vc_single_image image=”55270″ img_size=”large” alignment=”center” onclick=”link_image”][vc_empty_space height=”15px”][vc_column_text]
Before
[/vc_column_text][/vc_column_inner][vc_column_inner width=”1/2″][vc_single_image image=”55269″ img_size=”large” alignment=”center” onclick=”link_image”][vc_empty_space height=”15px”][vc_column_text]
After
[/vc_column_text][/vc_column_inner][/vc_row_inner][vc_empty_space][vc_column_text]
Don’t forget to Save Your Effect
[/vc_column_text][vc_row_inner][vc_column_inner width=”1/6″][vc_empty_space height=”15px”][vc_single_image image=”46824″ img_size=”medium” alignment=”center” onclick=”link_image”][vc_empty_space height=”15px”][vc_single_image image=”46825″ img_size=”medium” alignment=”center” onclick=”link_image”][/vc_column_inner][vc_column_inner width=”5/6″][vc_column_text]Save and Share Your Effects. If you end up really liking an effect, you can save it to quickly apply in next time! You can either save the effect as a preset level (top icon) or global effect (bottom icon). Global presets allow you to share your creation with others by selecting ‘Yes’ in the Public field. Your effect will be shared to the entire Topaz Community instantly![/vc_column_text][/vc_column_inner][/vc_row_inner][vc_empty_space][/vc_column][/vc_row][vc_row][vc_column][vc_column_text]
Gallery
[/vc_column_text][vc_column_text]Saving the effect can be a great way to quickly apply the same setting to multiple images. Maybe you took multiple hazy images of the same canyon or mountain. Here are some more before and after images I edited. Thanks for reading and hope you’ve gained a little more understanding of the DeHaze Adjustment![/vc_column_text][vc_row_inner][vc_column_inner width=”1/2″][vc_empty_space height=”15px”][vc_column_text]
Before
[/vc_column_text][vc_empty_space height=”15px”][vc_single_image image=”55516″ img_size=”large” alignment=”center” onclick=”link_image”][vc_empty_space height=”15px”][vc_single_image image=”55518″ img_size=”large” alignment=”center” onclick=”link_image”][/vc_column_inner][vc_column_inner width=”1/2″][vc_empty_space height=”15px”][vc_column_text]
After
[/vc_column_text][vc_empty_space height=”15px”][vc_single_image image=”55517″ img_size=”large” alignment=”center” onclick=”link_image”][vc_empty_space height=”15px”][vc_single_image image=”55519″ img_size=”large” alignment=”center” onclick=”link_image”][/vc_column_inner][/vc_row_inner][vc_empty_space][/vc_column][/vc_row][vc_row][vc_column][vc_column_text]
Thanks for Reading!
[/vc_column_text][vc_column_text]That’s all I have for today! That’s all the basic functionality that is contained in the DeHaze Adjustment. I hope you learned a little bit about effective haze removal.
We’ll be adding more tutorials and videos so be sure to give us a follow to learn more!
If you’d like to share your images with us, tag us on Instagram with @topazlabs and Twitter with @topazlabs. We’re also on Facebook and YouTube![/vc_column_text][vc_empty_space][/vc_column][/vc_row][vc_row][vc_column][vc_empty_space][vc_column_text]
Free Download
[/vc_column_text][vc_empty_space height=”15px”][vc_row_inner][vc_column_inner width=”1/2″][vc_btn title=”Windows” shape=”square” color=”primary” align=”center” button_block=”true” link=”url:https%3A%2F%2Fopen_beta.s3.amazonaws.com%2Ftopazstudio_online_installer.exe|||”][/vc_column_inner][vc_column_inner width=”1/2″][vc_btn title=”Mac” shape=”square” color=”primary” align=”center” button_block=”true” link=”url:https%3A%2F%2Fopen_beta.s3.amazonaws.com%2Ftopazstudio_online_installer.dmg|||”][/vc_column_inner][/vc_row_inner][/vc_column][/vc_row][vc_row][vc_column][vc_empty_space height=”15px”][vc_separator border_width=”3″][vc_empty_space height=”15px”][vc_column_text]
About Taylor L. Seaton
[/vc_column_text][vc_empty_space height=”15px”][vc_row_inner][vc_column_inner width=”1/6″][vc_single_image image=”8720″ img_size=”medium” alignment=”center” style=”vc_box_circle_2″][/vc_column_inner][vc_column_inner width=”5/6″][vc_empty_space][vc_column_text]Taylor Seaton is a 2016 graduate from Angelo State University. While attending ASU, she obtained her Bachelor of Fine Arts with a concentration in Graphic Design and an area of emphasis in Business Management and Marketing. She also played volleyball at the collegiate level. She is currently the Social Media Manager at Topaz Labs.[/vc_column_text][/vc_column_inner][/vc_row_inner][vc_empty_space height=”15px”][vc_separator border_width=”3″][vc_empty_space height=”15px”][/vc_column][/vc_row]
 Original[/caption]
[caption id="attachment_55600" align="alignnone" width="1200"]
Original[/caption]
[caption id="attachment_55600" align="alignnone" width="1200"] After Heal Tool[/caption]