
As we wrap-up the festive season and review the many family photos snapped throughout all of our holiday traditions, you may come across a few shots that are almost perfect.
Photographing holidays, like all live events, calls for a reportage style of photography: You’ll shoot quickly to catch the perfect moment, but sometimes the light will be a little low, or your shutter speed a bit slow, or the subject doesn’t quite fill the frame. Authentic moments unfold spontaneously, in real-time, and there are no “do-overs”.
When you make that almost perfect shot — a great moment, with some technical flaws — all you need is a little help in post-production to make that image to shine. Topaz Labs offers a whole collection of AI-powered photo editing apps to help you rescue your photos.
Holiday lights look stunning in a dimly-lit room, but they are difficult to photograph. When you’re shooting in low light without a flash, you’ll struggle to shoot at a fast shutter speed unless you raise your ISO.
Higher ISOs increase the sensitivity of your camera’s sensor, so you can freeze motion even in low light. But this higher sensitivity comes at a price: noise. Noise is like a veil of static across an entire photo, muddling the details and depth of your image.
DeNoise AI uses machine learning tech to tackle heavy image noise, so your photos looks crisp and clean even at ISO 10,000 and above. It’s the perfect app to finish your nighttime holiday photos.
You’ve never seen a kid fly across a room faster than on Christmas morning! They’re all smiles as they tear into their gifts under the tree. These are the best moments filled with pure joy and lightning speed. But capturing those happy moments are difficult, because quick-moving subjects often leave us with a little motion blur in the final photo.
Correcting missed focus and motion blur is easy with Sharpen AI. You can choose from three AI Models — Sharpen, Stabilize, or Focus — to correct a soft image in one click. The results will give you more detail, for crystal-clear holiday memories.
Sometimes you’ll shoot the perfect portrait — if only your subject was filling the frame! If you need to crop-in to your photo to recompose the perfect shot, how many pixels are you losing? How much resolution do you sacrifice by cropping?
The solution is simple. Gigapixel AI makes it possible to upscale your image up to 600% with enhanced detail and sharpness. Achieve cleaner, crisper, bigger photos, ideal for print.
Whether it’s capturing crisp photos or creating the perfect composition, we all have our own challenges with photography. What’s your biggest photo challenge? Let us know in the comments!
Masking allows you to selectively make adjustments on your image. Let’s say you want to bring out the details in your granddaughter’s hair, but don’t necessarily want to bring out all the details of her skin, like her pores. Masking is great for that. Masking allows you to enhance part of the image, without being forced to make that same edit to the overall image. You also have the choice of varying mask densities. A black (0.00) density mask will completely remove the effect, while a white (1.00) density mask will allow an effect to completely remain. You can tune the range in between those values to achieve your desired effect.
The Topaz Studio Integrated Masking is unlike anything you have seen before. We have included 5 masking types: Brush, Spot, Gradient, Color, and Luminosity, as well as a Mask Adjustments panel and an option to invert or completely reset your mask. Our brush masking includes intuitive, content-aware technology that was developed in house. Not only are the new masking features awe-inspiring, but you can combine masking types. After making adjustments with one type of mask, click apply or switch to another mask type and build upon that mask. It’s never been so easy!
In Topaz Studio, we wanted to give you full control, so we have included both Look Masking and Filter Level Masking. Each has the exact same functions, but Look Masking will effect the entire set of filters, or “Look” that have been applied to your image. Filter Level Masking will only effect that Filter that you use the mask on.
To edit your Look Mask, apply a look and then simply click mask icon next to the name of your look. To edit your filter mask, select the masking icon next to the Filter you wish to edit.
Brush Masking works great to apply effects exactly where you need them to be placed. You can paint in or paint out just one adjustment or entire effects with the global masking. In the Brush Mask Panel, you will find many easy to use controls. The Mask Density slider controls the opacity of your brush from 0.00 to 1.00. The Radius Slider controls the overall size, while the Softness Slider controls edge softness. The Edge Aware toggle allows you turn on or off our unique Edge Aware technology.
Our unique edge aware technology allows you to effortlessly perfect masks. Simply keep the edge that you wish to be detected between the red inner circle and the green outer circle. Our technology will automatically detect the edge. It’s that easy.

The Spot Mask tool allows you to add eclipse shaped masks to your image. Easily adjust the size and shape of your Spot Mask with the on screen manipulation tools. The Spot Mask Adjustment Panel allows you to adjust the Mask Density, Transition, and Color Aware with easy-to-use sliders. If you wish to add more than one Spot Mask to your image, simply click done and then click the spot mask again to add a second mask.
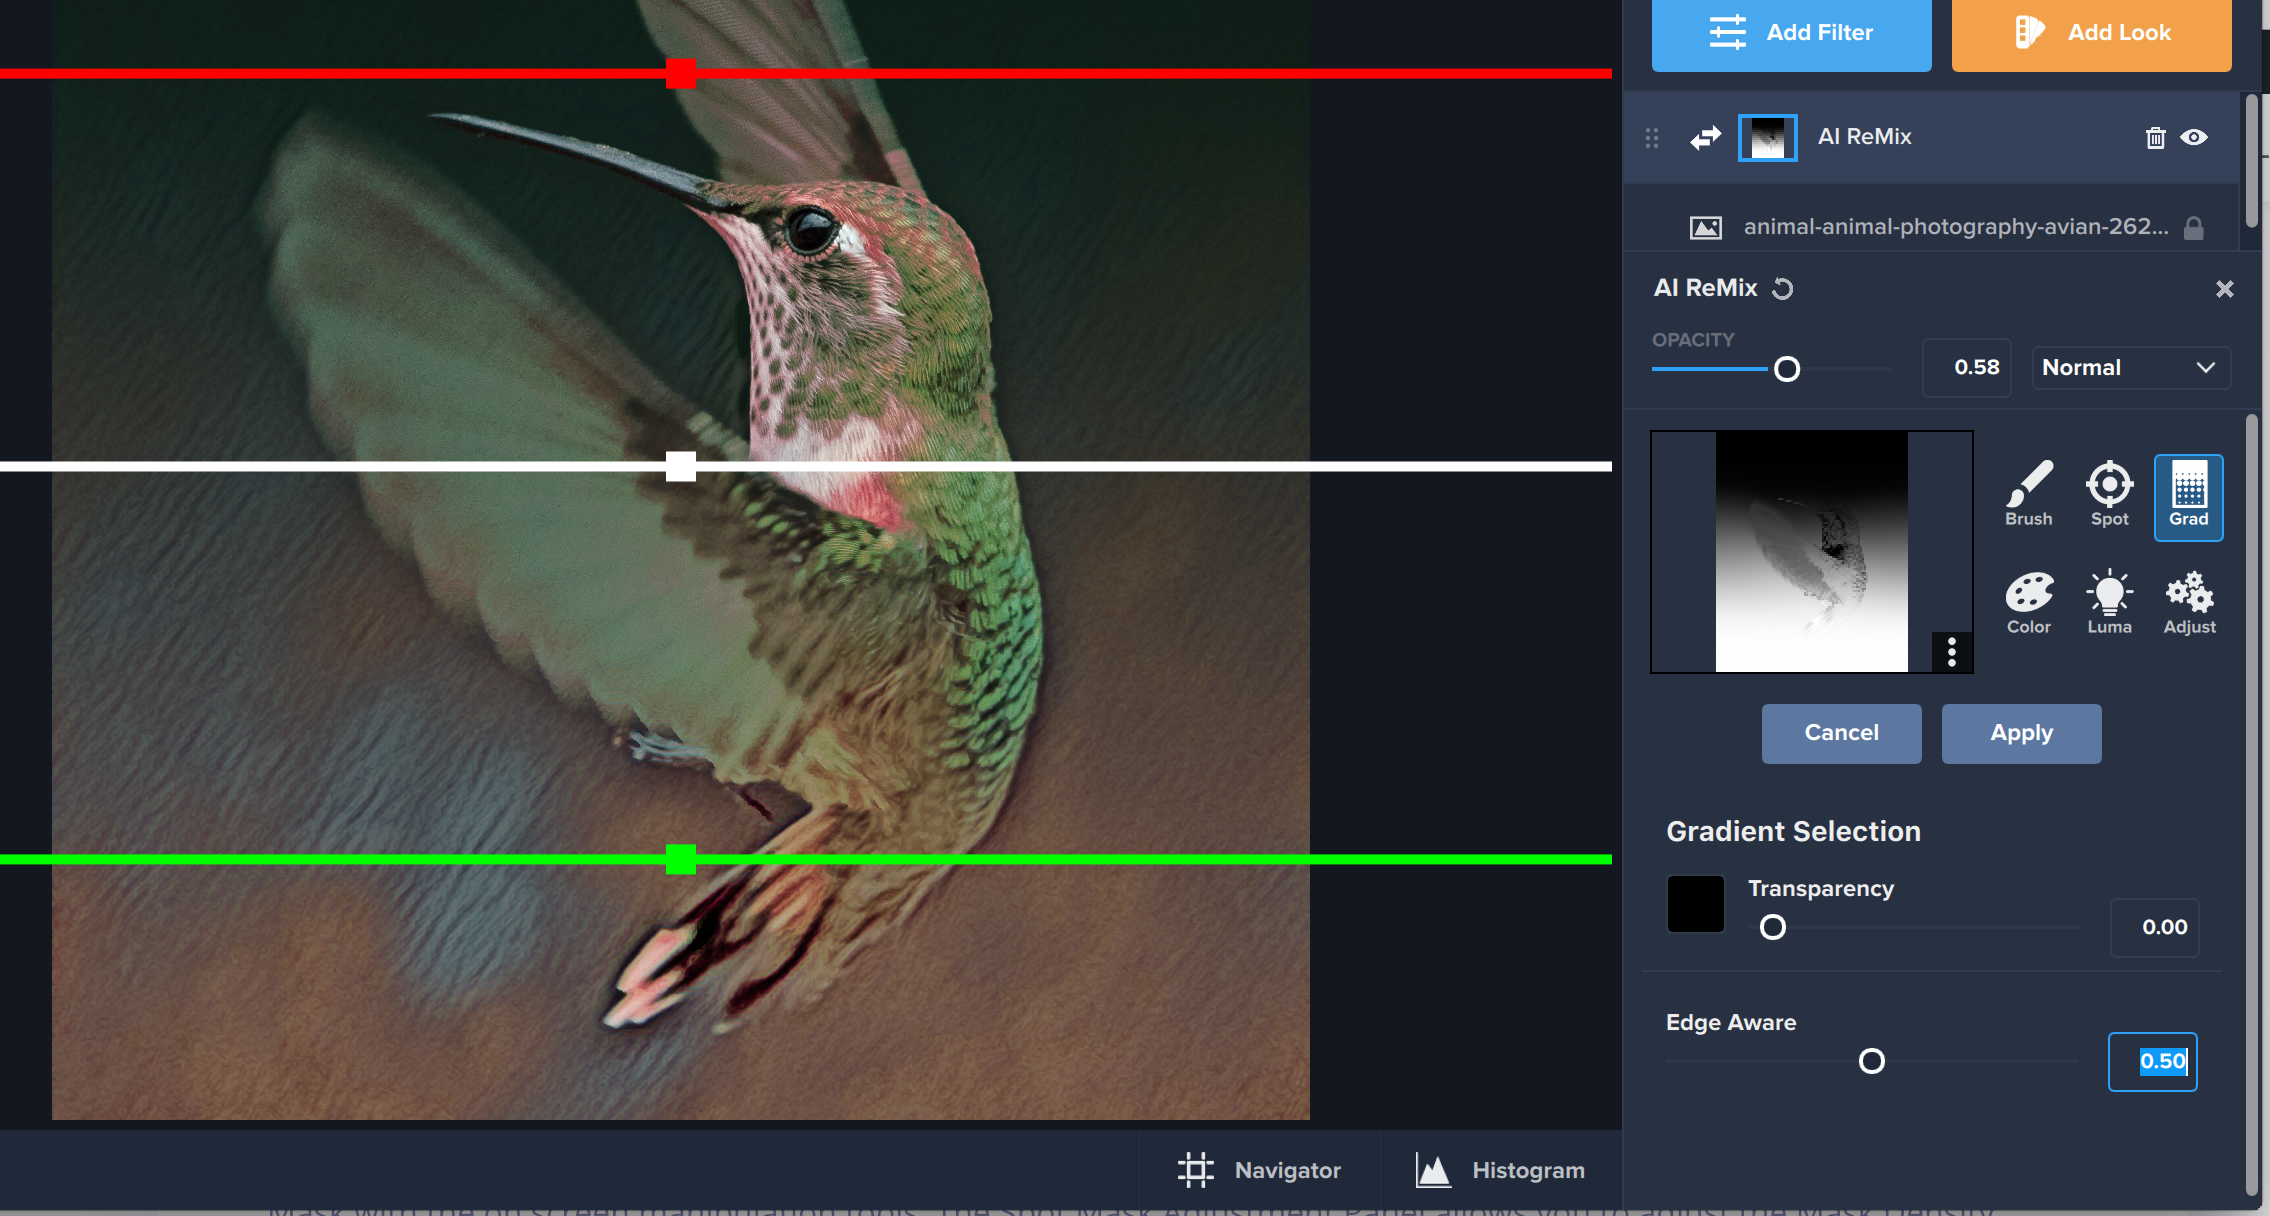
The Gradient Mask allows you to create natural transitions. To add a Gradient Mask, simply click the gradient icon. When the gradient mask is added you will see three lines – a red, white, and green. Anything above the red line will be completely removed and anything below the green line will completely remain. You can manipulate the gradient on screen by grabbing the handles. The white handle will move the entire gradient, while moving the green or red handle can create longer and shorter transitions. You also have the power to manipulate it to have it going any direction you wish, such as mirrored or vertical. You can increase the Content Aware Slider or add more than one Gradient Mask to create interesting effects.
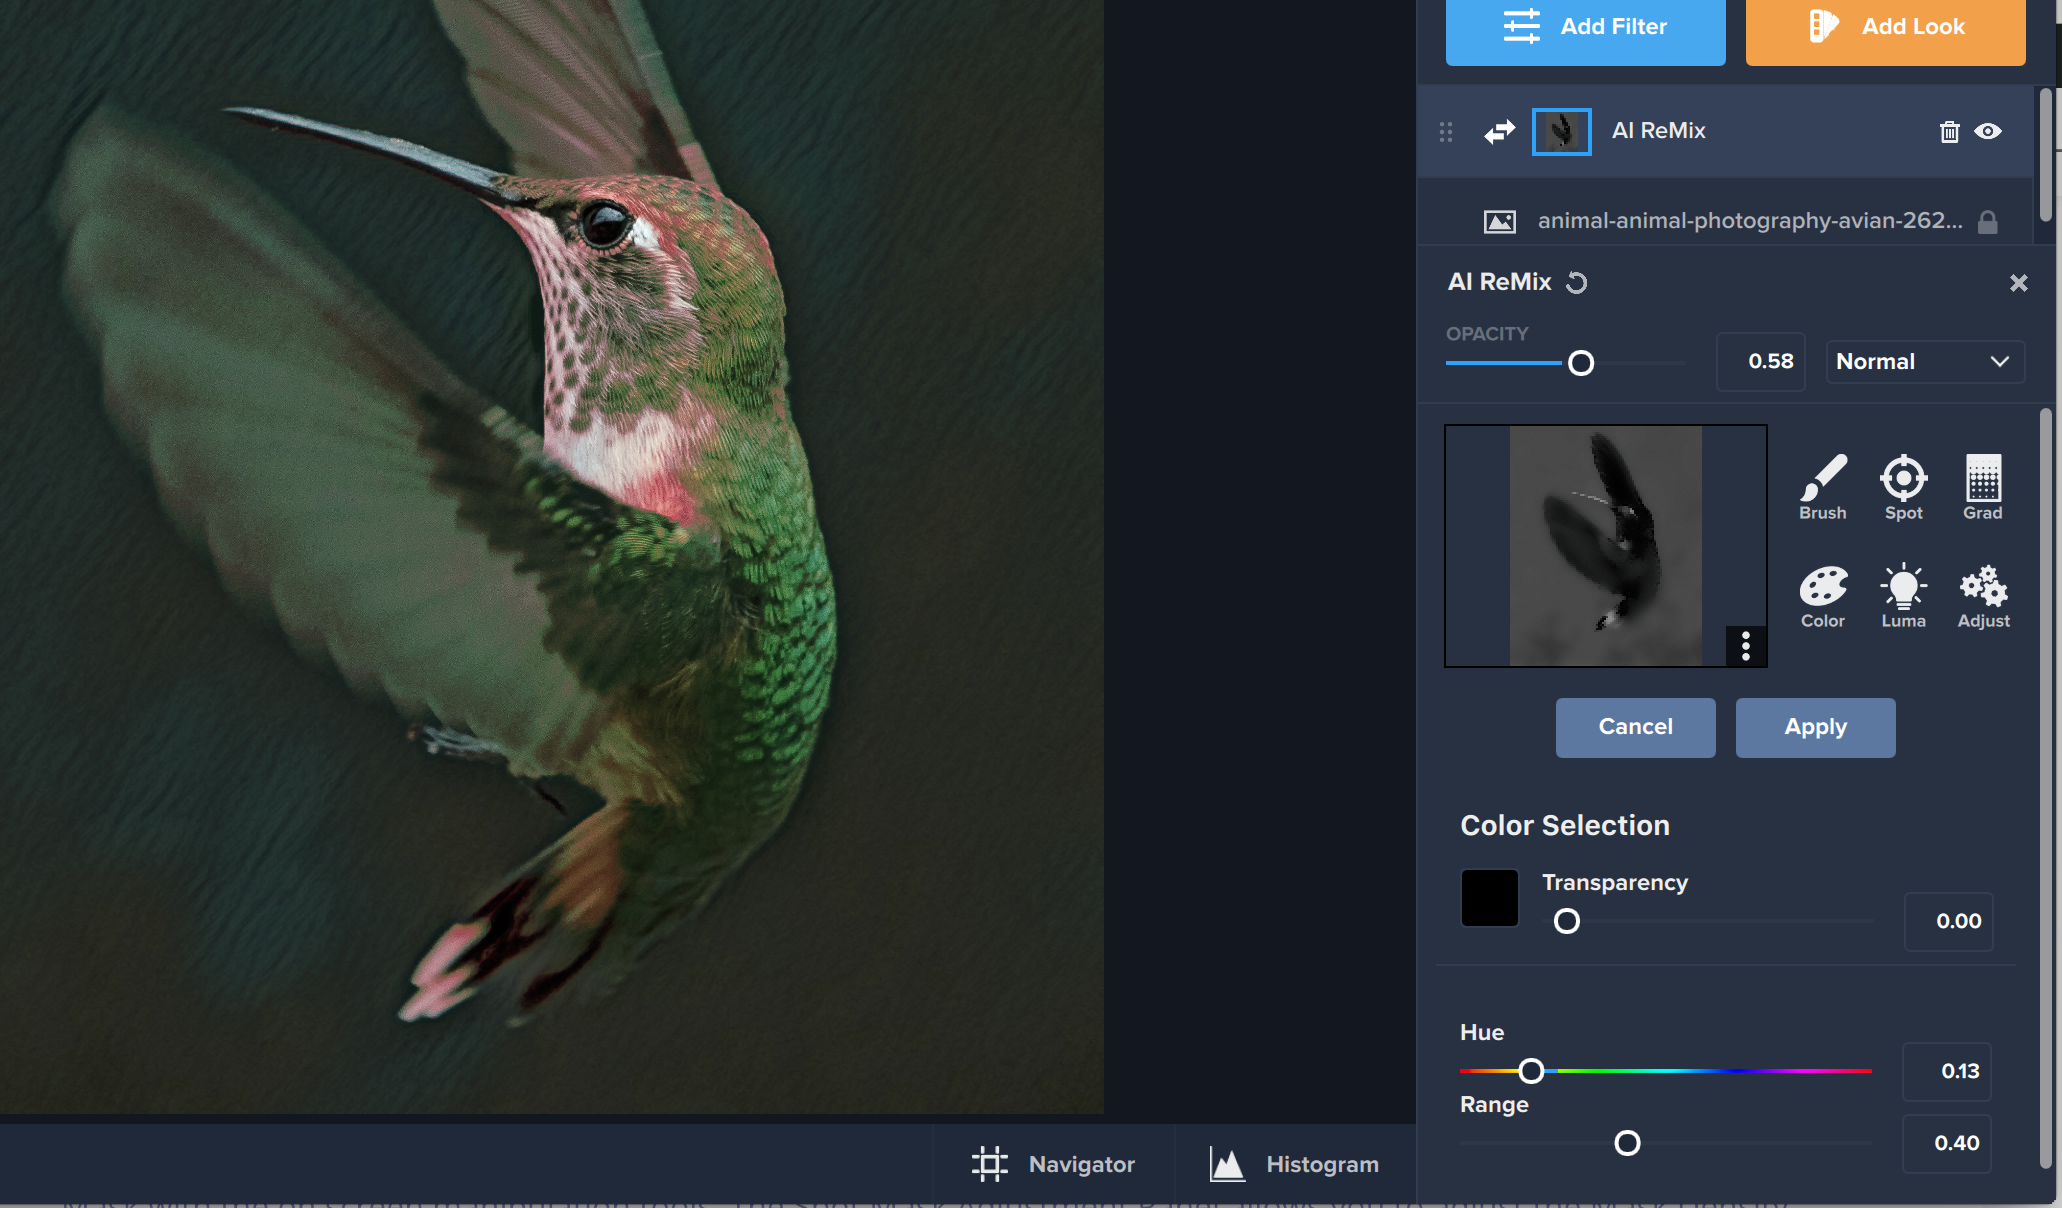
The Color Mask allows you to create masks based upon colors found in your image. You can select a color by moving the Hue Slider. Whatever hue you select, will be masked out. The Range Slider allows you to capture a larger range or smaller range of colors. If you wish to have a more natural selection, use a larger range, but if you wish for a more precise selection, use a smaller range. If you wish for the hue you selected to remain, simply invert the mask once you are satisfied with your edits.
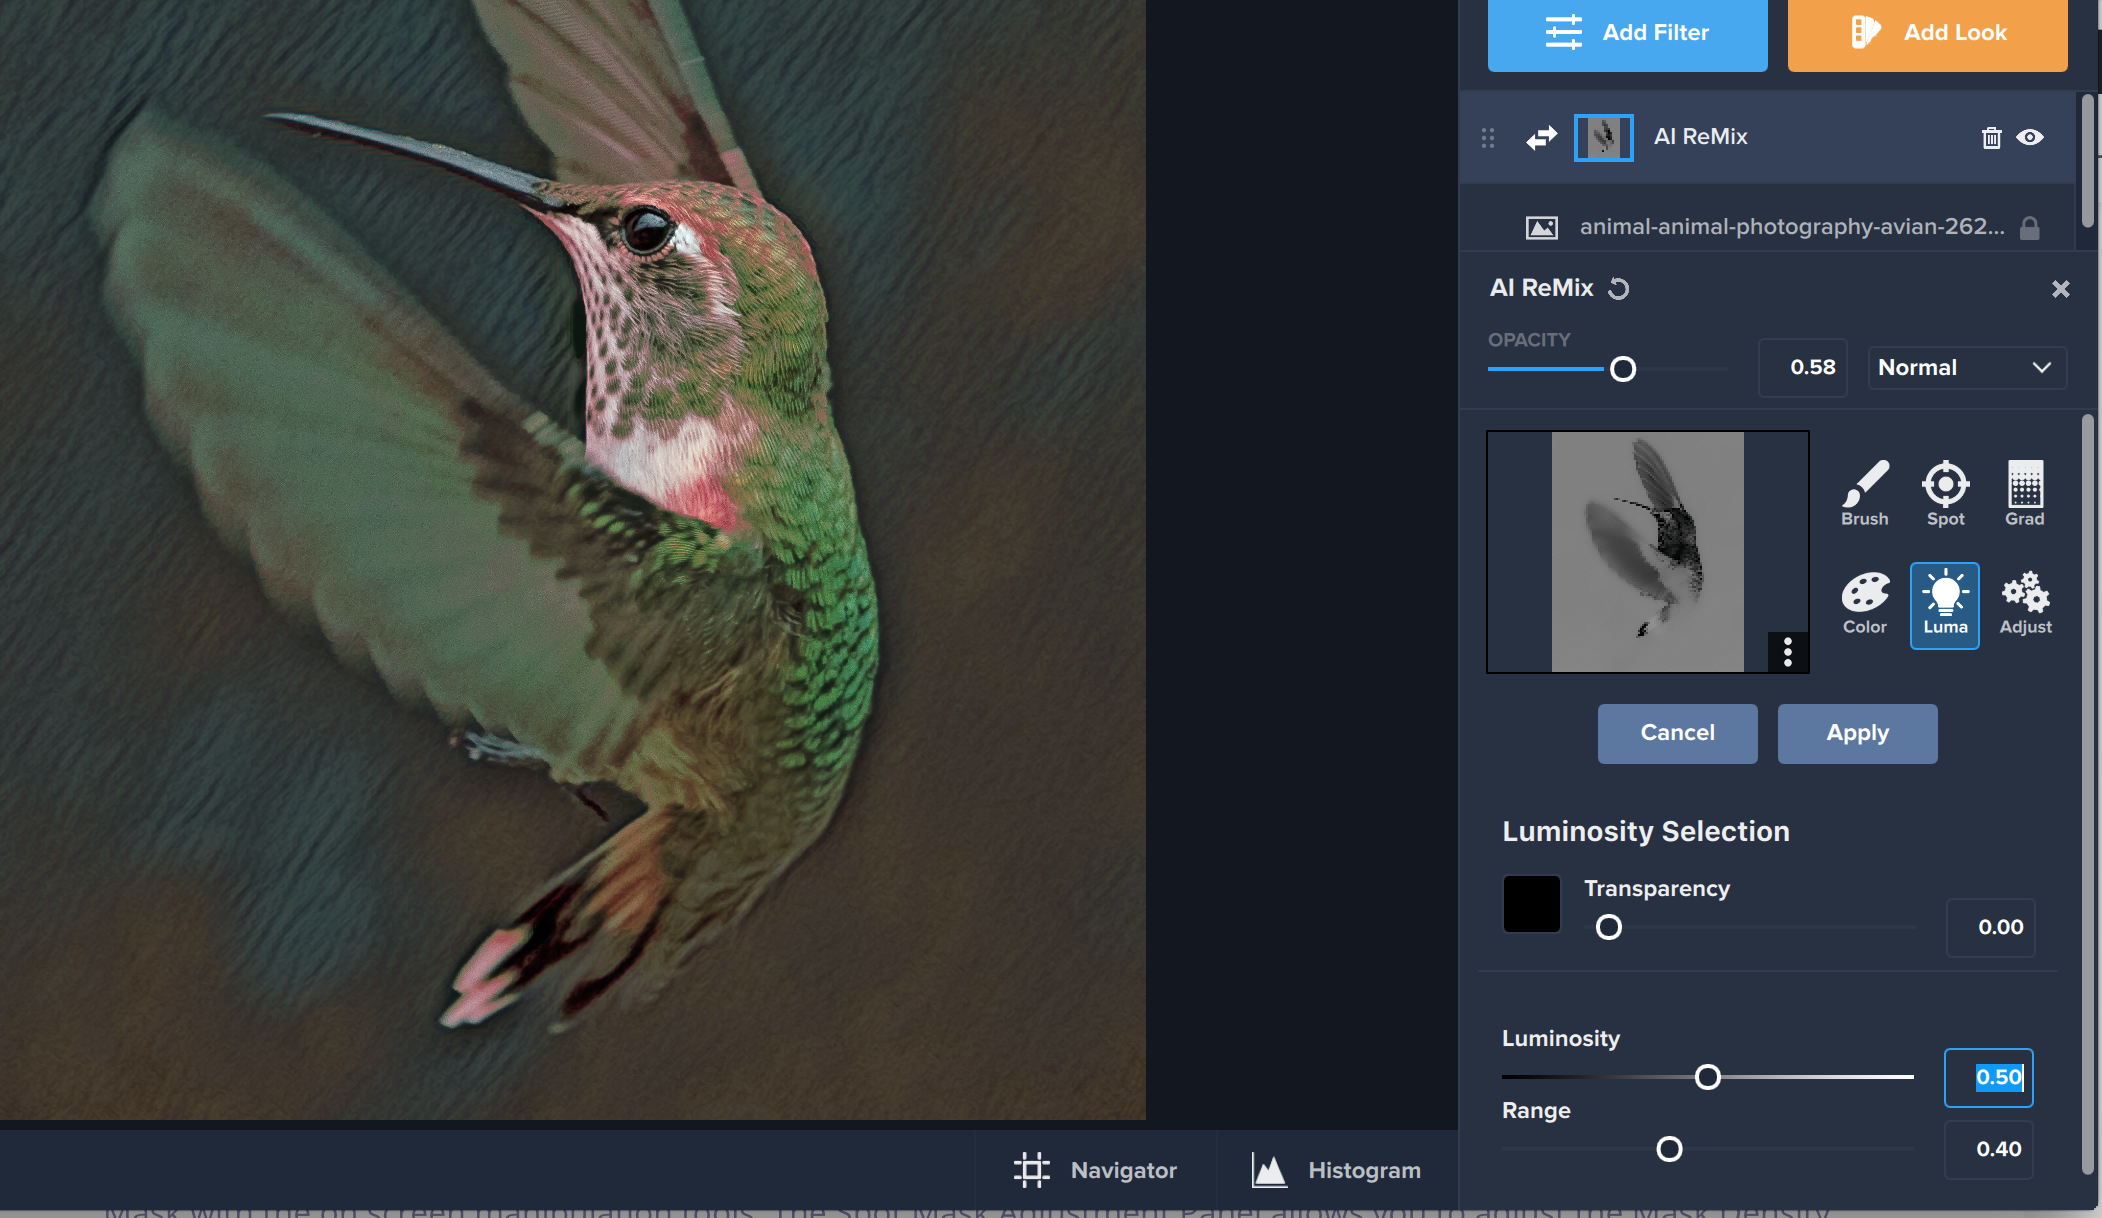
Luminosity Masking allows you to make masking selections based upon the brightness of you image. You can select the brightness you would wish to be masked using the Luminosity Slider. The range slider allows you to adjust if you would like smoother or more precise selection.
The Adjustment Panel is where you can modify the mask you just created. You can change the feathering to be a smoother transition, as well as the contrast and density to create more drastic or less drastic masking transitions. These are all dependent on the look you wish to achieve. When you are satisfied with your adjustments to your mask, all you have to do is click Apply to burn your mask in.
Invert, Clear, and Delete. You have the ability to completely invert, clear, and delete your mask all from the Masking Panel. These options are easily accessed by clicking the three dots in the lower right-hand corner of your mask preview screen. Inverting a mask can be great for creating unique effects or in the various ways stated earlier in section 2 & 4. If you’re not happy with your mask, you can always clear it and start fresh. If you’d like to get rid of it entirely, simply delete the mask from your filter or look.
Find written and video tutorials to guide you through creative processes in Topaz software. Start creating a masterpiece today!
Got a question? We’ve got answers. Find troubleshooting, tips, and more, or contact our Support Team.
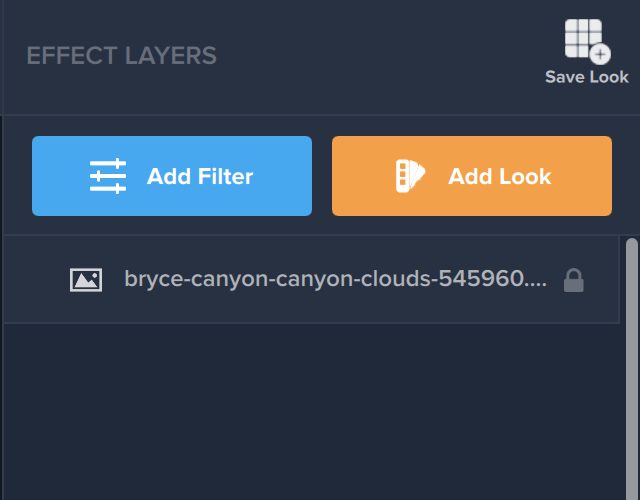
The Right Hand Menu, or the Effect Layers panel, on the Studio 2 User Interface is meant to assist the user easily navigate between filters, looks, and more. The Effect Layers panel is divided into a few sections. First, the two prominent options on the Effect Layers Panel are the Add Filter and Add Look button. The Add Filter Button lets you choose from over 30 unique filters with thousands of options and build the layers on your image yourself with full customizable options. The Add Look button takes you to our pre-made Looks panel, where you can select from over 200 curated looks for your image.
Below these two options is the Layers Panel, where you will be able to see everything that has been applied to your image. When you have either a Look or a Filter selected from the layers panel, a section will appear that will allow you to access all of the options for that look or filter. The same thing happens when you apply a mask to a filter or look.
The “Save Look” button allows you to save a look that includes all of the layers in your Layer Panel so you can access this look again later in the “My Looks” dropdown menu.
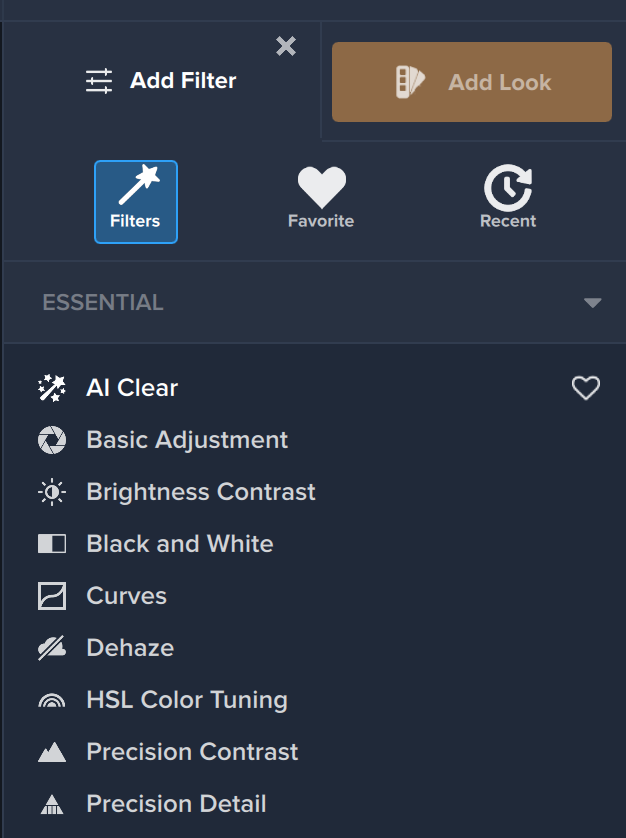
The “Add Filter” button allows you to access over 30 customizable filters divided into three unique sections: Essential, Creative, and Stylistic. Once you select this button, you will see all of the options available. Select a filter, and the filter will open in the right hand panel, allowing you full creative control on how the filter affects your image. You can save a favorite filter by highlighting the filter and clicking the heart of “Favorite” setting. These filters will be found in the “Favorite” menu at the top of the Add Filter screen. To see which filters you have recently used, select the “Recent” menu at the top of the Add Filter Screen.
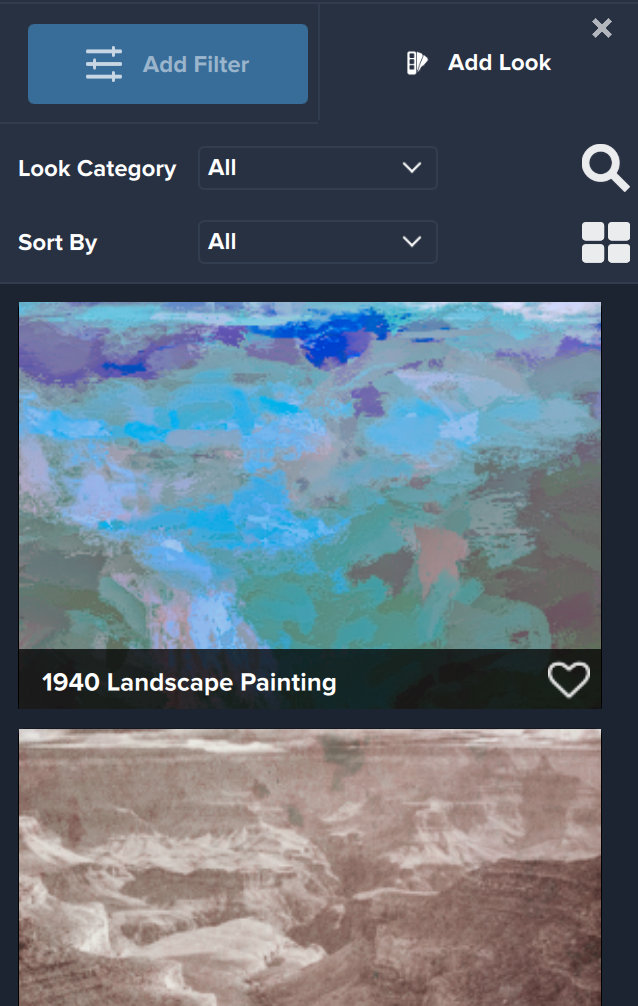
The “Add Look” button allows you to access over 200 customizable Looks. These are packs of filters that give a unique look to your image. You can scroll through the looks that appear or select a category from the Look Category dropdown menu. You are also able to sort by filters using the Sort By drop down menu (for instance, if you are only looking for Looks that include the Impression filter). You can change the size of how the filters appear on your screen using the icon with four squares on the right hand side above your looks. You can favorite a look by seleting the heart beside the name of each look. These favorites will appear in the Category menu as “My Favorites”. Lastly, if you know the name of a look you love, you can search for it with the search icon.
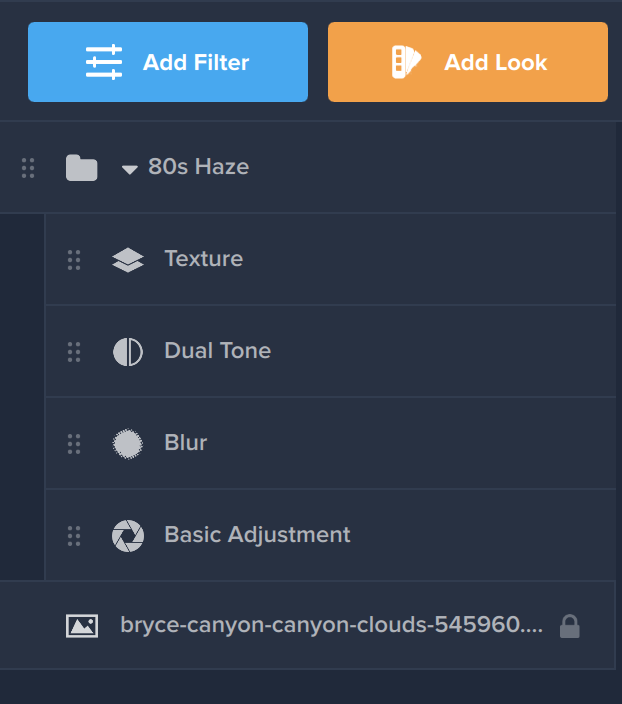
The Layers Panel shows you what has been applied to your image to achieve the look that appears on your image. The Layers Panel will show filters and looks that have been applied to your image. At the bottom will be the name of your image as the base layer. You are able to move filters and layers up or down in the layers pannel using the six dots to the left of each filter or look. Moving one filter above another may affect the overall appearance of your image.
Find written and video tutorials to guide you through creative processes in Topaz software. Start creating a masterpiece today!
Got a question? We’ve got answers. Find troubleshooting, tips, and more, or contact our Support Team.
 Adjust AI
 Gigapixel AI
 Local Image Bundle
$68.00 / month
Local Image Bundle
$68.00 / month
 Topaz B&W Effects
$59.99
Topaz B&W Effects
$59.99
 Topaz Lens Effects
$79.99
Topaz Lens Effects
$79.99
© 2005 - 2025 Topaz Labs. All rights reserved.

