Posted on 6 Comments

Topaz Studio v 1.0.6 Introducing the New Healing Tool

[vc_row css=”.vc_custom_1499750369090{padding-top: 20px !important;padding-bottom: 20px !important;}”][vc_column][vc_column_text]

Created with: Topaz Studio version 1.0.8

[/vc_column_text][vc_empty_space][vc_column_text]

Introducing Healing

Hello, all you avid Topaz fans! Today we’re excited to walk you through the latest feature in Topaz Studio, our new healing brush. The Healing tool, now available within Topaz Studio as of version 1.0.6, is our most highly requested Topaz Studio feature, and is available to all users of Topaz Studio absolutely free. The healing brush allows for intelligent removal of blemishes, distracting secondary subjects, or background cleanup of your image. Using this new tool is simple, just select the tool, change the radius of your brush to fit what you’d like to remove, brush it out and let Topaz Studio do the rest.[/vc_column_text][/vc_column][/vc_row][vc_row][vc_column][vc_empty_space][vc_separator][vc_empty_space height=”15px”][vc_column_text]

Watch The Video Instead?

If you don’t feel like following along in a tutorial you can watch me try the tool out on a few images in the following video.
[/vc_column_text][vc_empty_space height=”15px”][vc_video link=”https://youtu.be/Z43XcSCsJZ0″][vc_empty_space height=”15px”][vc_separator][vc_empty_space height=”15px”][/vc_column][/vc_row][vc_row css=”.vc_custom_1499750369090{padding-top: 20px !important;padding-bottom: 20px !important;}”][vc_column][vc_column_text css=”.vc_custom_1499781447156{padding-top: 20px !important;}”]

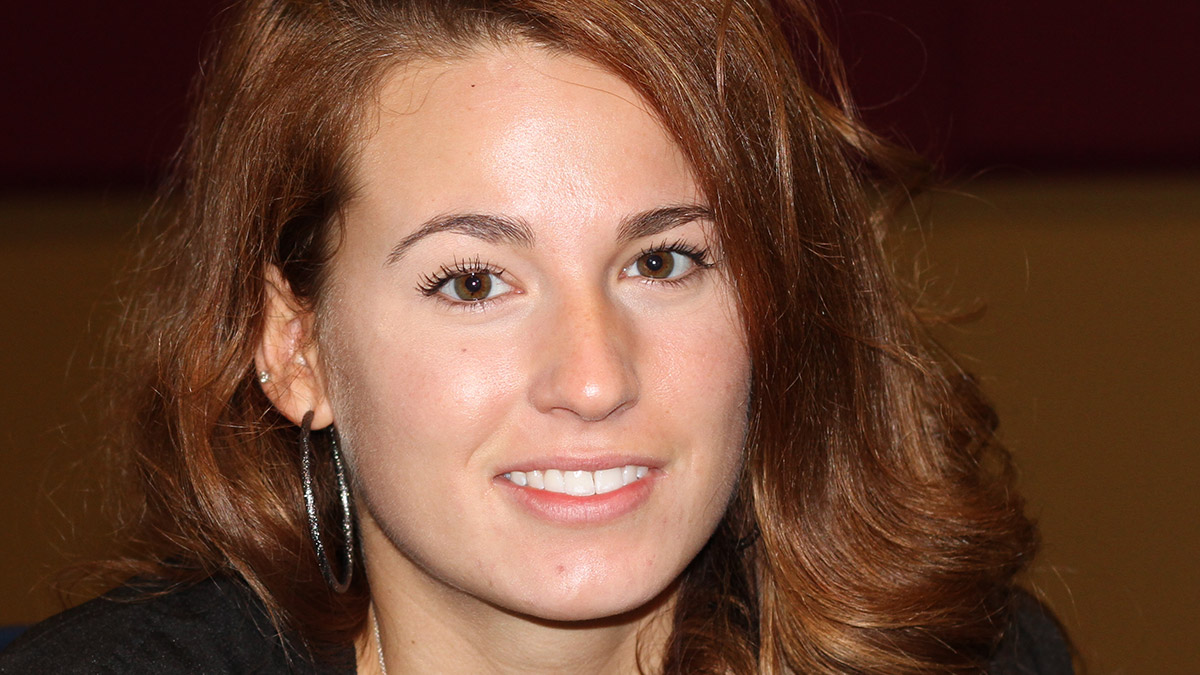
Example 1: Blemish Removal

So let’s go ahead and get started. If you’ve used healing before in Photoshop or Lightroom you’ll be familiar with this workflow.  have here an image of my family member. I took this photo years ago and haven’t done anything with it. She’s very pretty, of course, being related to me, but there are some things I’d like to clean up on the skin on her face. This will get rid of a few distracting blemishes and draw the focus more towards features of her face that I want to emphasize like her eyes, lips, and hair.[/vc_column_text][vc_empty_space][vc_single_image image=”55594″ img_size=”full” alignment=”center” onclick=”link_image”][vc_empty_space][vc_row_inner][vc_column_inner width=”1/2″][vc_column_text css=”.vc_custom_1499781744430{padding-top: 20px !important;}”]First off, I want to clean up my workspace so I have a little bit more room to work. Since I know that I’m working on the image and not going to start with an effect, I’ll close the effect window by clicking on the bar directly to the right of that window.

Also since I don’t want to change images, I’m going to go ahead and collapse the image browser by clicking on the thin bar at the top of the image browser. This gives me a much cleaner workspace to use as I focus on cleaning up this image. You can always open those panels again by clicking on the bars to toggle expanding or collapsing them.[/vc_column_text][/vc_column_inner][vc_column_inner width=”1/2″][vc_single_image image=”55595″ img_size=”full” onclick=”link_image”][/vc_column_inner][/vc_row_inner][vc_empty_space][vc_row_inner][vc_column_inner width=”1/2″][vc_single_image image=”55596″ img_size=”large” onclick=”link_image”][/vc_column_inner][vc_column_inner width=”1/2″][vc_column_text css=”.vc_custom_1499781783873{padding-top: 20px !important;}”]I’ll go ahead and zoom in on my image, so we can see the blemishes that were wanting to remove and get a little bit more detail on the skin.

See you can see on this image I’ve marked some of the blemishes that I’d like to remove. You can see a few blemishes on her chin a freckle below her eye, and some other general cleanup I’d like to do. That’s going to be really easy to do with a healing tool.[/vc_column_text][/vc_column_inner][/vc_row_inner][/vc_column][/vc_row][vc_row css=”.vc_custom_1499750369090{padding-top: 20px !important;padding-bottom: 20px !important;}”][vc_column width=”2/3″][vc_column_text]In order to find the healing tool you’ll go to the toolbar that pops up on the right side of your screen and you’ll see a little bandage icon in the image below that says “heal” Just click that, and the healing brush size slider will appear. It’s really easy to see the size brush you want, with a nice preview on your image of your brush size. However, since we’re working on light blemishes, I’ll work with a small brush. [/vc_column_text][/vc_column][vc_column width=”1/3″][vc_single_image image=”54837″ img_size=”medium” onclick=”link_image”][/vc_column][/vc_row][vc_row css=”.vc_custom_1499750369090{padding-top: 20px !important;padding-bottom: 20px !important;}”][vc_column width=”1/3″][vc_single_image image=”55598″ img_size=”large” onclick=”link_image”][/vc_column][vc_column width=”2/3″][vc_column_text css=”.vc_custom_1499782717877{padding-top: 20px !important;}”]The healing tool makes it really easy to remove blemishes with just a click. s you can see in this image, just paint over your image with the brush, release your mouse, and the blemishes will disappear. So i’ll we’ll do is paint over each point that i’ve highlighted in the image above with the healing tool and very quickly we’re able to clean up some of the small blemishes that could distract from the main features of my subject.

Below you can see the before, the area’s I’ve painted in, and the after.

If you’d like to see the before and after in your image, it’s very simple to do. You just need to make sure you have the healing tool selected, then you can press the spacebar to show your before image, and release to show your image after healing.[/vc_column_text][/vc_column][/vc_row][vc_row css=”.vc_custom_1499750369090{padding-top: 20px !important;padding-bottom: 20px !important;}”][vc_column][vc_row_inner disable_element=”yes”][vc_column_inner width=”1/2″][vc_single_image image=”55599″ img_size=”large” add_caption=”yes” onclick=”link_image”][/vc_column_inner][vc_column_inner width=”1/2″][vc_single_image image=”55600″ img_size=”large” add_caption=”yes” onclick=”link_image”][/vc_column_inner][/vc_row_inner][vc_column_text]

[caption id="attachment_55599" align="alignnone" width="1200"] Original[/caption] [caption id="attachment_55600" align="alignnone" width="1200"] After Heal Tool[/caption]

[/vc_column_text][/vc_column][/vc_row][vc_row css=”.vc_custom_1499750369090{padding-top: 20px !important;padding-bottom: 20px !important;}”][vc_column][vc_separator][vc_empty_space height=”15″][vc_column_text]

So how does it work?

Healing tools tend to all work the same way. Once you paint out a section of your image, it effectively creates a hole within that image, which the software has to try to figure out how to fill with the correct content.

Tools like Photoshop use a system called “patch match” which analyzes your image and looks for the best patch to copy from another section of the image based on the content around the hole you’ve created with your brush. It then fills the hole you’ve created with the healing brush with the best patch it can determine will fit that spot.

The Healing Tool within Topaz Studio uses a method called Statistical Measure, which analyzes the image and compares dozens of different patches that could fit to find the most reasonable result on a per pixel basis. So instead of finding one patch to fill in the hole we’ve created, we’re comparing dozens of different areas and finding the best statistical fit for each pixel within the selected healing area. It ads a bit of processing time to the tool, but results in a much more natural and accurate heal in most cases. [/vc_column_text][vc_empty_space height=”15″][vc_separator][/vc_column][/vc_row][vc_row css=”.vc_custom_1499750369090{padding-top: 20px !important;padding-bottom: 20px !important;}”][vc_column][vc_single_image image=”55604″ img_size=”full” onclick=”link_image”][vc_empty_space][vc_column_text css=”.vc_custom_1499783208304{padding-top: 20px !important;}”]

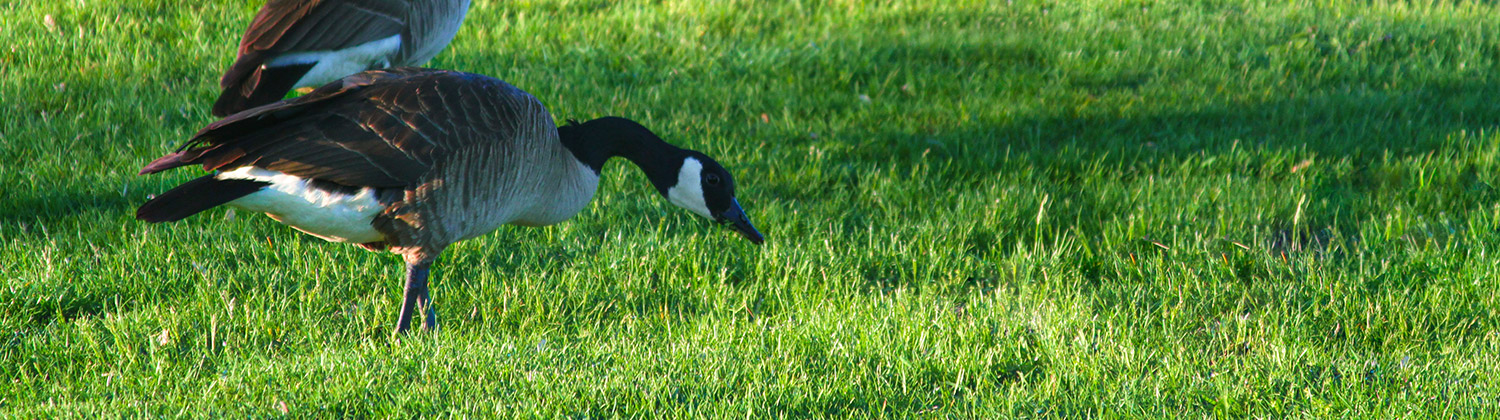
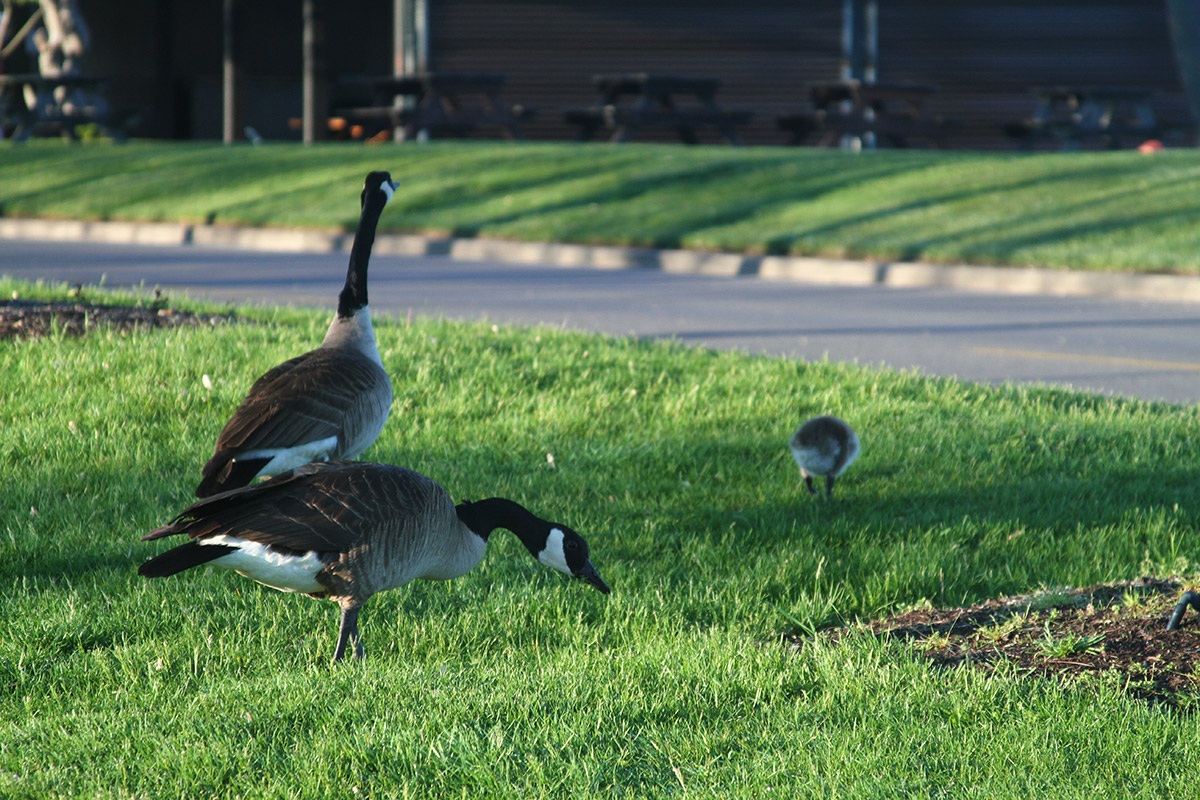
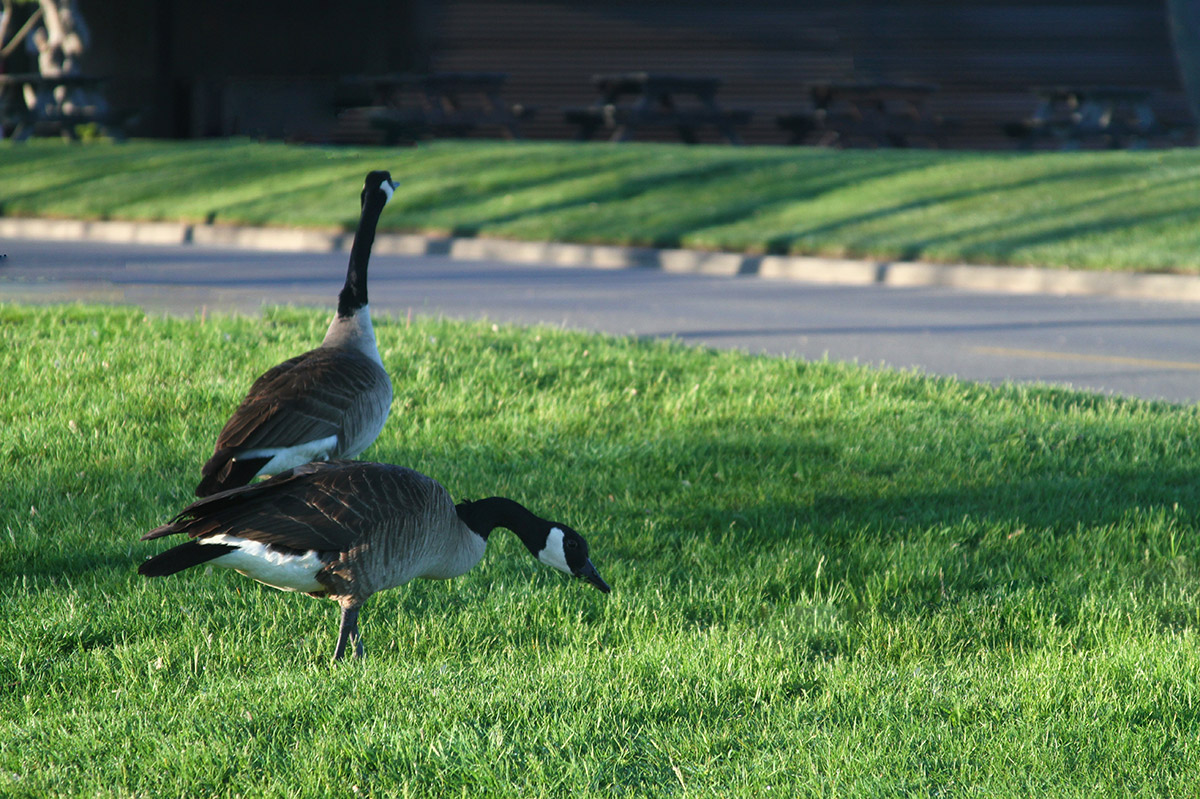
Example 2: Removing distracting secondary subjects and distracting background items

For my next image, I have a photo I took of some geese in my yard most definitely not tearing it up. I don’t really like geese, they’re kind of the jerks of the bird world. But as with most jerks, they definitely want to be the center of attention in this image. Like they say, if you can’t beat em, then join em. We’re going to work to get all the other distractions out of this image, so they can have the spotlight for a moment before I shoo them away. You can see with this image there’s a lot of distractions big and small. [/vc_column_text][vc_row_inner][vc_column_inner width=”1/3″][vc_empty_space][vc_single_image image=”55605″ img_size=”medium” alignment=”center” onclick=”link_image”][vc_column_text]

For big distractions we have these large swaths of bare ground, and also the baby goose.

[/vc_column_text][/vc_column_inner][vc_column_inner width=”1/3″][vc_empty_space][vc_single_image image=”55606″ img_size=”medium” alignment=”center” onclick=”link_image”][vc_column_text]

There’s also some medium sized  distracting objects in the background like those pillars.

[/vc_column_text][/vc_column_inner][vc_column_inner width=”1/3″][vc_empty_space][vc_single_image image=”55607″ img_size=”medium” alignment=”center” onclick=”link_image”][vc_column_text]

And then there’s small areas that draw your eye like these orange spots, and feathers laying in the grass.

[/vc_column_text][/vc_column_inner][/vc_row_inner][/vc_column][/vc_row][vc_row css=”.vc_custom_1499750369090{padding-top: 20px !important;padding-bottom: 20px !important;}”][vc_column][vc_column_text css=”.vc_custom_1499783450090{padding-top: 20px !important;}”]Whatever the size distraction the process is the same. We’ll use the healing brush to cover up the spots we’d like to remove in red, then release the mouse to let Topaz Studio do the rest.

Even with the larger areas it’s not too terribly important that you be precise with your masking. You don’t have to just select the goose or the dirt, it’s ok to go a little outside the lines.[/vc_column_text][vc_row_inner][vc_column_inner][vc_column_text]

[/vc_column_text][/vc_column_inner][/vc_row_inner][vc_column_text css=”.vc_custom_1499784540612{padding-top: 20px !important;}”]Here we can see our before and after. We were able to very quickly clean up the distracting parts of the image and get a much cleaner more professional looking composition without a lot of fuss.

And that’s the Topaz Studio Healing Tool. It may seem pretty simple, but don’t let it fool you it’s also quite powerful. Let me mention again that it’s available within Topaz Studio completely free. So if you haven’t yet, give it a whirl, we’d love to hear your thoughts about this awesome new tool.[/vc_column_text][/vc_column][/vc_row][vc_row][vc_column][vc_empty_space][vc_column_text]

Download Topaz Studio Free

[/vc_column_text][vc_column_text]The healing tool is one of many free features available within Topaz Studio!

Don’t have Topaz Studio? Topaz Studio is free to download! You can get it now by using the links below. If you need more information about Topaz Studio, check out this overview: Introducing Topaz Studio

Topaz Studio is a simple to use editing platform with Topaz Labs’ powerful acclaimed photo enhancement technology. It works as a standalone editor, a plugin within Lightroom and Photoshop, as well as a host application for your other Topaz plugins. It is free to use the program, all 1-click effects, and 10 Adjustments.[/vc_column_text][vc_empty_space height=”15px”][vc_row_inner][vc_column_inner width=”1/2″][vc_btn title=”Windows” shape=”square” color=”primary” align=”center” button_block=”true” link=”url:https%3A%2F%2Ftopazlabs.s3.amazonaws.com%2Ftopazstudio_online_installer.exe|||”][/vc_column_inner][vc_column_inner width=”1/2″][vc_btn title=”Mac” shape=”square” color=”primary” align=”center” button_block=”true” link=”url:https%3A%2F%2Ftopazlabs.s3.amazonaws.com%2Ftopazstudio_online_installer.dmg|||”][/vc_column_inner][/vc_row_inner][/vc_column][/vc_row]

Posted on 1 Comment

How to Use the Sharpen Adjustment

How to use the Sharpen Adjustment

[vc_row][vc_column][vc_empty_space][vc_column_text]Tutorial created Topaz Studio V1.0.8[/vc_column_text][vc_empty_space height=”15px”][vc_column_text]

What is the Sharpen Adjustment?

[/vc_column_text][vc_empty_space height=”15px”][vc_column_text]The Topaz Studio Sharpen Adjustment is an awesome tool that allows you to emphasize details and bring all your photos into perfect focus. Even images that you feel are in focus become crisp after this adjustment.

About the Sharpen Adjustment. The Topaz Studio Sharpen Adjustment is really two for the price of one. You can use the unsharp mask option to sharpen images or reverse the affect of lens blur on an image using the Lens DeBlur option.

How they work. Each sharpening option contains unique technology to ensure you have perfectly sharpened images. The Unsharp Mask works by utilizing an unsharpening mask to enhance details. The Lens DeBlur option is one of my favorites. It has some really unique technology behind it. It does an amazing job of removing lens blur, but keeping your image looking natural. Lens DeBlur uses the blind deconvolution process to mathematically recover image sharpness. This technology has the ability to analyze your image, and based upon the output image, can make an educated guess on the intended input image. The result is restored image quality, but it isn’t a cookie cutter filter. It is specifically tailored sharpening effect applied to each of your images and it truly works wonders.[/vc_column_text][/vc_column][/vc_row][vc_row][vc_column][vc_empty_space][vc_column_text]

Free Download

[/vc_column_text][vc_empty_space height=”15px”][vc_column_text]The Sharpen Adjustment is available within Topaz Studio as a Pro Adjustment. While Pro Adjustments are not free, Topaz Studio is completely free and there are limited functionality within the Sharpen Adjustment that is completely free. You can also try all the unlocked functionality for 30 days, completely commitment free. If you’d like to follow along with the Sharpen Adjustment, you can click the links below to download Topaz Studio.[/vc_column_text][vc_empty_space height=”15px”][vc_row_inner][vc_column_inner width=”1/2″][vc_btn title=”Windows” shape=”square” color=”primary” align=”center” button_block=”true” link=”url:https%3A%2F%2Fopen_beta.s3.amazonaws.com%2Ftopazstudio_online_installer.exe|||”][/vc_column_inner][vc_column_inner width=”1/2″][vc_btn title=”Mac” shape=”square” color=”primary” align=”center” button_block=”true” link=”url:https%3A%2F%2Fopen_beta.s3.amazonaws.com%2Ftopazstudio_online_installer.dmg|||”][/vc_column_inner][/vc_row_inner][/vc_column][/vc_row][vc_row][vc_column][vc_empty_space][vc_column_text]

What We Will Cover in This Tutorial

[/vc_column_text][vc_empty_space height=”15px”][vc_column_text]1. About the Sharpen Adjustment

2. How to use the Unsharp Mask

3. How to use Lens DeBlur[/vc_column_text][/vc_column][/vc_row][vc_row][vc_column][vc_empty_space][vc_column_text]

Reading not your Thing? Watch the Full Tutorial!

[/vc_column_text][vc_column_text]Feel free to watch me work through all the features the Sharpen Adjustment has to offer. Every step outlined in this blog post is demonstrated in this video as well as the gallery images at the end of this posting. Hope you enjoy it![/vc_column_text][vc_empty_space height=”15px”][vc_video link=”https://youtu.be/S_dPhDWvfWc” el_width=”80″ align=”center”][vc_empty_space][/vc_column][/vc_row][vc_row][vc_column][vc_column_text]

1. What is the Sharpen Adjustment?

[/vc_column_text][vc_row_inner][vc_column_inner width=”2/3″][vc_empty_space height=”15px”][vc_single_image image=”50874″ img_size=”large”][/vc_column_inner][vc_column_inner width=”1/3″][vc_empty_space][vc_empty_space][vc_empty_space][vc_column_text]Here at Topaz, we wanted to make it effortless to sharpen images, so we kept this adjustment nice and simple. The Unsharp Mask option features 3 sliders and the Lens DeBlur option has only two sliders. After you apply the Sharpen Adjustment to your image, you will see a 3 slider panel pop up in the adjustments panel (If you don’t, click the blue Try Pro link at the bottom of the panel).[/vc_column_text][/vc_column_inner][/vc_row_inner][vc_empty_space][/vc_column][/vc_row][vc_row][vc_column][vc_column_text]

Breakdown of the Sliders

[/vc_column_text][vc_row_inner][vc_column_inner width=”1/4″][vc_empty_space height=”15px”][vc_single_image image=”50882″ img_size=”large”][vc_empty_space height=”15px”][vc_single_image image=”50884″ img_size=”large”][/vc_column_inner][vc_column_inner width=”3/4″][vc_empty_space][vc_empty_space][vc_column_text]

Select Sharpen Type:

1. Unsharp Mask:
Select the Unsharp mask to create a clearer, sharper image. The Unsharp Mask utilizes unsharpening mask technology to create naturally looking, sharper images by using the image to get the base layer instead of just cookie cutter contrast sharpening.

2. Lens DeBlur:
Use Lens DeBlur to correct image blur. This type of sharpening utilizes the blind deconvolution process to mathematically correct images. The technology in Lens DeBlur analyzes the output image and has the ability to make educated guesses on the intended input to correct blurred images.

The sliders and what they do:

1. Strength:
Increasing the value of this slider increases the the overall strength of the selected sharpen type within the Sharpen Adjustment.

2. Radius:
This slider is only available for the Unsharp Mask. Increasing this slider will increase how strong the contrast of the edge of the Sharpening Mask is.

3. Threshold:
Increasing the value of this slider will increase the amount of details that are untouched by the Sharpen Adjustment. Utilizing this slider will allow for sharper images, but block out distracting image noise and artifacts.[/vc_column_text][vc_empty_space][/vc_column_inner][/vc_row_inner][vc_empty_space][/vc_column][/vc_row][vc_row][vc_column][vc_column_text]

Apply the Sharpen Adjustment to Your Image

[/vc_column_text][vc_empty_space height=”15px”][vc_row_inner][vc_column_inner width=”2/3″][vc_empty_space height=”15px”][vc_single_image image=”50919″ img_size=”full” alignment=”center”][/vc_column_inner][vc_column_inner width=”1/3″][vc_empty_space][vc_column_text]Before we get started, you’ll want to open an image. If this is your first time opening Topaz Studio, you’ll notice that there is a lot of empty fields. This is because you’ll need to open an image to get started! There is more than one way that you can open an image .

  1. Drag and drop an image from your computer into the program.
  2. Click Open (located in the Canvas) and navigate through your files. Select an image and click Open.
  3. Click Open in the menu bar. Select an image and click Open.
  4. Go to Menu > File > Open Image… and then select an image and click Open.
  5. Use your shortcut keys (such as Command O or Control O).

[/vc_column_text][/vc_column_inner][/vc_row_inner][vc_empty_space][/vc_column][/vc_row][vc_row][vc_column][vc_column_text]

Apply the Adjustment to Your Image

[/vc_column_text][vc_row_inner][vc_column_inner width=”2/3″][vc_empty_space height=”15px”][vc_single_image image=”50931″ img_size=”large”][/vc_column_inner][vc_column_inner width=”1/3″][vc_empty_space][vc_empty_space][vc_column_text]After you have successfully opened an image, you will want to apply the Sharpen Adjustment. This can be done one of two ways:

  1. Clicking Adjustments > Sharpen  from the top Menu Bar.
  2. Clicking More > Sharpen from the Adjustment tool bar located on the right-hand side of your workspace.

By default, the Unsharp Mask option will be selected. You can switch to the Lens DeBlur option by moving the toggle to the right.[/vc_column_text][/vc_column_inner][/vc_row_inner][vc_empty_space][/vc_column][/vc_row][vc_row][vc_column][vc_column_text]

2. Unsharp Mask

[/vc_column_text][vc_row_inner][vc_column_inner width=”2/3″][vc_empty_space height=”15px”][vc_single_image image=”50986″ img_size=”large” alignment=”center”][/vc_column_inner][vc_column_inner width=”1/3″][vc_empty_space][vc_empty_space][vc_column_text]The Unsharp Mask works great to amplify small details. I love using it on macro and plant photography. Even on images that I think are in perfect focus, can benefit from an added touch of the Unsharp Mask. When you are focusing on the small details, I suggest zooming in so you can really see how it is affecting your image. We organized the sliders to reflect the most logical workflow, so start with the Strength slider and work your way down. Also, remember it’s ok if there is some artifacts and image noise introduced by the Strength and Radius slider. The Threshold slider does an amazing job of blocking all of it out.[/vc_column_text][/vc_column_inner][/vc_row_inner][vc_empty_space][/vc_column][/vc_row][vc_row][vc_column][vc_column_text]

The Settings

[/vc_column_text][vc_row_inner][vc_column_inner width=”1/4″][vc_empty_space height=”15px”][vc_single_image image=”50964″ img_size=”large”][/vc_column_inner][vc_column_inner width=”3/4″][vc_empty_space][vc_empty_space][vc_column_text]Here are the settings I used for the Unsharp Mask. You can make these edits as subtle or extreme as you would like. Another thing I love to do with the Sharpen Adjustment is to use the integrated masking to mask out the effect in some areas to create a very strong focal area.[/vc_column_text][/vc_column_inner][/vc_row_inner][vc_empty_space][vc_column_text]

Here is the before, after, and magnified comparison:

[/vc_column_text][vc_empty_space height=”15px”][vc_row_inner][vc_column_inner width=”1/3″][vc_single_image image=”51170″ img_size=”large” alignment=”center” onclick=”link_image”][vc_empty_space height=”15px”][vc_column_text]

Before

[/vc_column_text][/vc_column_inner][vc_column_inner width=”1/3″][vc_single_image image=”51174″ img_size=”large” alignment=”center” onclick=”link_image”][vc_empty_space height=”15px”][vc_column_text]

After

[/vc_column_text][/vc_column_inner][vc_column_inner width=”1/3″][vc_single_image image=”51186″ img_size=”large” alignment=”center” onclick=”link_image”][vc_empty_space height=”15px”][vc_column_text]

Magnified

[/vc_column_text][/vc_column_inner][/vc_row_inner][vc_empty_space height=”15px”][vc_column_text]I love how the Unsharp Mask is able to bring out the small details of the leaves without magnifying the image noise or creating artifacts. The result is a perfectly natural looking, sharpened image.[/vc_column_text][vc_empty_space][/vc_column][/vc_row][vc_row][vc_column][vc_column_text]

3. Lens DeBlur

[/vc_column_text][vc_empty_space height=”15px”][vc_column_text]For the next part of this tutorial, I’m going to be demonstrating how to use Lens DeBlur. Feel free to save the image and follow along to test out Lens DeBlur for yourself.

Blurry photos can be a result of multiple things such as impurities in the air or due to lower end lenses. Lens DeBlur works wonders on photos. This simple, but effective tool turns photos that were shot with a $200 lens look like they were shot with a $3000 lens.

The algorithm behind Lens DeBlur analyses your photo and using the blind deconvolution process, mathematically reverse lens blur. It creates a tailored filter for each image. This yields much better results because you aren’t getting a cookie cutter filter for every image. I find myself being surprised at the results I get from images I didn’t even feel were blurry.[/vc_column_text][vc_empty_space height=”15px”][vc_single_image image=”51207″ img_size=”large” alignment=”center” onclick=”link_image”][vc_empty_space][vc_column_text]

Apply the Sharpen Adjustment and Switch to Lens DeBlur

[/vc_column_text][vc_row_inner][vc_column_inner width=”2/3″][vc_empty_space height=”15px”][vc_single_image image=”51220″ img_size=”large” alignment=”center” onclick=”link_image”][/vc_column_inner][vc_column_inner width=”1/3″][vc_empty_space][vc_empty_space][vc_empty_space][vc_column_text]Like before, you are going to apply the Sharpen Adjustment to the image, but this time switch the toggle to the Lens DeBlur option.[/vc_column_text][/vc_column_inner][/vc_row_inner][vc_empty_space][vc_row_inner][vc_column_inner width=”2/3″][vc_empty_space height=”15px”][vc_single_image image=”51241″ img_size=”large” alignment=”center”][/vc_column_inner][vc_column_inner width=”1/3″][vc_empty_space][vc_empty_space][vc_empty_space][vc_column_text]When you first see this image, I personally wouldn’t categorize this as a blurry image. Once you start adding Lens DeBlur, it is extremely evident just how crips this image could be! I always zoom way in when I’m working with the Sharpen Adjustment, so I can really see how it is affecting my image. My goal for this image was to make the trees more distinct and the mountain more prominent against the cloudy sky.[/vc_column_text][/vc_column_inner][/vc_row_inner][vc_empty_space][vc_column_text]

The Settings

[/vc_column_text][vc_row_inner][vc_column_inner width=”1/4″][vc_empty_space height=”15px”][vc_single_image image=”51246″ img_size=”large” alignment=”center” onclick=”link_image”][/vc_column_inner][vc_column_inner width=”3/4″][vc_empty_space][vc_empty_space][vc_column_text]If you would like to duplicate the settings here are what I used for the mountain image. Like the Unsharp Mask, the Threshold slider in the Lens DeBlur option will block out artifacts and image noise. With these two sliders, you can bring focus back to images in seconds.[/vc_column_text][/vc_column_inner][/vc_row_inner][vc_empty_space][/vc_column][/vc_row][vc_row][vc_column][vc_column_text]

Here is the before, after, and magnified comparison:

[/vc_column_text][vc_empty_space height=”15px”][vc_row_inner][vc_column_inner width=”1/3″][vc_single_image image=”51319″ img_size=”large” alignment=”center” onclick=”link_image”][vc_empty_space height=”15px”][vc_column_text]

Before

[/vc_column_text][/vc_column_inner][vc_column_inner width=”1/3″][vc_single_image image=”51320″ img_size=”large” alignment=”center” onclick=”link_image”][vc_empty_space height=”15px”][vc_column_text]

After

[/vc_column_text][/vc_column_inner][vc_column_inner width=”1/3″][vc_single_image image=”51324″ img_size=”large” alignment=”center” onclick=”link_image”][vc_empty_space height=”15px”][vc_column_text]

Magnified

[/vc_column_text][/vc_column_inner][/vc_row_inner][vc_empty_space height=”15px”][vc_column_text]You can see that Lens DeBlur brought a lot of the detail back in the mountain and the trees. The best part is that it looks completely natural. The result isn’t one of those images that have obviously been post-processed.[/vc_column_text][vc_empty_space][/vc_column][/vc_row][vc_row][vc_column][vc_column_text]

Bonus: Don’t Forget all the Other Functionality

[/vc_column_text][vc_empty_space height=”15px”][vc_row_inner][vc_column_inner width=”1/4″][vc_empty_space height=”15px”][vc_single_image image=”51251″ img_size=”large”][/vc_column_inner][vc_column_inner width=”3/4″][vc_column_text]Don’t forget that Topaz Studio has a lot of built in functionality that allows you to perfect how each adjustment affects your image. Each adjustment has the functionality built right into the header next to its name. You will find adjustment level masking, an opacity slider, 28 blending modes, and the ability to duplicate the adjustment! Also, don’t forget that if you are ever curious if you own a Pro Adjustment, the blue box around the icon in the adjustment stack indicates you have complete, unlocked functionality of that adjustment.[/vc_column_text][/vc_column_inner][/vc_row_inner][vc_empty_space][/vc_column][/vc_row][vc_row][vc_column][vc_column_text]

Adjustment Level Masking

[/vc_column_text][vc_row_inner][vc_column_inner width=”1/6″][vc_empty_space height=”15px”][vc_single_image image=”46805″ img_size=”medium” alignment=”center”][/vc_column_inner][vc_column_inner width=”5/6″][vc_column_text]One of the tools I use the most is the adjustment level masking. Combine the Sharpen Adjustment with the adjustment level masking to make interesting focal areas. While I won’t go in depth about it here, I wanted to make sure you knew it existed and is amazing! The brush masking has this awesome functionality called edge aware. So there is no need to create the perfect mask, just keep the edge of your subject between the green and red circles and it will do all the heavy lifting for you! If you’d like an in-depth tutorial about Masking, you can learn about Topaz Studio Masking here.[/vc_column_text][/vc_column_inner][/vc_row_inner][vc_empty_space][/vc_column][/vc_row][vc_row][vc_column][vc_column_text]

Saving Your Custom Effect

[/vc_column_text][vc_row_inner][vc_column_inner width=”1/6″][vc_empty_space height=”15px”][vc_single_image image=”46824″ img_size=”medium” alignment=”center”][vc_empty_space height=”15px”][vc_single_image image=”46825″ img_size=”medium” alignment=”center”][/vc_column_inner][vc_column_inner width=”5/6″][vc_column_text]Save and Share Your Effects. If you end up really liking an effect, you can save it to quickly apply in next time!  You can either save the effect as a preset level (top icon) or global effect (bottom icon). Global presets allow you to share your creation with others by selecting ‘Yes’ in the Public field. Your effect will be shared to the entire Topaz Community instantly![/vc_column_text][/vc_column_inner][/vc_row_inner][vc_empty_space][/vc_column][/vc_row][vc_row][vc_column][vc_column_text]

Gallery

[/vc_column_text][vc_column_text]You can apply the same effect quickly and effortlessly by adding your new custom preset level effect to many images and then tweaking it to each individual image. This can be great if you took multiple images with similar camera settings and you want all of them to be a little sharper. Here are some more before and after images I edited. Thanks for reading and hope you’ve gained a little more understanding of the Sharpen Adjustment![/vc_column_text][vc_column_text]

Unsharp Mask

[/vc_column_text][vc_row_inner][vc_column_inner width=”1/2″][vc_empty_space height=”15px”][vc_column_text]

Before

[/vc_column_text][vc_empty_space height=”15px”][vc_single_image image=”51405″ img_size=”large” alignment=”center” onclick=”link_image”][vc_empty_space height=”15px”][vc_single_image image=”51409″ img_size=”large” alignment=”center” onclick=”link_image”][/vc_column_inner][vc_column_inner width=”1/2″][vc_empty_space height=”15px”][vc_column_text]

After

[/vc_column_text][vc_empty_space height=”15px”][vc_single_image image=”51401″ img_size=”large” alignment=”center” onclick=”link_image”][vc_empty_space height=”15px”][vc_single_image image=”51413″ img_size=”large” alignment=”center” onclick=”link_image”][/vc_column_inner][/vc_row_inner][vc_empty_space][vc_column_text]

Lens DeBlur

[/vc_column_text][vc_row_inner][vc_column_inner width=”1/2″][vc_empty_space height=”15px”][vc_column_text]

Before

[/vc_column_text][vc_empty_space height=”15px”][vc_single_image image=”51392″ img_size=”large” alignment=”center” onclick=”link_image”][vc_empty_space height=”15px”][vc_single_image image=”51399″ img_size=”large” alignment=”center” onclick=”link_image”][/vc_column_inner][vc_column_inner width=”1/2″][vc_empty_space height=”15px”][vc_column_text]

After

[/vc_column_text][vc_empty_space height=”15px”][vc_single_image image=”51393″ img_size=”large” alignment=”center” onclick=”link_image”][vc_empty_space height=”15px”][vc_single_image image=”51400″ img_size=”large” alignment=”center” onclick=”link_image”][/vc_column_inner][/vc_row_inner][vc_empty_space][/vc_column][/vc_row][vc_row][vc_column][vc_column_text]

Thanks for Reading!

[/vc_column_text][vc_column_text]That’s all I have for today! That’s all the basic functionality that is contained in the Sharpen Adjustment. I wanted to keep this tutorial short and sweet, so I encourage you to play with all the functionality such as masking and the pre-made effects.

We’ll be adding more tutorials and videos so be sure to give us a follow to learn more!

If you’d like to share your images with us, tag us on Instagram with @topazlabs and Twitter with @topazlabs. We’re also on Facebook and YouTube![/vc_column_text][vc_empty_space][/vc_column][/vc_row][vc_row][vc_column][vc_empty_space][vc_column_text]

Free Download

[/vc_column_text][vc_empty_space height=”15px”][vc_row_inner][vc_column_inner width=”1/2″][vc_btn title=”Windows” shape=”square” color=”primary” align=”center” button_block=”true” link=”url:https%3A%2F%2Fopen_beta.s3.amazonaws.com%2Ftopazstudio_online_installer.exe|||”][/vc_column_inner][vc_column_inner width=”1/2″][vc_btn title=”Mac” shape=”square” color=”primary” align=”center” button_block=”true” link=”url:https%3A%2F%2Fopen_beta.s3.amazonaws.com%2Ftopazstudio_online_installer.dmg|||”][/vc_column_inner][/vc_row_inner][/vc_column][/vc_row][vc_row][vc_column][vc_empty_space height=”15px”][vc_separator border_width=”3″][vc_empty_space height=”15px”][vc_column_text]

About Taylor L. Seaton

[/vc_column_text][vc_empty_space height=”15px”][vc_row_inner][vc_column_inner width=”1/6″][vc_single_image image=”8720″ img_size=”medium” alignment=”center” style=”vc_box_circle_2″][/vc_column_inner][vc_column_inner width=”5/6″][vc_empty_space][vc_column_text]Taylor Seaton is a 2016 graduate from Angelo State University. While attending ASU, she obtained her Bachelor of Fine Arts with a concentration in Graphic Design and an area of emphasis in Business Management and Marketing. She also played volleyball at the collegiate level. She is currently the Social Media Manager at Topaz Labs.[/vc_column_text][/vc_column_inner][/vc_row_inner][vc_empty_space height=”15px”][vc_separator border_width=”3″][vc_empty_space height=”15px”][/vc_column][/vc_row]

Posted on 5 Comments

Precision Contrast Adjustment vs. Topaz Clarity

Precision Contrast vs. Topaz Clarity


What is the Difference?

Are you trying to decide what is what and if you should buy or not? I had the same questions at first, too. This article weighs the pro and cons of each program, so you can decide what is best for your editing needs.

If you own Topaz Clarity and are trying to decide if you should invest in the Precision Contrast Adjustment, I would advise waiting. Unless you are just dying to have some new software to play with, the Topaz Clarity and Precision Contrast tools preform very similar functions. You may find Precision Contrast to be slightly redundant if you already own Topaz Clarity. We will continue to support our existing plugins. The updated functionality that Precision Contrast boasts will soon be implemented into Topaz Clarity.

While I do not suggest re-buying similar software, there are different things to take into consideration when deciding between them if you do not own either. If you are still curious about the differences or do not own either, please read on to make an informed purchase decision. Whichever you choose, I promise it will quickly become one of your go to programs.

Download and Try Them for Free

[vc_empty_space height=”15px”][vc_column_text]I can tell you all day about the pros and cons of each program, or you could try it out for yourself. We offer a 30 day free trial of all of our software. So you can stop reading right now and decide which one you like better, just by trying them out yourself. I’ve provided the download links for each program below.[/vc_column_text][vc_empty_space height=”15px”][vc_row_inner][vc_column_inner width=”1/2″][vc_column_text]

Topaz Studio Precision Contrast

[/vc_column_text][vc_empty_space height=”15px”][/vc_column_inner][vc_column_inner width=”1/2″][vc_column_text]

Topaz Clarity

[/vc_column_text][vc_empty_space height=”15px”][/vc_column_inner][/vc_row_inner][vc_empty_space height=”15px”][vc_row_inner][vc_column_inner width=”1/4″][vc_btn title=”Windows” shape=”square” color=”primary” align=”center” button_block=”true” link=”url:https%3A%2F%2Fopen_beta.s3.amazonaws.com%2Ftopazstudio_online_installer.exe|||”][/vc_column_inner][vc_column_inner width=”1/4″][vc_btn title=”Mac” shape=”square” color=”primary” align=”center” button_block=”true” link=”url:https%3A%2F%2Fopen_beta.s3.amazonaws.com%2Ftopazstudio_online_installer.dmg|||”][/vc_column_inner][vc_column_inner width=”1/4″][vc_btn title=”Windows” shape=”square” color=”primary” align=”center” button_block=”true” link=”url:http%3A%2F%2Fd2xkriaa67cpt4.cloudfront.net%2Ftopazclarity_setup.exe|||”][/vc_column_inner][vc_column_inner width=”1/4″][vc_btn title=”Mac” shape=”square” color=”primary” align=”center” button_block=”true” link=”url:https%3A%2F%2Ftopazlabs.s3.amazonaws.com%2Ftopazclarity.dmg|||”][/vc_column_inner][/vc_row_inner][vc_empty_space height=”15px”][vc_row]

What do they do?

[vc_empty_space height=”15px”][vc_column_text]First things first, if you have never heard of either program, let me give you a small crash course on what each program accomplishes.

Each program has the ability to intuitively increase the contrast of your image. Typically, a contrast tool makes your darks darker and your lights lighter to create a higher contrast between shades in an image. The problem with most contrast tools is it is always a balancing act. You are either blowing out highlights or crushing shadows, since a contrast tool adjusts both your darks and lights of the overall image.

Each program features similar technology that allows you to independently control contrast by the varying degree of details in your image. Each algorithm analyzes your image and categories details as either micro, low, medium, or high contrast. We then allow you to adjust each one independently of one another. There’s no more balancing act in either program. While the do strive to achieve the same end result, they are each very unique.[/vc_column_text][vc_empty_space][/vc_row][vc_row][vc_column_text]

Appearance

[/vc_column_text][vc_empty_space height=”15px”][vc_column_text]The most obvious difference between the two applications is their appearance. Topaz Clarity, being the older of the two programs, has a slightly more dated interface. Upon starting each program, you will see each program features effects on the left-hand side and the sliders on the right-hand side. Topaz Studio has multi-document support, so you can have multiple images opened at once. Topaz Clarity only lets you adjust one image at a time. There is also a slight difference between the implementation of effects between the two programs. The effects on the left-hand side within Clarity only use Clarity technology, while the effects on the left-hand side of Topaz Studio contain multiple adjustments. If you wish to apply an adjustment that only uses Precision Contrast technology, you will have to click the drop down menu with the Precision Contrast Adjustment on the right-hand side of your screen.[/vc_column_text][vc_empty_space height=”15px”][vc_row_inner][vc_column_inner width=”1/2″][vc_empty_space height=”15px”][vc_single_image image=”47054″ img_size=”large” onclick=”link_image”][vc_empty_space height=”15px”][vc_column_text]

Topaz Clarity

[/vc_column_text][/vc_column_inner][vc_column_inner width=”1/2″][vc_empty_space height=”15px”][vc_single_image image=”47055″ img_size=”large” onclick=”link_image”][vc_empty_space height=”15px”][vc_column_text]

Precision Contrast Adjustment

[/vc_column_text][/vc_column_inner][/vc_row_inner][vc_empty_space][/vc_row][vc_row][vc_column][vc_column_text]

Functionality

[/vc_column_text][vc_empty_space height=”15px”][vc_column_text]The biggest difference between Clarity and Precision Contrast is the speed. The Precision Contrast Adjustment is lightyears faster than Topaz Clarity. I have both on my computer right now and the edits I make within the Precision Contrast Adjustment are instant. No waiting whatsoever. Edits done with Topaz Clarity seem to take quite a bit longer, about a few seconds for each change. I find myself getting very impatient sometimes. A deciding factor may be the system requirements. You can check out the system requirements for Topaz Clarity here and the system requirements for Precision Contrast here.[/vc_column_text][vc_empty_space][/vc_column][/vc_row][vc_row][vc_column][vc_column_text]

Features

[/vc_column_text][vc_empty_space height=”15px”][vc_column_text]This is where it gets a little hazy. There are perks for each program. Deciding which program best fits your needs will be dependent on your workflow. Here’s a comparison of the two programs:[/vc_column_text][vc_empty_space height=”15px”][vc_row_inner][vc_column_inner width=”1/2″][vc_column_text]

Topaz Clarity

[/vc_column_text][vc_separator border_width=”2″ el_width=”80″][vc_column_text]

  • Requires a host editor, but it is a plugin with very focused functionality
  • More adjustment focused presets are available
  • Large grid view for viewing presets
  • Much Slower
  • Adjust Hue, Saturation, and Luminosity
  • A smaller range of control
  • Requires you to open multiple plugins to edit an image from start to finish
  • Effects can only contain the functionality contained in Topaz Clarity
  • Does not have a micro details color slider
  • Price: $49.99 USD

[/vc_column_text][/vc_column_inner][vc_column_inner width=”1/2″][vc_column_text]

Precision Contrast Adjustment

[/vc_column_text][vc_separator border_width=”2″ el_width=”80″][vc_column_text]

  • Is part of Topaz Studio and can work as a host editor, plugin, or standalone
  • 6 adjustment level presets are available (does not include effects that use Precision Contrast)
  • Small grid view for viewing presets
  • Much Faster
  • To adjust Hue, Saturation, and Luminosity you need to add the HSL Adjustment
  • A much larger range of control
  • Is part of Topaz Studio, that contains all the technology needed to edit from start to finish
  • Effects have the ability to apply more than just one function
  • Has a mico details color slider
  • Price: $29.99 USD

[/vc_column_text][/vc_column_inner][/vc_row_inner][vc_empty_space][/vc_column][/vc_row][vc_row][vc_column][vc_column_text]

Gallery

[/vc_column_text][vc_column_text]Here are some images I edited with Topaz Clarity or the Precision Contrast Adjustment, just so you can compare apples to apples for yourself. As you can see, Topaz Clarity’s output is consistently darker even though the settings are exactly the same. I hope this helps to demonstrate the difference between the two and gives you the information needed to purchase the contrast tool that best fits your needs![/vc_column_text][vc_row_inner][vc_column_inner width=”1/3″][vc_empty_space height=”15px”][vc_column_text]

Before

[/vc_column_text][vc_empty_space height=”15px”][vc_single_image image=”47209″ img_size=”large” alignment=”center” onclick=”link_image”][vc_empty_space height=”15px”][vc_single_image image=”47212″ img_size=”large” alignment=”center” onclick=”link_image”][vc_empty_space height=”15px”][vc_single_image image=”47215″ img_size=”large” alignment=”center” onclick=”link_image”][/vc_column_inner][vc_column_inner width=”1/3″][vc_empty_space height=”15px”][vc_column_text]

Topaz Clarity

[/vc_column_text][vc_empty_space height=”15px”][vc_single_image image=”47210″ img_size=”large” alignment=”center” onclick=”link_image”][vc_empty_space height=”15px”][vc_single_image image=”47213″ img_size=”large” alignment=”center” onclick=”link_image”][vc_empty_space height=”15px”][vc_single_image image=”47216″ img_size=”large” alignment=”center” onclick=”link_image”][/vc_column_inner][vc_column_inner width=”1/3″][vc_empty_space height=”15px”][vc_column_text]

Precision Contrast

[/vc_column_text][vc_empty_space height=”15px”][vc_single_image image=”47211″ img_size=”large” alignment=”center” onclick=”link_image”][vc_empty_space height=”15px”][vc_single_image image=”47214″ img_size=”large” alignment=”center” onclick=”link_image”][vc_empty_space height=”15px”][vc_single_image image=”47217″ img_size=”large” alignment=”center” onclick=”link_image”][/vc_column_inner][/vc_row_inner][vc_empty_space][/vc_column][/vc_row][vc_row][vc_column][vc_column_text]

Thanks for Reading!

[/vc_column_text][vc_column_text]That’s all I have for today! I hope this has helped to clear up the similarities about Topaz Clarity and the Precision Contrast Adjustment. Remember, there is no right or wrong answer, but instead what works best for your workflow!

We’ll be adding more tutorials and videos so be sure to give us a follow to learn more!

If you’d like to share your images with us, tag us on Instagram with @topazlabs and Twitter with @topazlabs. We’re also on Facebook and YouTube![/vc_column_text][vc_empty_space][/vc_column][/vc_row][vc_row][vc_column][vc_empty_space][vc_column_text]

Free Download

[/vc_column_text][vc_empty_space height=”15px”][vc_column_text]Here’s the links again incase you’ve decided that you’d like to try out one or both of our programs. It’s completely commitment free and I promise you, you wont regret it. The technology in both of these programs is amazing![/vc_column_text][vc_empty_space height=”15px”][vc_row_inner][vc_column_inner width=”1/2″][vc_column_text]

Topaz Studio Precision Contrast

[/vc_column_text][/vc_column_inner][vc_column_inner width=”1/2″][vc_column_text]

Topaz Clarity

[/vc_column_text][/vc_column_inner][/vc_row_inner][vc_row_inner][vc_column_inner width=”1/4″][vc_btn title=”Windows” shape=”square” color=”primary” align=”center” button_block=”true” link=”url:https%3A%2F%2Fopen_beta.s3.amazonaws.com%2Ftopazstudio_online_installer.exe|||”][/vc_column_inner][vc_column_inner width=”1/4″][vc_btn title=”Mac” shape=”square” color=”primary” align=”center” button_block=”true” link=”url:https%3A%2F%2Fopen_beta.s3.amazonaws.com%2Ftopazstudio_online_installer.dmg|||”][/vc_column_inner][vc_column_inner width=”1/4″][vc_btn title=”Windows” shape=”square” color=”primary” align=”center” button_block=”true” link=”url:http%3A%2F%2Fd2xkriaa67cpt4.cloudfront.net%2Ftopazclarity_setup.exe|||”][/vc_column_inner][vc_column_inner width=”1/4″][vc_btn title=”Mac” shape=”square” color=”primary” align=”center” button_block=”true” link=”url:https%3A%2F%2Ftopazlabs.s3.amazonaws.com%2Ftopazclarity.dmg|||”][/vc_column_inner][/vc_row_inner][/vc_column][/vc_row][vc_row][vc_column][vc_empty_space height=”15px”][vc_separator border_width=”3″][vc_empty_space height=”15px”][vc_column_text]

About Taylor L. Seaton

[/vc_column_text][vc_empty_space height=”15px”][vc_row_inner][vc_column_inner width=”1/6″][vc_single_image image=”8720″ img_size=”medium” alignment=”center” style=”vc_box_circle_2″][/vc_column_inner][vc_column_inner width=”5/6″][vc_empty_space][vc_column_text]Taylor Seaton is a 2016 graduate from Angelo State University. While attending ASU, she obtained her Bachelor of Fine Arts with a concentration in Graphic Design and an area of emphasis in Business Management and Marketing. She also played volleyball at the collegiate level. She is currently the Social Media Manager at Topaz Labs.[/vc_column_text][/vc_column_inner][/vc_row_inner][vc_empty_space height=”15px”][vc_separator border_width=”3″][vc_empty_space height=”15px”][/vc_column][/vc_row]