Posted on 1 Comment

Creating Imagery Driven by Imagination with Topaz Studio

Today we are going over a few adjustments in Topaz Studio, to show you the creativity and control you can have over your images.

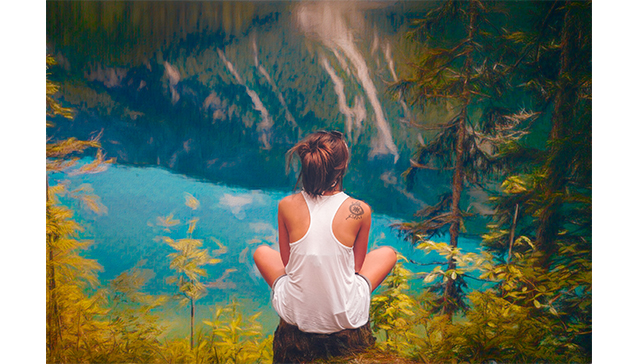
Today we start with this image of a girl sitting on a stump overlooking a river. What we are going to do is make the background seem more painterly, while keeping her realistic. This way it looks as if she was dropped into a painting.

We will be using one helping of Impression, one spoonful of Ai Remix, and one healthy scoop of HSL Color Tuning. We will also be using masks, blending modes, and opacity setting to help control the effects of each adjustment and how it is applied to our photo.
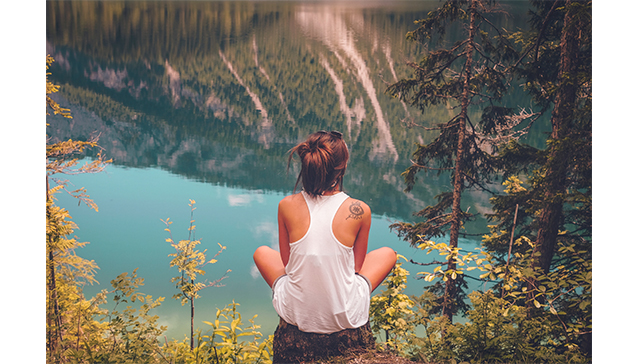
(before)
(after)


Wanna See how it’s done? Watch the video below!


With that being said, lets jump feet first into these edits.

1. Impression

First we’re going to start with Impression. Go to  the adjustments drop down menu and select impression. The VERY FIRST thing I want to do is mask out my girl, this way any effects we put on the photo does not affect her in any way.

So, go to the mask icon, which is the white box in-between the adjustments name and the eye icon, and click it. This will open the mask menu. We’re going to select a slightly smaller brush, keep the masking area white, and the mask its self black. Select the black square, to be sure we have the black MASK OUT brush selected, and color in the girl and her hair. When this is completed select done at the bottom.
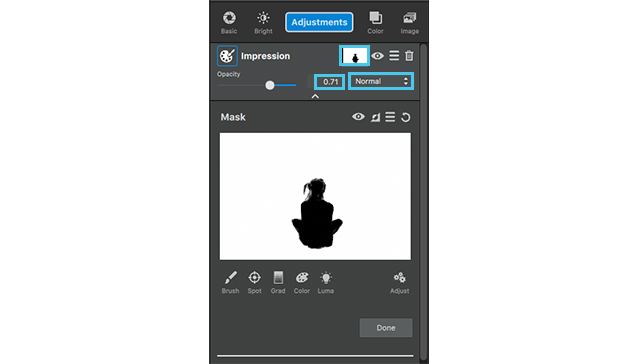
Now we’ll get into the adjustment settings.
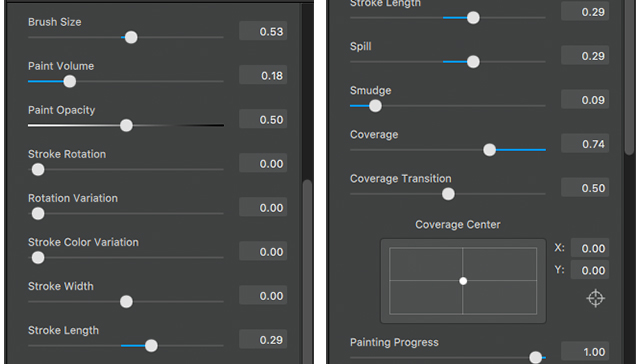
Select the first brush to apply to this image. I want this to look a bit like an acrylic painting and a little messy.
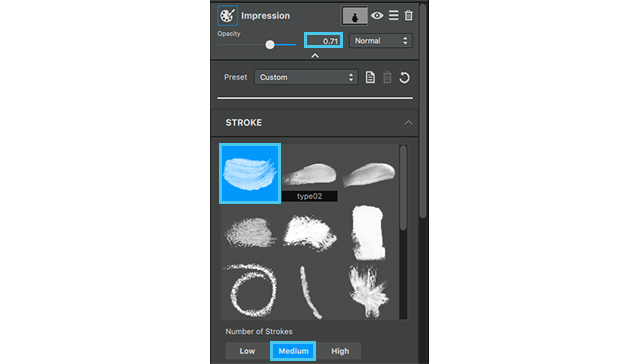
  1. Number of strokes: Medium
  2. Brush Size: .53
  3. Paint Volume: .18
  4. Paint Opacity: .50
  5. Stroke length: .29
  6. Spill: .29
  7. Smudge: .09
  8. Coverage: .74

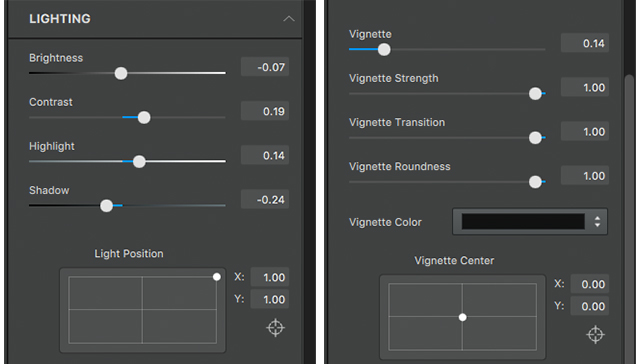
Next we will go into the lighting drop down at the bottom of this adjustment menu just to give the image a more vibrant feeling, like you often get with acrylic paint.

Lighting drop down:

  1. Brightness: .-07
  2. Contrast: .19
  3. Highlight: .14
  4. Shadow: -.24
  5. Vignette: .14

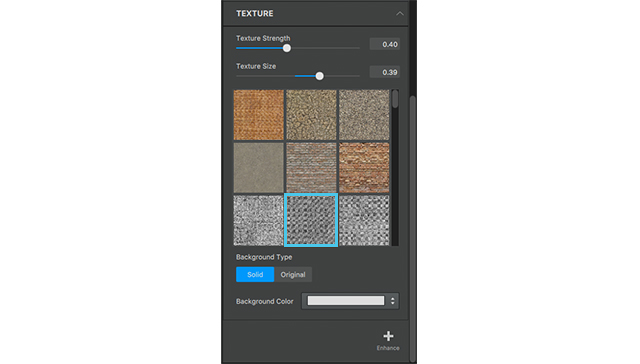
We are also going to add a little bit of texture to give this image a canvas feeling to play more of the idea of making this more and more like an acrylic painting in the background.

  1. The Texture we are going to select is in the 3rd row 2nd column.
  2. Texture Strength: .40
  3. Texture Size: .39

Woo!

Now that we are through all of that bring the opacity to .71, and lets move on to the next adjustment.

As you can see this brings an impressionistic feel to the background.
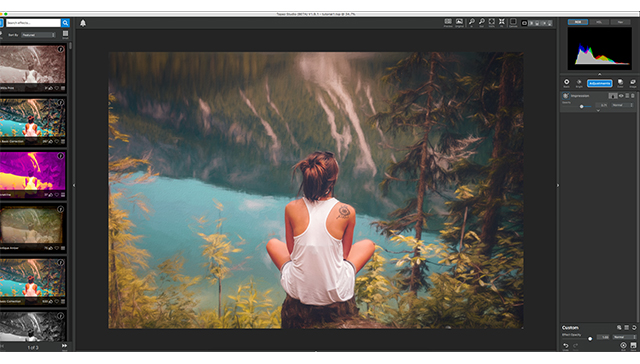
The colors still seem a little muted to me so we’re going to add an Ai ReMix adjustment to add a little bit a texture and bring some life to this color!

2. Ai ReMix

Go to adjustments menu, select AI Remix.
First thing we are going to do with this adjustment is copy the mask from the previous adjustment.

Click the mask icon on the previous adjustment, and select the hamburger menu (in-between the invert icon and the reset icon). Click this menu and select copy mask.
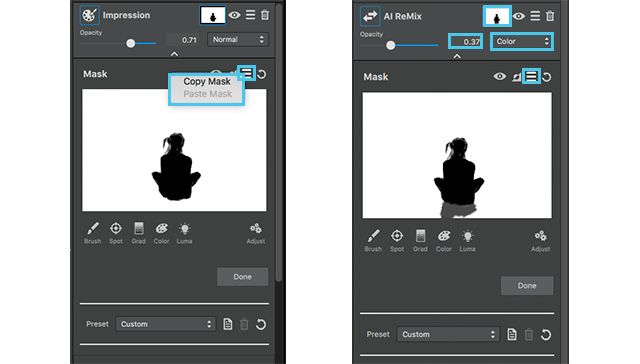
Close that adjustment but using the arrow at the top, and select the mask on the AI Remix. Go to the same hamburger menu on this adjustment and select past mask. This time we are going to add a little bit to this mask. Select a grey brush and brush in the tree stump, that way the Adjustment doesn’t fully affect this area.

After completing this close the masking menu, by clicking done, now we can go into the actual setting of this adjustment.
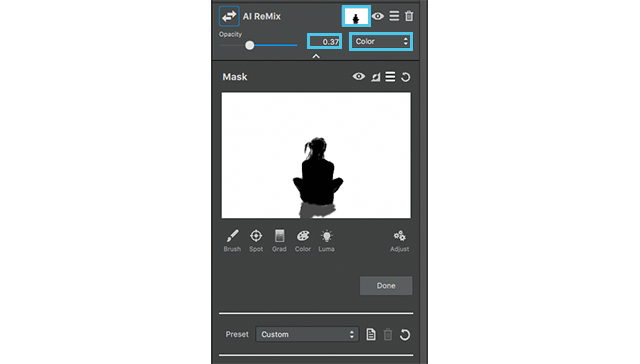
  1. The style we are going to choose is in the 5th row 2nd column, it looks like a pasture, click and apply. We aren’t going to do too much to the setting, so close the drop down menu and go into the opacity.
  2. We are going to set our opacity to .37 and the blending mode to color.
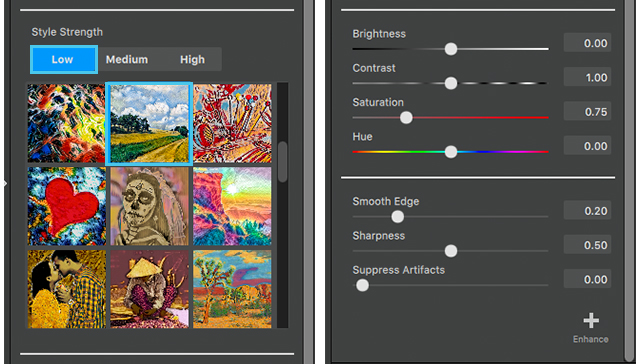
This allows Ai ReMix to adapt better to the colors of the image and the previous adjustments.

With the addition of the Ai ReMix the look of a textured background is a lot more evident in addition, the color of the water is more vibrant, the yellow of the trees pops (but isn’t distracting), and we even added a bit more green to the mountains across from her. I would still like to play with a few of the colors in the background, to make the seem more painterly, so we’re going to apply an HSL Color Tuning adjustment.

3. HSL Color Tuning

The Final Adjustment is an HSL Color tuning.

We are going to apply the mask from the first adjustment one more time, but since we already have it copied all we have to do is going into the mask menu on this layer, go to the hamburger menu and select past mask.
Now we get to play with the settings of the adjustment.
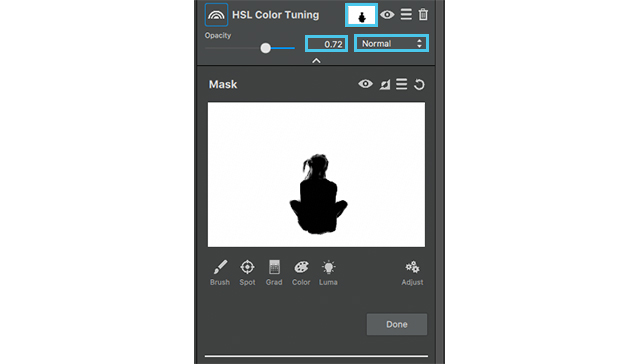
The colors we’re going to edit the overall color, yellow, aqua, and blue.
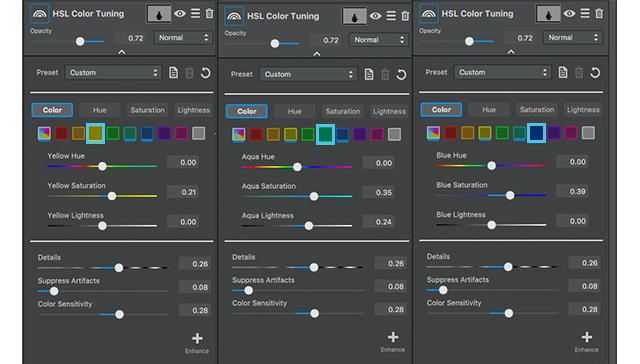
  1. Yellow Settings:
    Yellow Saturation: .21
  2. Aqua Settings:
    Aqua Saturation: .35
    Aqua Lightness: .24
  3. Blue Settings:
    Blue Saturation: .39
  4. Overall Settings:
    Overall Hue: .15
    Overall Saturation: .17
    Overall Lightness: -.07

No we are going to go into  the detail settings

  1. Details: .26
  2. Suppress artifacts: .08
  3. Color Sensitivity: .28
  4. Finally go to the opacity and bring it down to .72.
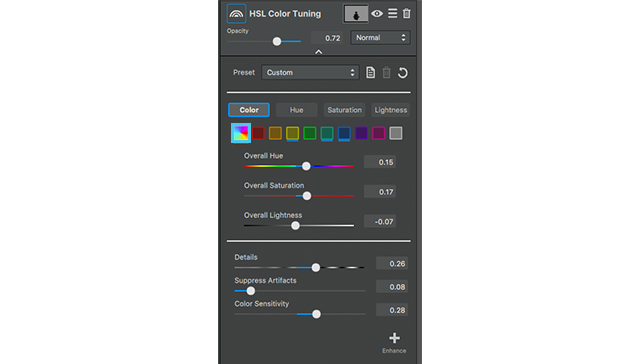
As you can see all these setting make the background mimic an almost impressionistic acrylic painting.
Additional tip:

Since we haven’t had a tutorial on digital frame either I thought I would take the time to add an extra tidbit to this top tip.

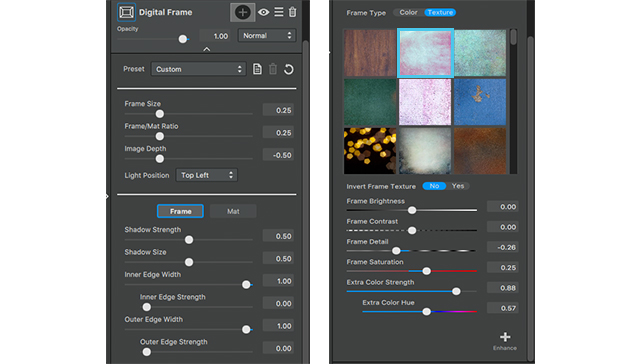
Now I’m going to do a pretty simplistic frame with the default setting because I like the way it fits the photo, but what I am going to go in an edit is the texture around the frame.
We are going to select 2nd texture out of the 1st row, this is actually one of my favorite textures in studio as a whole so I tend to lean toward it often.

After selecting this texture we are going to go down to the color setting, because I want the colors of the frame to play more off the blue of the water; and instead of picking a frame that mimics the color we’re going to edit the color of this frame to our liking.

So go to the frame color setting menu at the bottom and set them to the following:

  1. Frame brightness: -.22
  2. Frame contrast: .27
  3. Frame Detail: -.26
  4. Frame Saturation: .25
  5. Extra color strength: .88
  6. Extra Color Hue: .57

As you can see this just adds an extra touch to our image to give it more of a professional presentation
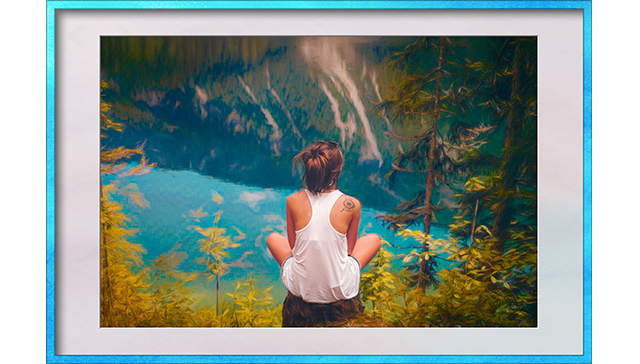
Well thats it for this Topaz Studio tutorial! Join us next time to see what you can learn.
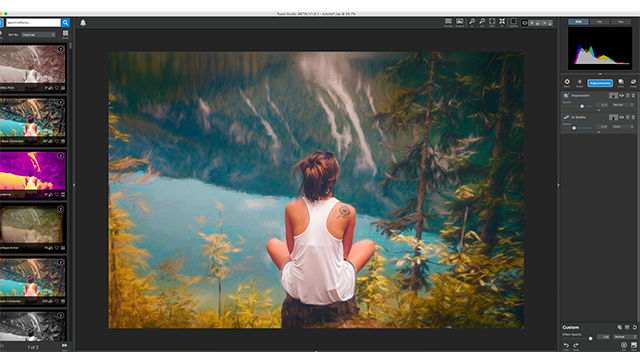
Posted on

Introducing Glow in Studio

[vc_row css=”.vc_custom_1499750369090{padding-top: 20px !important;padding-bottom: 20px !important;}”][vc_column][vc_column_text]

Created with: Topaz Studio version 1.6.6

[/vc_column_text][vc_empty_space][vc_row_inner][vc_column_inner width=”1/2″][vc_empty_space][vc_column_text]
Topaz Glow has been upgraded to “Glow in Studio” and has officially moved into Topaz Studio! Moving Glow into Topaz Studio will enable us to focus on the overall mission of improving the entire Topaz Labs workflow and experience from start to finish.[/vc_column_text][vc_empty_space][qodef_button size=”huge-full-width” type=”outline” target=”_self” icon_pack=”” font_weight=”” text=”Get Glow in Studio” link=”https://topazlabs.com/cart/?add-to-cart=234938″ margin=”5px” hover_color=”#ffffff” hover_background_color=”#000000″][qodef_button size=”huge-full-width” type=”outline” target=”_self” icon_pack=”” font_weight=”” text=”Learn More” margin=”5px” color=”#000000″ border_color=”#000000″ hover_background_color=”#0a0000″ hover_border_color=”#0a0101″ hover_color=”#ffffff” link=”https://topazlabs.com/glow-in-studio”][vc_column_text]

View System Requirements  | View Change Log

[/vc_column_text][/vc_column_inner][vc_column_inner width=”1/2″][vc_empty_space][vc_single_image image=”236156″ img_size=”full” onclick=”custom_link” link=”https://topazlabs.com/glow-in-studio”][/vc_column_inner][/vc_row_inner][/vc_column][/vc_row][vc_row disable_element=”yes”][vc_column][vc_single_image image=”236053″ img_size=”full” alignment=”center” onclick=”link_image”][vc_empty_space][vc_separator][vc_empty_space height=”15px”][vc_empty_space height=”15px”][/vc_column][/vc_row][vc_row disable_element=”yes”][vc_column][vc_empty_space height=”15px”][vc_video link=”https://youtu.be/rYztMpDLK1Y”][vc_empty_space height=”15px”][vc_separator][vc_empty_space height=”15px”][/vc_column][/vc_row][vc_row css=”.vc_custom_1499750369090{padding-top: 20px !important;padding-bottom: 20px !important;}”][vc_column][vc_empty_space][vc_column_text css=”.vc_custom_1513266096731{padding-top: 20px !important;}”]

Now inside Topaz Studio 

Glow in Studio combines the “Glow”, “HSL Color Tuning” and “Smudge” Pro Adjustments, and the “Vignette” free Adjustment. Going forward, you will access Glow from the Topaz Studio application, and it can now be accessed without a paid host editor (such as Photoshop and Lightroom). You can also access Glow directly from the Workflow Panel in Topaz Studio.  With this new name, we continue the journey to a more integrated, complete, and user-focused product.

You can access the Traditional Glow workflow through the workflow panel on the left under “Glow”. Or access any of the adjustments from the adjustment drop-down menu, and also, from the blue adjustment shortcut button on the workspace to the right.[/vc_column_text][vc_empty_space][vc_row_inner][vc_column_inner width=”1/2″][vc_column_text]

Before – Glow 2

[/vc_column_text][vc_single_image image=”236052″ img_size=”large” alignment=”center” onclick=”link_image”][vc_empty_space][/vc_column_inner][vc_column_inner width=”1/2″][vc_column_text]

After – Glow in Studio

[/vc_column_text][vc_single_image image=”236053″ img_size=”full” alignment=”center” onclick=”link_image”][vc_empty_space][/vc_column_inner][/vc_row_inner][vc_empty_space][vc_separator][vc_empty_space][vc_column_text]

Own the Plugin? Update For Free!

AS ALWAYS, if you already own Glow 2 then you will receive the update to Glow in Studio 100% free! You will need to download and install Topaz Studio (a free application) to use the latest version of Glow. If you are just getting started with Topaz Studio and want to update to the latest version of Glow in Studio, please follow the steps here: https://topazlabs.com/2017/11/updating-plugins-to-studio/[/vc_column_text][vc_empty_space][vc_separator][/vc_column][/vc_row][vc_row css=”.vc_custom_1499750369090{padding-top: 20px !important;padding-bottom: 20px !important;}”][vc_column][vc_empty_space height=”32″][vc_column_text]

Plugin Access

Keeping with Topaz Labs tradition, you can still launch Glow directly as a Photoshop plug-in. However, we’ve moved the entry into Topaz Studio, so you know you’re launching Glow in Studio.[/vc_column_text][vc_row_inner][vc_column_inner width=”1/2″][vc_column_text]

Before

Filter → Topaz Labs → Topaz Glow…

[/vc_column_text][vc_empty_space height=”15″][vc_single_image image=”111298″ img_size=”full” alignment=”center” onclick=”link_image”][/vc_column_inner][vc_column_inner width=”1/2″][vc_column_text]

After

Filter → Topaz Studio → Glow…

[/vc_column_text][vc_empty_space height=”15″][vc_single_image image=”111300″ img_size=”full” alignment=”center” onclick=”link_image”][/vc_column_inner][/vc_row_inner][vc_empty_space height=”32″][vc_column_text]

Can’t Find it in Photoshop?

If you do not see Glow listed in Photoshop, please follow the guidance at this article: https://help.topazlabs.com/hc/en-us/articles/115004587027[/vc_column_text][vc_empty_space height=”32″][vc_separator][/vc_column][/vc_row][vc_row css=”.vc_custom_1499750369090{padding-top: 20px !important;padding-bottom: 20px !important;}”][vc_column][vc_empty_space height=”32″][vc_column_text]

External Editor Access

You can still launch Glow from hosts that support external editors, like Lightroom. However, we’ve changed what you need to choose from that list just a bit, so you know you’re launching Glow in Studio! Please note the new location:[/vc_column_text][vc_row_inner][vc_column_inner width=”1/2″][vc_column_text]

Before

Photo → Edit In → Topaz Glow…

[/vc_column_text][vc_empty_space height=”15″][vc_single_image image=”236057″ img_size=”full” alignment=”center” onclick=”link_image”][/vc_column_inner][vc_column_inner width=”1/2″][vc_column_text]

After

Photo → Edit In → Topaz Studio…

[/vc_column_text][vc_empty_space height=”15″][vc_single_image image=”236056″ img_size=”full” alignment=”center” onclick=”link_image”][/vc_column_inner][/vc_row_inner][vc_empty_space height=”32″][vc_column_text]

Can’t Find it in Your External Editor?

If you do not see Topaz Studio listed in your host editor (like Lightroom), please follow the guidance at this article: https://help.topazlabs.com/hc/en-us/articles/115004747368[/vc_column_text][vc_empty_space height=”32″][vc_separator][vc_empty_space height=”32″][vc_column_text]

Keep Your Presets

Presets/Effects you have created in Detail 2.0.5 will be available in Detail in Studio, simply select the Import Effects option from the Help menu:[/vc_column_text][vc_empty_space height=”32″][vc_single_image image=”111330″ img_size=”full” alignment=”center” onclick=”link_image”][vc_empty_space][vc_separator][/vc_column][/vc_row][vc_row][vc_column][vc_empty_space][vc_column_text]

Download Topaz Studio Free

[/vc_column_text][vc_column_text]Detail is now exclusively available within Topaz Studio!

Don’t have Topaz Studio? Topaz Studio is free to download! You can get it now by using the links below. If you need more information about Topaz Studio, check out this overview: Introducing Topaz Studio

Topaz Studio is a simple to use editing platform with Topaz Labs’ powerful acclaimed photo enhancement technology. It works as a standalone editor, a plugin within Lightroom and Photoshop, as well as a host application for your other Topaz plugins. It is free to use the program, all 1-click effects, and 10 Adjustments.[/vc_column_text][vc_empty_space height=”15px”][vc_row_inner][vc_column_inner width=”1/2″][vc_btn title=”Windows” shape=”square” color=”primary” align=”center” button_block=”true” link=”url:https%3A%2F%2Ftopazlabs.s3.amazonaws.com%2Ftopazstudio_online_installer.exe|||”][/vc_column_inner][vc_column_inner width=”1/2″][vc_btn title=”Mac” shape=”square” color=”primary” align=”center” button_block=”true” link=”url:https%3A%2F%2Ftopazlabs.s3.amazonaws.com%2Ftopazstudio_online_installer.dmg|||”][/vc_column_inner][/vc_row_inner][/vc_column][/vc_row]

Posted on 1 Comment

Introducing Simplify in Studio

[vc_row css=”.vc_custom_1499750369090{padding-top: 20px !important;padding-bottom: 20px !important;}”][vc_column][vc_column_text]

Created with: Topaz Studio version 1.5.3

[/vc_column_text][vc_column_text]

[/vc_column_text][vc_empty_space][vc_column_text]

Introducing Simplify in Studio

Topaz Simplify has been upgraded to “Simplify in Studio” and has officially moved into Topaz Studio! MovingSimplify into Topaz Studio will enable us to focus on the overall mission of improving the entire Topaz Labs workflow and experience from start to finish.[/vc_column_text][vc_empty_space][vc_single_image image=”175019″ img_size=”full” alignment=”center”][vc_empty_space height=”15px”][vc_separator][vc_single_image image=”192282″ img_size=”full” onclick=”custom_link” link=”https://topazlabs.com/cart/?add-to-cart=174596″][vc_separator][vc_empty_space height=”15px”][/vc_column][/vc_row][vc_row disable_element=”yes” css=”.vc_custom_1510069640733{padding-top: 20px !important;padding-bottom: 20px !important;}”][vc_column][vc_row_inner][vc_column_inner width=”1/2″][vc_single_image image=”111150″ img_size=”large” alignment=”center” onclick=”link_image”][vc_column_text]

Before – Detail Plugin

[/vc_column_text][vc_empty_space][/vc_column_inner][vc_column_inner width=”1/2″][vc_single_image image=”111161″ img_size=”large” alignment=”center” onclick=”link_image”][vc_column_text]

After – Detail in Studio

[/vc_column_text][vc_empty_space][/vc_column_inner][/vc_row_inner][vc_empty_space][vc_column_text css=”.vc_custom_1509045295226{padding-top: 20px !important;}”]

Now inside Topaz Studio 

Topaz Simplify has been broken into the “Abstraction”, “Edge Exposure” and “QuadTone” Adjustments. Going forward, you will access Simplify from the Topaz Studio application. Simplify can now be accessed without a paid host editor (such as Photoshop and Lightroom), AND you can access Simplify directly from the Workflow Panel in Topaz Studio.  With this new name, we begin the journey to a more integrated, complete, and user-focused product.[/vc_column_text][vc_empty_space][vc_single_image image=”111216″ img_size=”full” alignment=”center” onclick=”link_image”][vc_column_text css=”.vc_custom_1509045344841{padding-top: 20px !important;}”]

Detail Adjustment In Studio

The Detail Plugin consists of the “Abstraction”, “Edge Exposure” and “QuadTone” Adjustments. We have added Simplify to several different areas inside Topaz Studio to make it more accessible to you. You can access the Traditional Simplify workflow through the workflow panel on the left under “Specialty”. Or access either of the new adjustments from the adjustment drop-down menu, and also, from the blue adjustment shortcut button on the workspace to the right.[/vc_column_text][vc_empty_space][vc_single_image image=”111227″ img_size=”full” alignment=”center” onclick=”link_image”][vc_separator][/vc_column][/vc_row][vc_row disable_element=”yes” css=”.vc_custom_1510069649711{padding-top: 20px !important;padding-bottom: 20px !important;}”][vc_column][vc_column_text]

Faster Speed

The Upgrade from Simplify 4 to Simplify in Studio comes with some awesome new performance and processing upgrades, a new interface, as well as new features. Depending on your hardware configuration, Simplify in Studio now performs as much as 100x faster.[/vc_column_text][vc_row_inner][vc_column_inner width=”1/2″][vc_single_image image=”111318″ img_size=”full” alignment=”center” onclick=”link_image”][vc_column_text]

Before – Detail Plugin

[/vc_column_text][vc_empty_space][/vc_column_inner][vc_column_inner width=”1/2″][vc_single_image image=”111320″ img_size=”full” alignment=”center” onclick=”link_image”][vc_column_text]

After – Detail in Studio

[/vc_column_text][vc_empty_space][/vc_column_inner][/vc_row_inner][vc_column_text]

Large Detail

With the latest update to Detail in Studio, we were able to improve the ability to target large structures in any image more accurately. Before, Detail 3.2.0 was targeting, what were considered “large details” with a fixed pixel size and not relating this “large detail” to the overall size of the image. Now, we are able to target the larger detail structure porportional to the overall image size, which will allow for more control over the your targeted detail structure to better enhance the overall style of your image.[/vc_column_text][vc_row_inner][vc_column_inner width=”1/2″][vc_single_image image=”113048″ img_size=”full” alignment=”center” onclick=”link_image”][vc_column_text]

Before – Detail Plugin

[/vc_column_text][vc_empty_space][/vc_column_inner][vc_column_inner width=”1/2″][vc_single_image image=”113062″ img_size=”full” alignment=”center” onclick=”link_image”][vc_column_text]

After – Detail in Studio

[/vc_column_text][vc_empty_space][/vc_column_inner][/vc_row_inner][vc_empty_space][vc_column_text]

Channel Mixer

One of the new controls introduced in Detail in Studio is the Channel Mixer found under the adjustment menu. The Channel Mixer is an expanded control over RGB(Red, Green, Blue color channels) be able to adjust the brightness by conbining the contribution of RGB in an image.[/vc_column_text][vc_empty_space][/vc_column][/vc_row][vc_row disable_element=”yes” css=”.vc_custom_1510069656290{padding-top: 20px !important;padding-bottom: 20px !important;}”][vc_column][vc_single_image image=”111360″ img_size=”full” alignment=”center” onclick=”link_image”][vc_empty_space][/vc_column][/vc_row][vc_row disable_element=”yes” css=”.vc_custom_1510069662545{padding-top: 20px !important;padding-bottom: 20px !important;}”][vc_column][vc_separator][vc_empty_space height=”32″][vc_column_text]

Plugin Access

Keeping with Topaz Labs tradition, you can still launch Detail directly as a Photoshop plug-in. However, we’ve moved the entry into Topaz Studio, so you know you’re launching Detail in Studio..[/vc_column_text][vc_row_inner][vc_column_inner width=”1/2″][vc_column_text]

Before

Filter → Topaz Labs → Topaz Detail…

[/vc_column_text][vc_empty_space height=”15″][vc_single_image image=”111298″ img_size=”full” alignment=”center” onclick=”link_image”][/vc_column_inner][vc_column_inner width=”1/2″][vc_column_text]

After

Filter → Topaz Studio → Detail…

[/vc_column_text][vc_empty_space height=”15″][vc_single_image image=”111300″ img_size=”full” alignment=”center” onclick=”link_image”][/vc_column_inner][/vc_row_inner][vc_empty_space height=”32″][vc_empty_space height=”32″][vc_column_text]

Keep Your Presets

Presets/Effects you have created in Detail 2.0.5 will be available in Detail in Studio, simply select the Import Effects option from the Help menu:[/vc_column_text][vc_empty_space height=”32″][vc_single_image image=”111330″ img_size=”full” alignment=”center” onclick=”link_image”][vc_separator][/vc_column][/vc_row][vc_row][vc_column][vc_empty_space][vc_column_text]

Download Topaz Studio Free

[/vc_column_text][vc_column_text]Simplify is now exclusively available within Topaz Studio!

Don’t have Topaz Studio? Topaz Studio is free to download! You can get it now by using the links below. If you need more information about Topaz Studio, check out this overview: Introducing Topaz Studio

Topaz Studio is a simple to use editing platform with Topaz Labs’ powerful acclaimed photo enhancement technology. It works as a standalone editor, a plugin within Lightroom and Photoshop, as well as a host application for your other Topaz plugins. It is free to use the program, all 1-click effects, and 11 Adjustments.[/vc_column_text][vc_empty_space height=”15px”][vc_row_inner][vc_column_inner width=”1/2″][vc_btn title=”Windows” shape=”square” color=”primary” align=”center” button_block=”true” link=”url:https%3A%2F%2Ftopazlabs.s3.amazonaws.com%2Ftopazstudio_online_installer.exe|||”][/vc_column_inner][vc_column_inner width=”1/2″][vc_btn title=”Mac” shape=”square” color=”primary” align=”center” button_block=”true” link=”url:https%3A%2F%2Ftopazlabs.s3.amazonaws.com%2Ftopazstudio_online_installer.dmg|||”][/vc_column_inner][/vc_row_inner][/vc_column][/vc_row][vc_row][vc_column][vc_column_text]

[/vc_column_text][/vc_column][/vc_row]