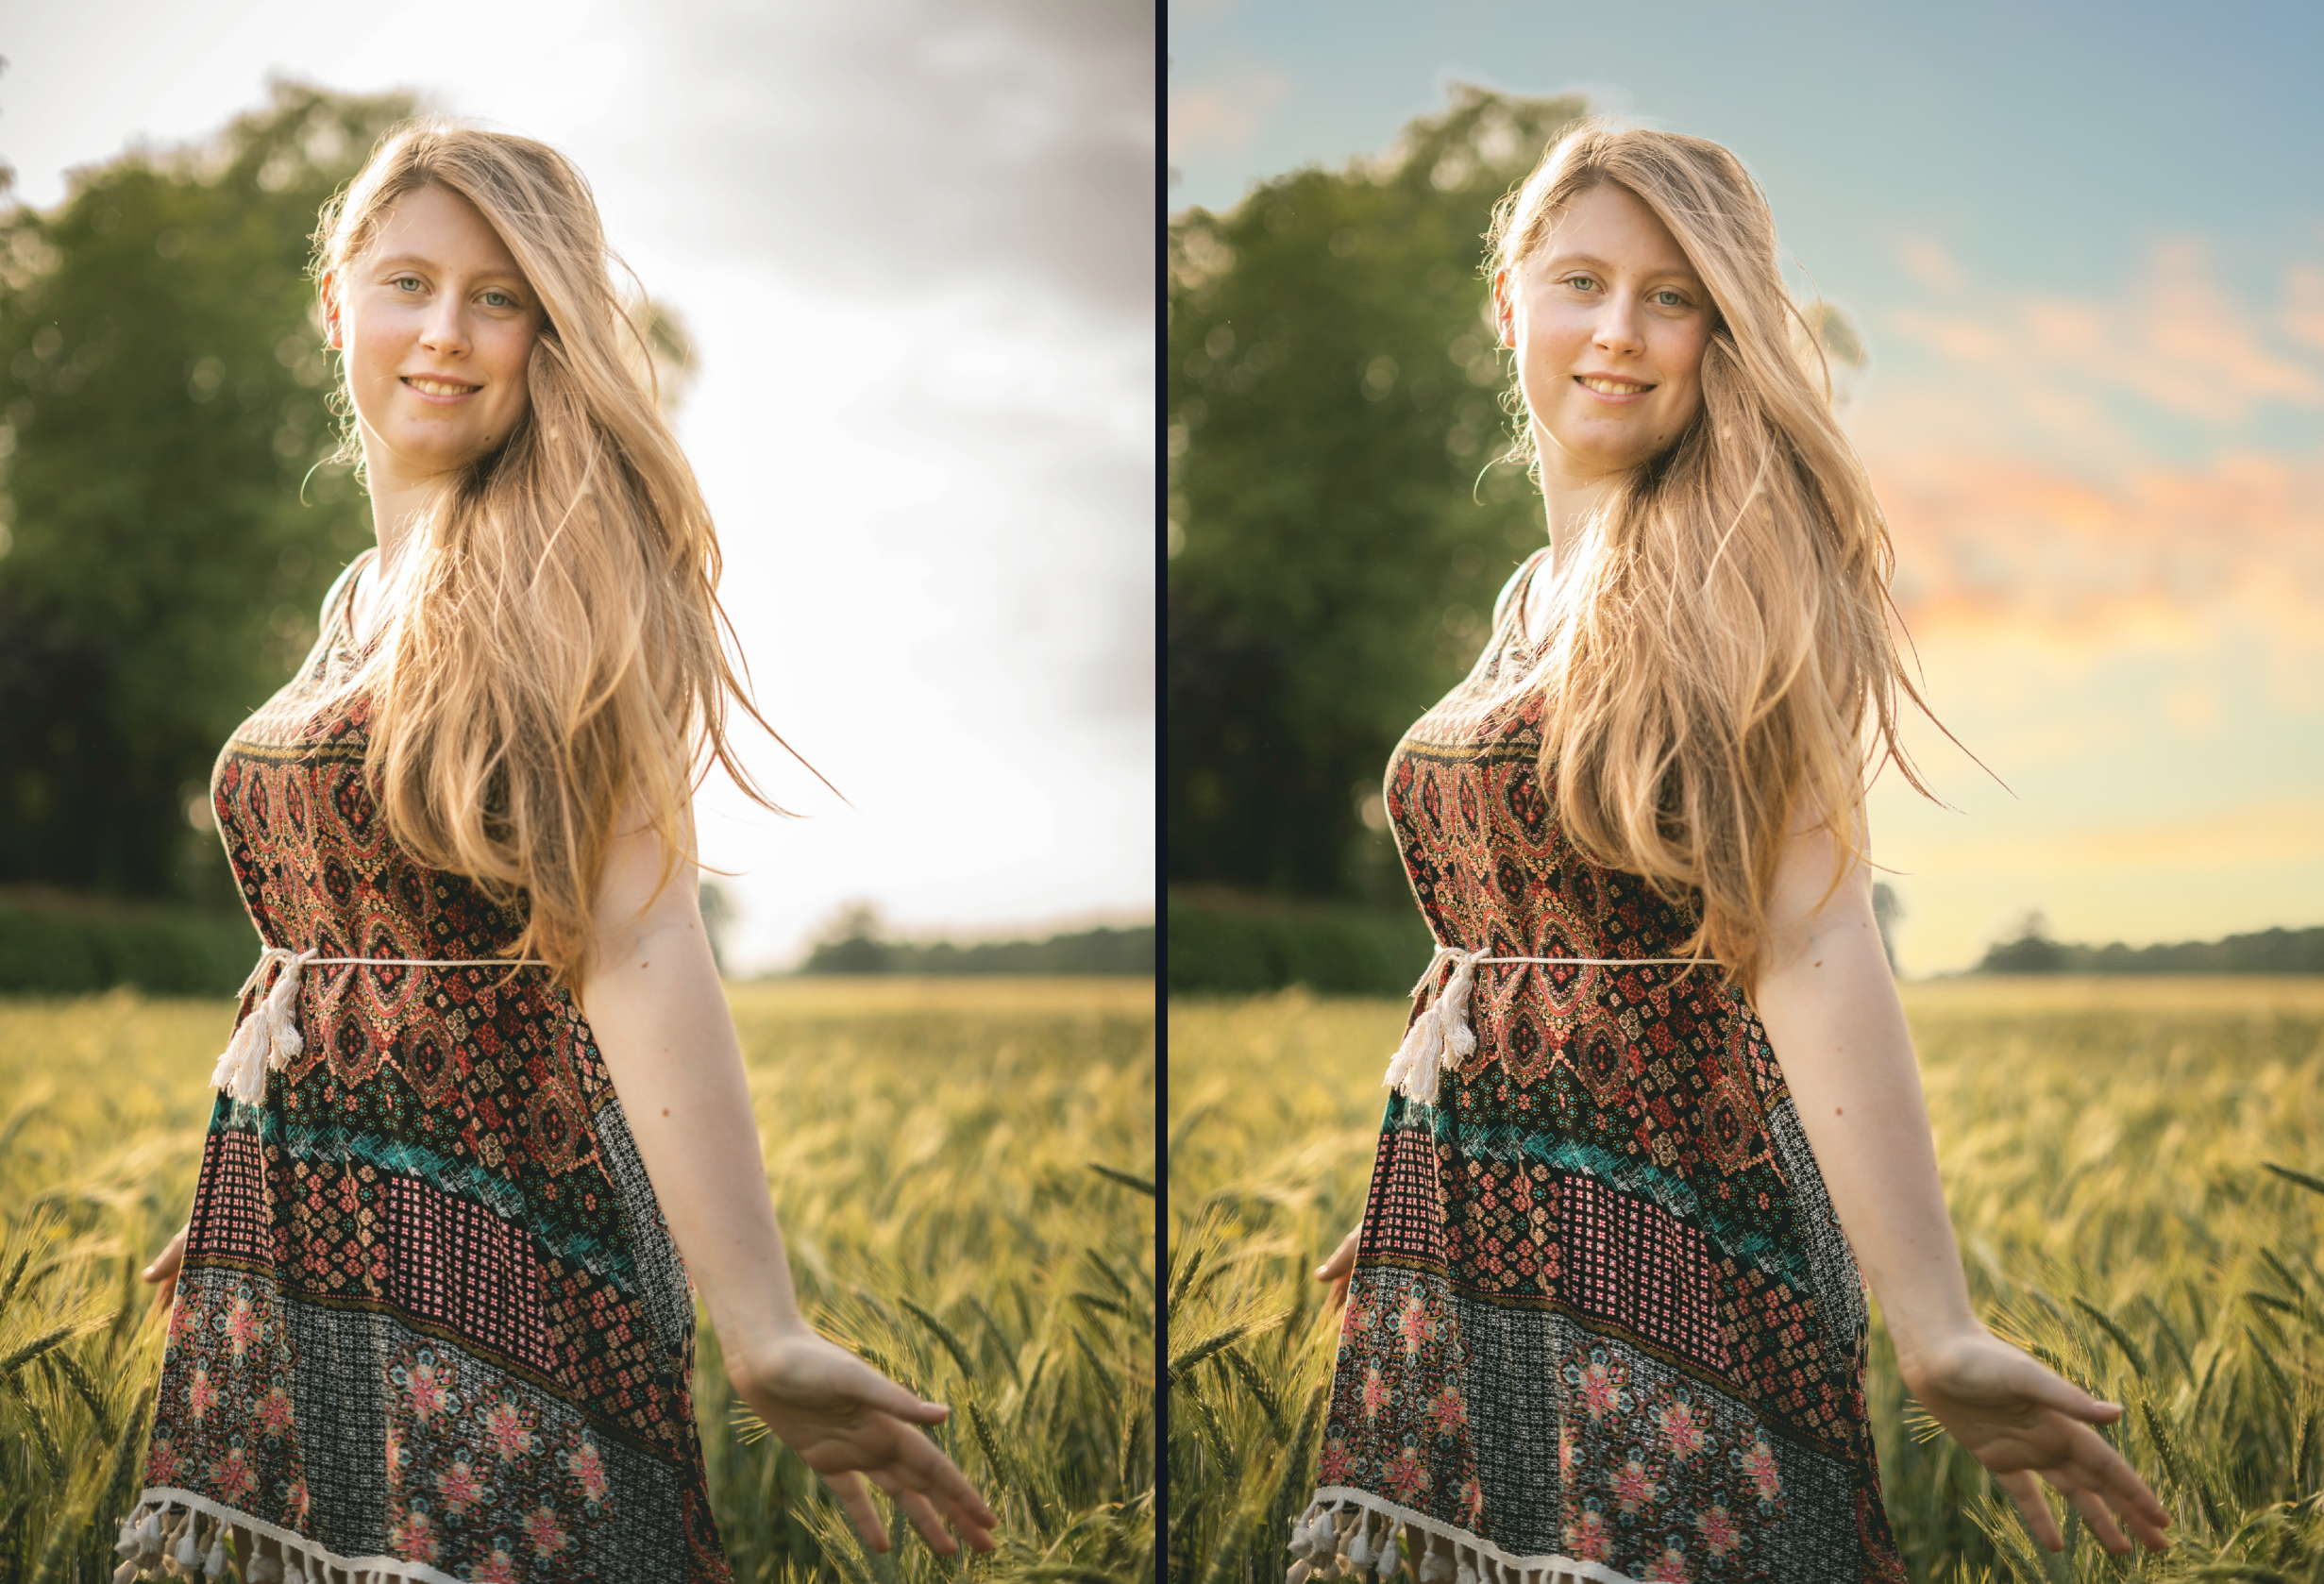
How to quickly mask and replace the background in your photos


Replacing the background of an image to create a composite photograph can result in stunning, creative works of art. Whether you want to completely replace the sky to change the mood of your photo, or totally isolate objects for your graphic design projects, your first step will be to create a mask.
A mask simply helps you select a portion of your image. After masking your image, you can can easily change background colors, make transparent images, or replace portions of your image without ever deleting a pixel from your original photo. Masking can require a lot of precision skill and effort to carefully refine complicated selections, like hair and fur.
If you’ve ever tried to replace the background of an image in Photoshop, you know how tedious this process can be. Even with Photoshop’s magic wand and quick mask tools, you’ll still find yourself zooming in at 1200% and carefully clicking away pixel-by-pixel to get a perfect mask.
The problem with masking in Photoshop is that isolating fine objects is time-consuming. You’ll need to switch through a variety of brushes and ideally use a digital drawing tablet to perfectly fade your brush strokes.
In the image above, you can see what you have to work with when you mask an image in Photoshop. Attempting to isolate the background from the model’s individual strands of hair could take hours to get just right.
Mask AI solves the problem of complicated image masks. Using the power of sophisticated neural networks, Mask AI can identify the content of your photo and make the most accurate masks in mere seconds. Finally, you can let your computer do all the complicated masking work for you, so you can complete your project in less time.
All it takes is a quick application of the trimap to compute a mask. Paint a blue line where you’d like the application to “compute” the mask, and drop a red paint bucket on the area you’d like removed. It’s that simple.
It only takes a moment for Mask AI to compute your mask, and just like that, your background is removed and details are preserved.
If necessary, you can tidy up the brush strokes, or refine the mask using sliders like Edge Strength and Foreground Recovery to get your mask just how you want it.
Mask AI has background replacement built-in, so you can finish your project without ever leaving the app. You can easily apply a solid color background, blur the existing background, or import a new background altogether.
Try Mask AI totally free for 30-days, no credit card or commitment required. Mask AI works as a standalone application for Mac or PC, or as a Photoshop plugin to help keep your workflow running smoothly.
Buy Mask AI today and get 15% off with coupon code MASKBETTER
The new Topaz Studio 2 features intuitive and easy-to-use masking tools! Choose from five types of masking or combine masking options for perfectly masked adjustments. Here is a quick run-through of the five masking tools in Topaz Studio 2.
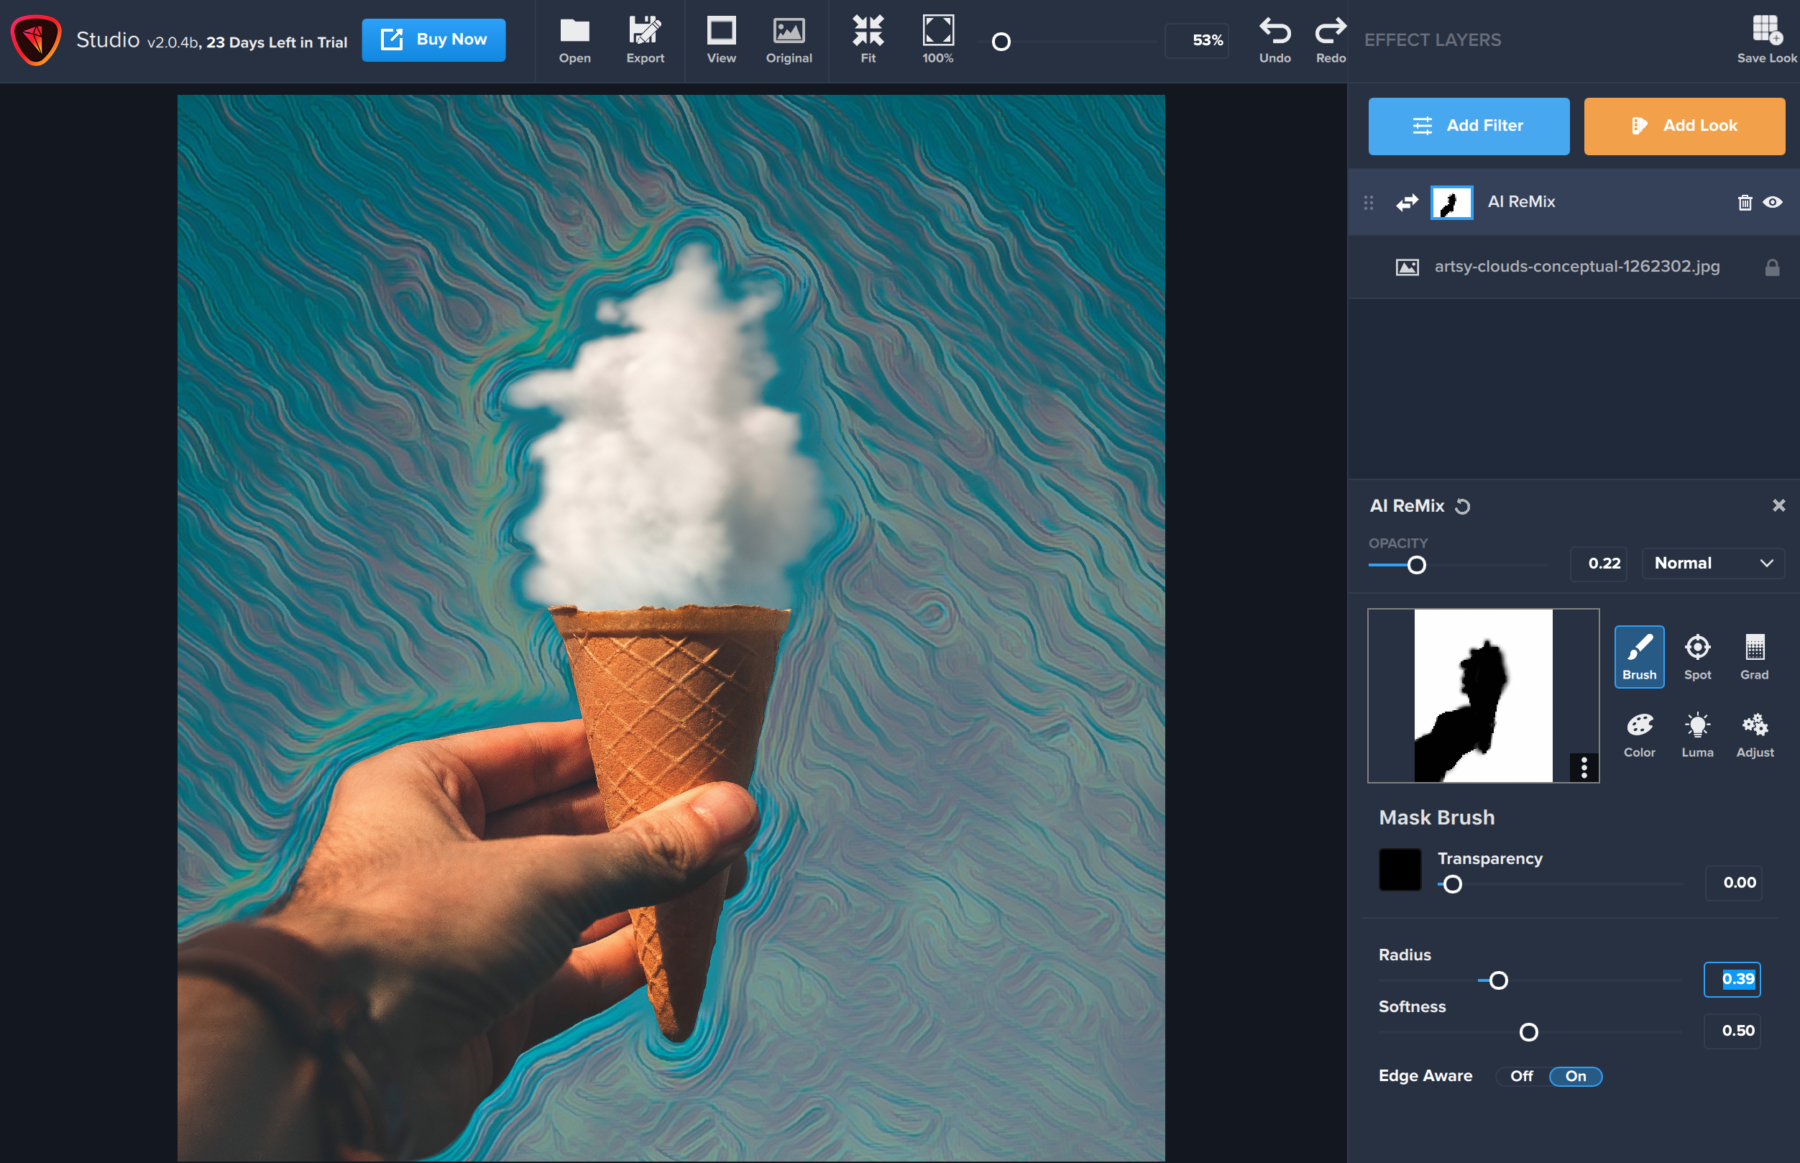
To get started, I’ve imported an image and applied AI Remix to this achieve an artistic background on a creatively staged photo.
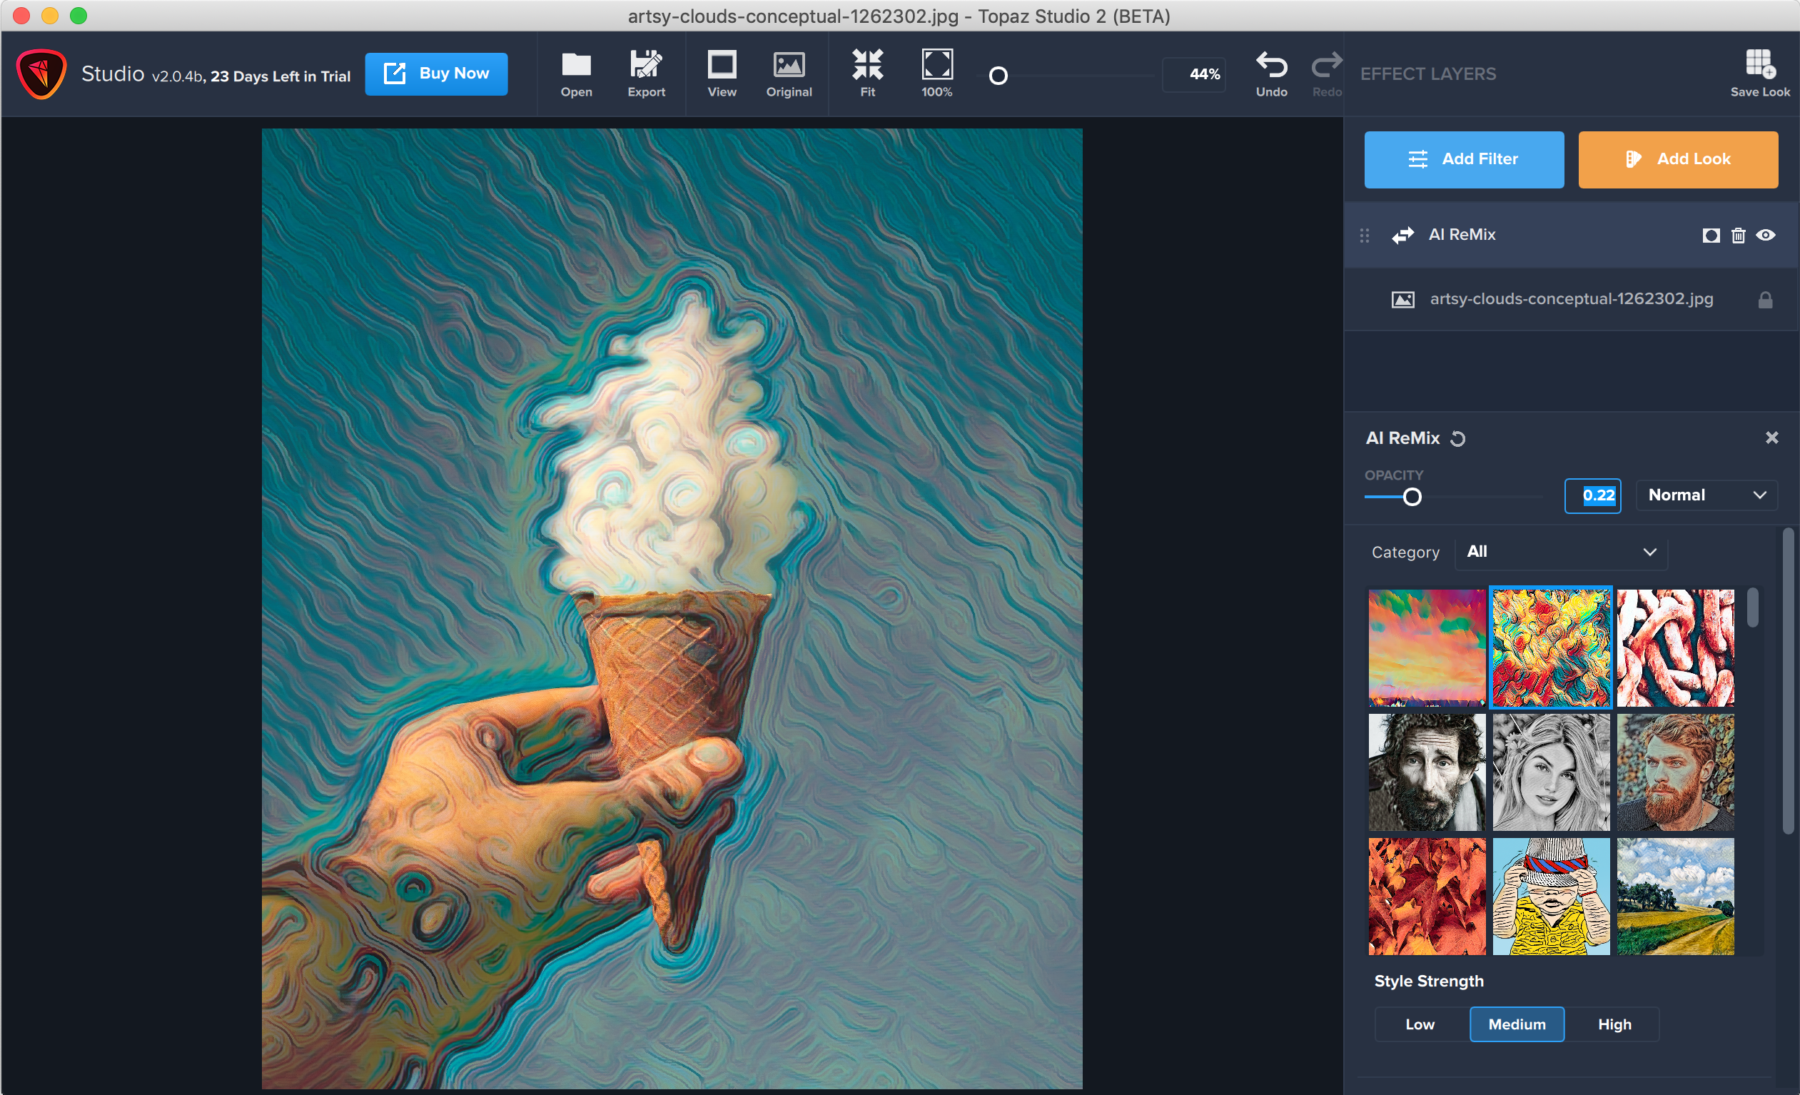
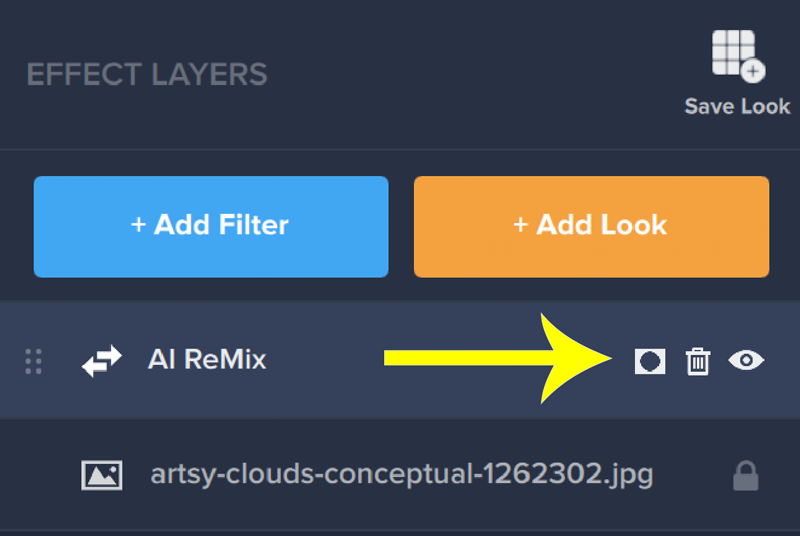
I want to keep the cloud and ice cream cone but keep the swirl background intact, so this is where masking will come in handy. To access the masking options, click the square and circle icon beside the Effect Layer name. See the illustration below!
Below you’ll see the different masking options within Topaz Studio 2.
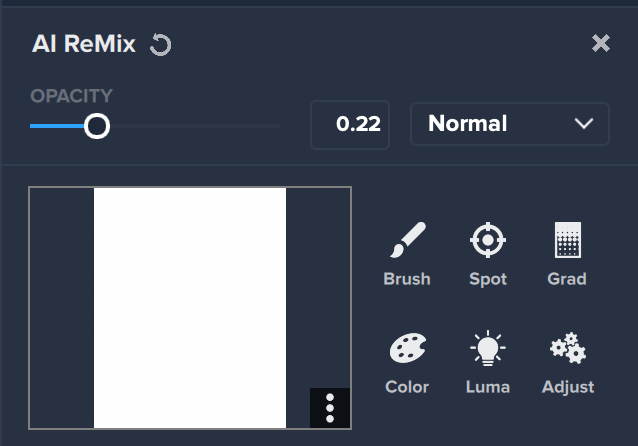
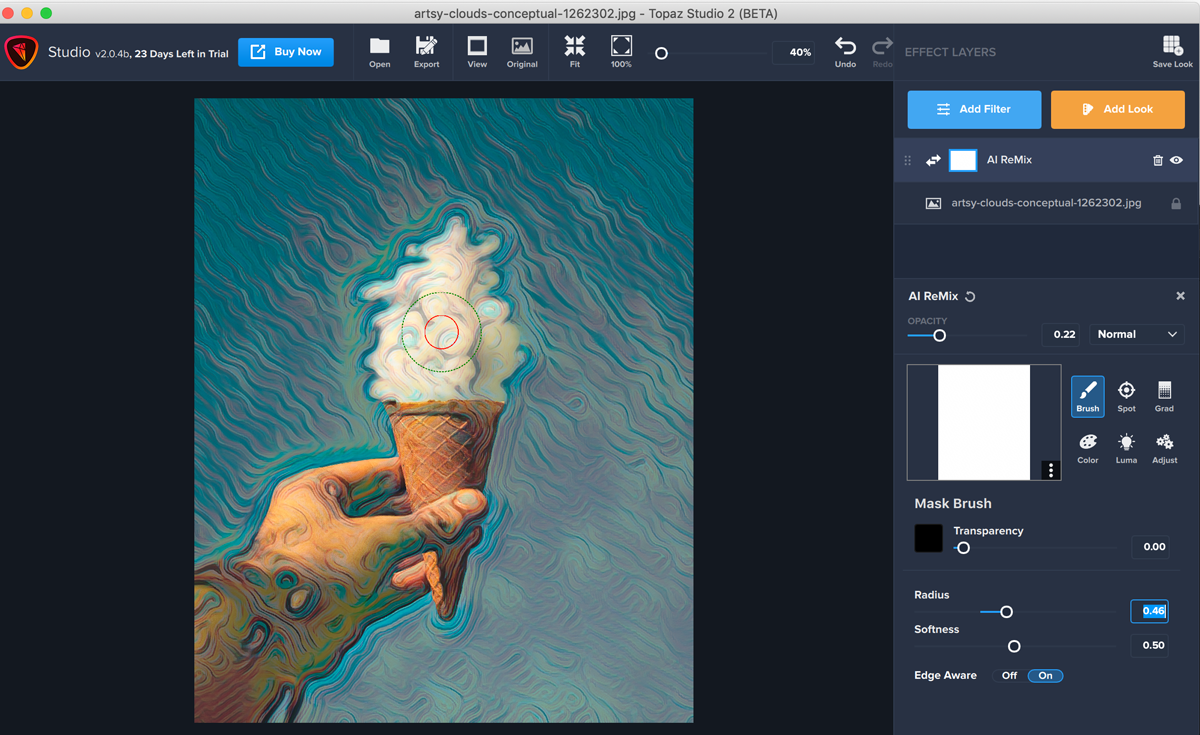
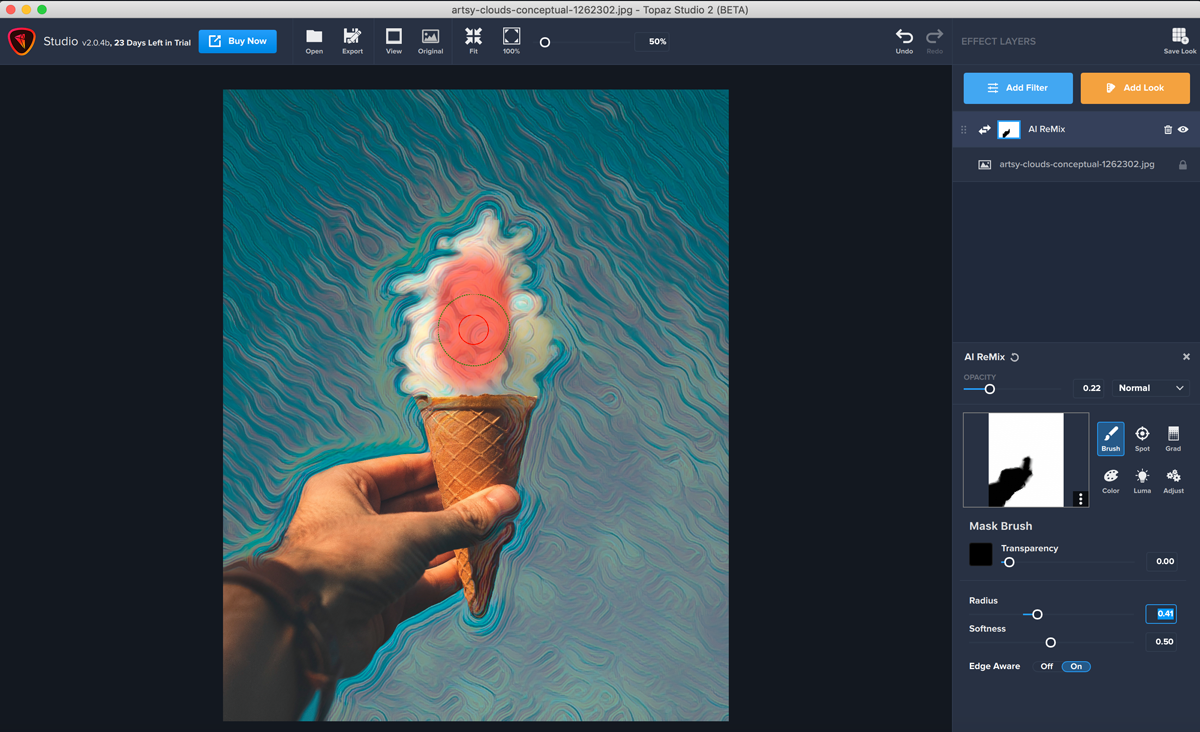
Brush masking allows you to apply or remove the applied effect in a more fluid way. You can selectively paint out where you’d like to remove the effect. Here are a few pointers on the Brush Mask panel: The Transparency slider controls the opacity of your brush mask from 0.00 to 1.00. The Radius slider controls the overall size, while the Softness slider controls edge softness.
Depending on how long you’ve been around the Topaz community, Edge Aware may not be new to you or may be completely unfamiliar. This unique technology allows you to have more freedom in masking: you don’t have to be excruciatingly perfect with your drawing technique, because our technology will intelligently identify edges and perfect your mask accordingly! All you have to do is keep the edge that you want to be detected between the red inner circle and the green outer circle. Our technology will automatically detect the edge. You’ll also see the Edge Aware tool featured throughout the other masking options in Topaz Studio 2.
Depending on the content of your image and the effect applied, the spot masking tool may be the quickest one for you.
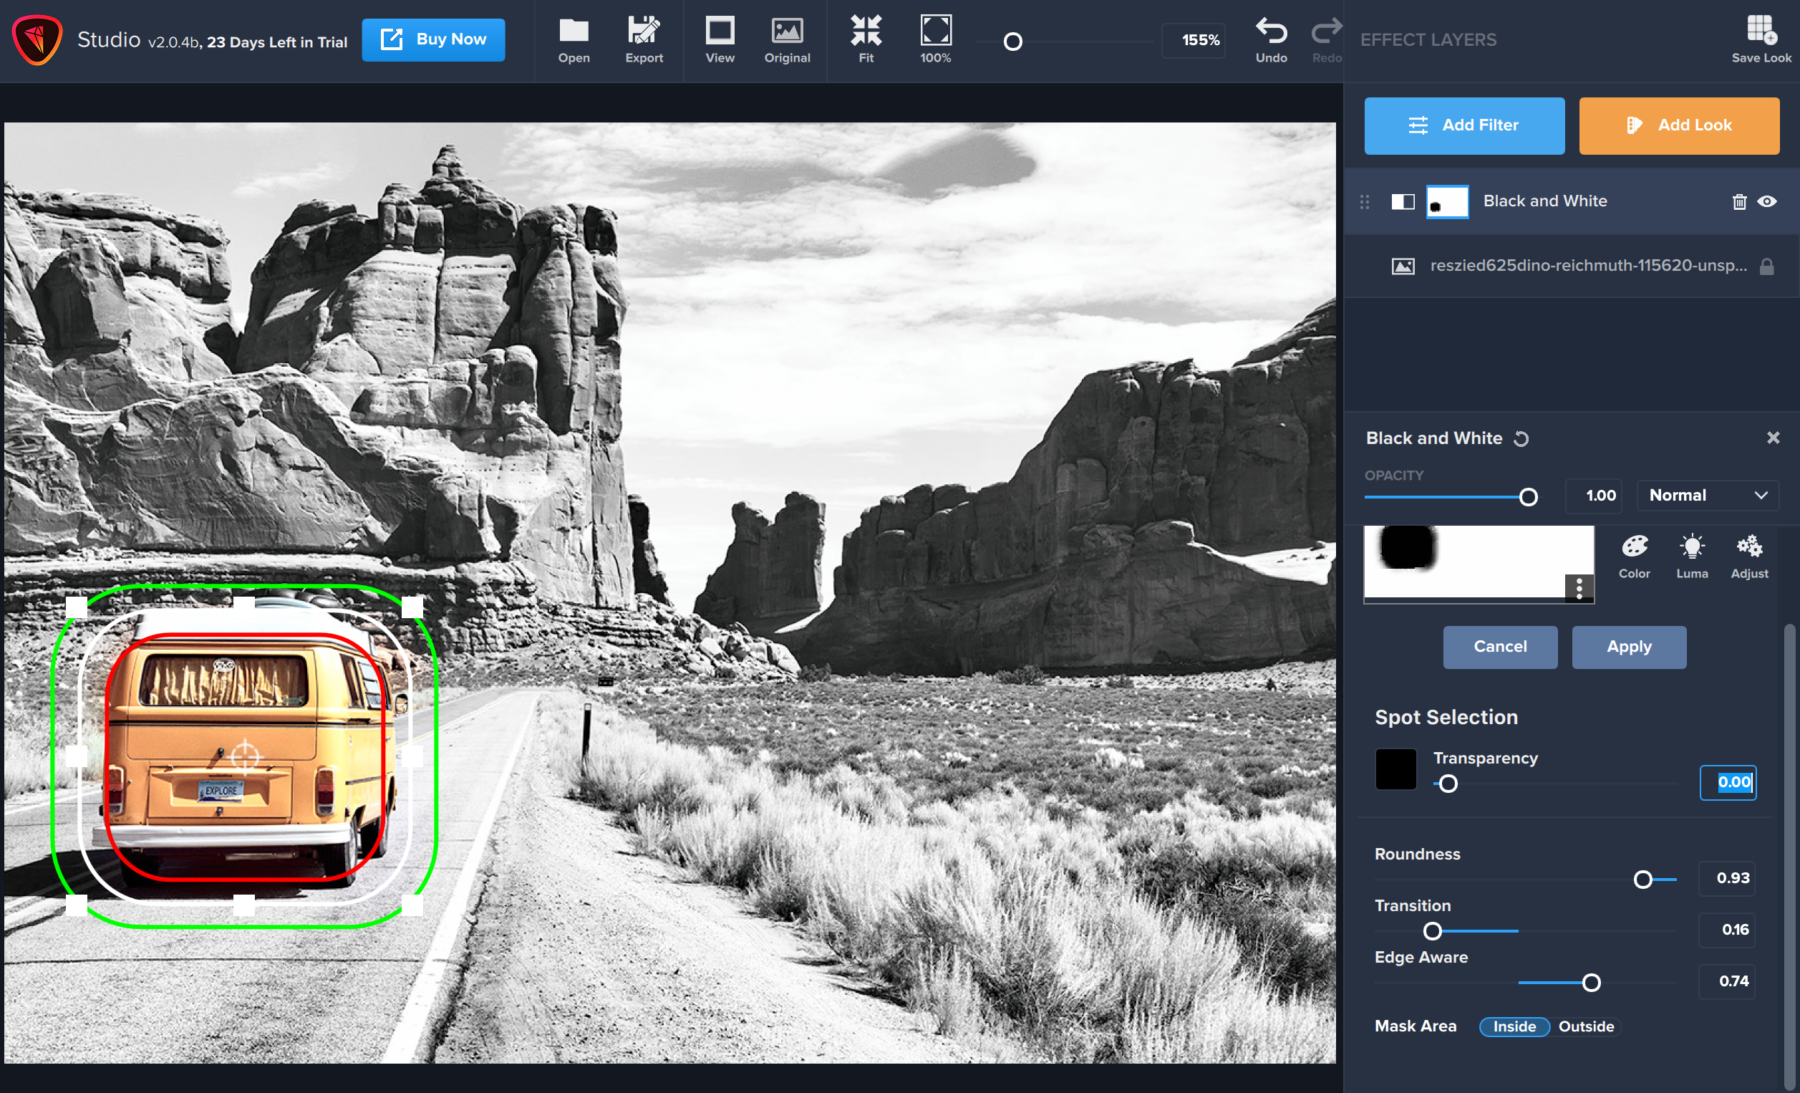
In this example image, I applied the Black & White effect from the Effect Layer panel. I want to keep the subject and her colorful sweater my focal point, so let’s try a spot mask.
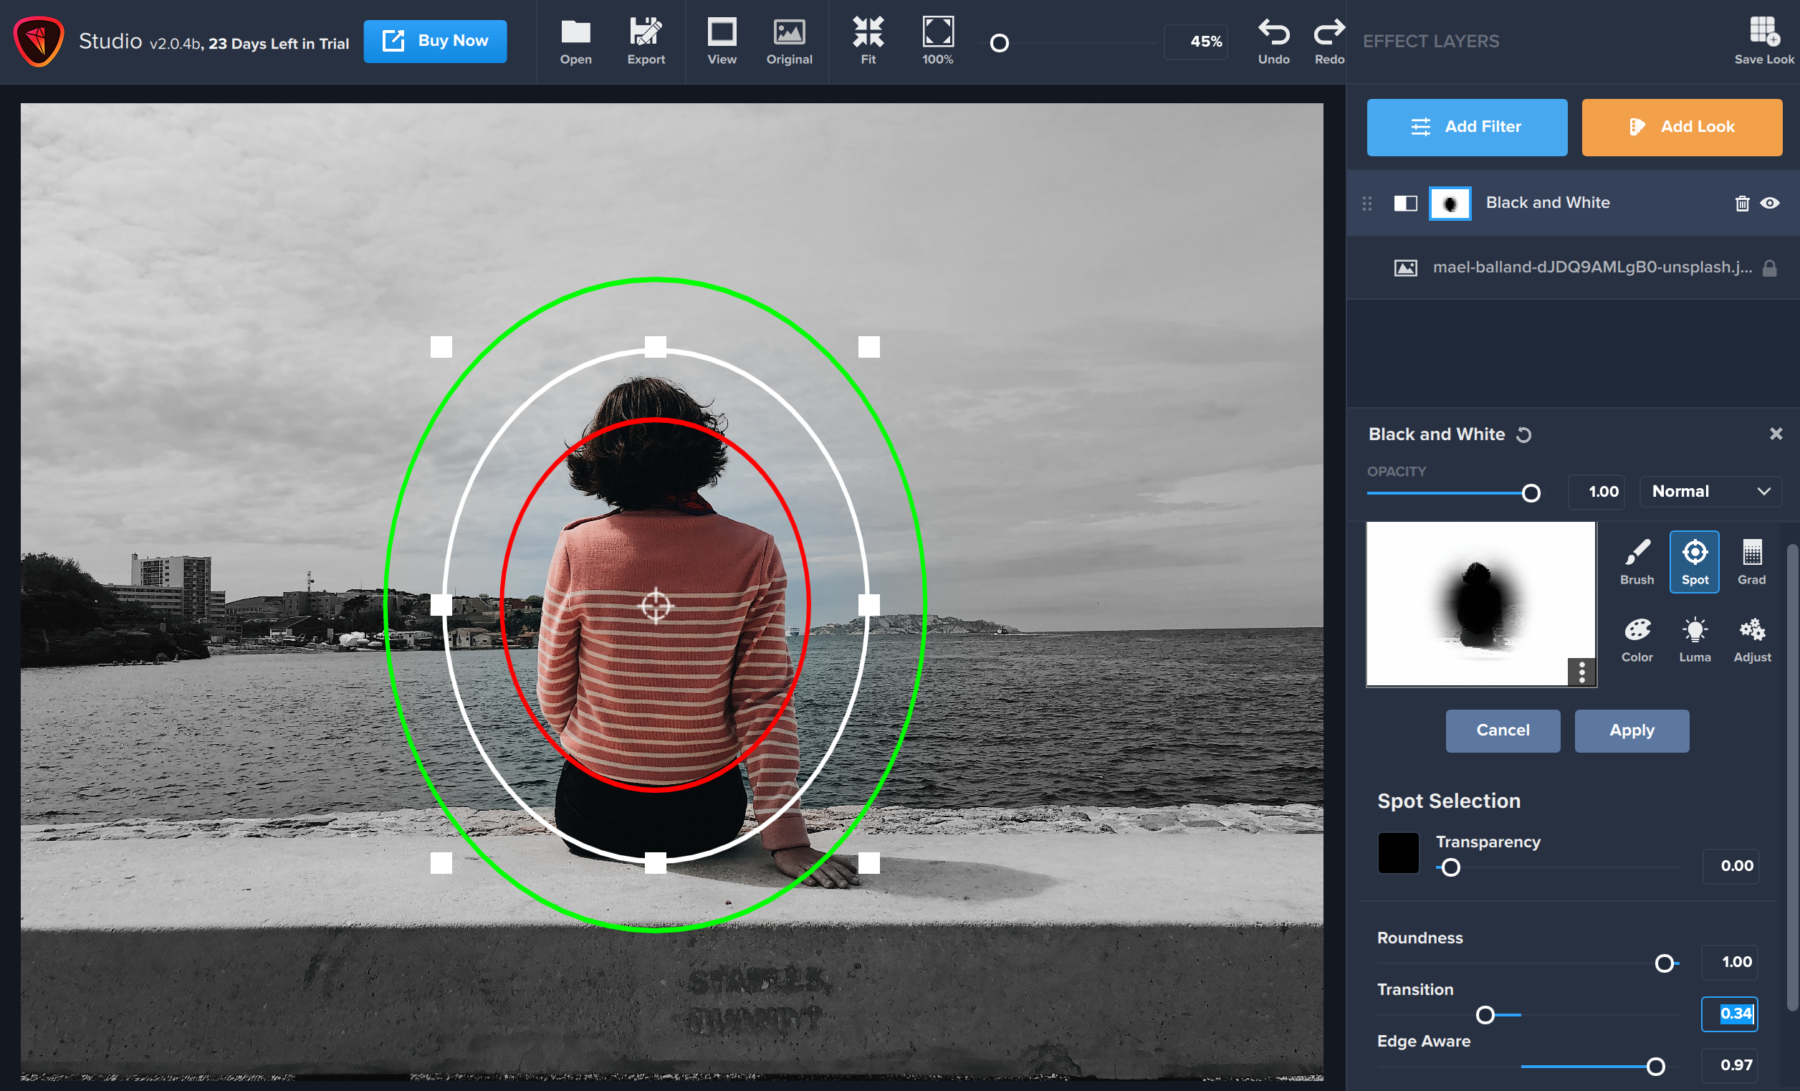
With a combination of the Roundness and Transition sliders, you can change the shape of your spot mask like below to better accommodate your mask subject.
Ideal for landscapes or anywhere you want to create a natural transition, gradient masking is a powerful tool to have in your masking toolbox. In this example image, I’d like to selectively apply the Radiance effect layer to just the stars in the sky and not the house on the horizon.
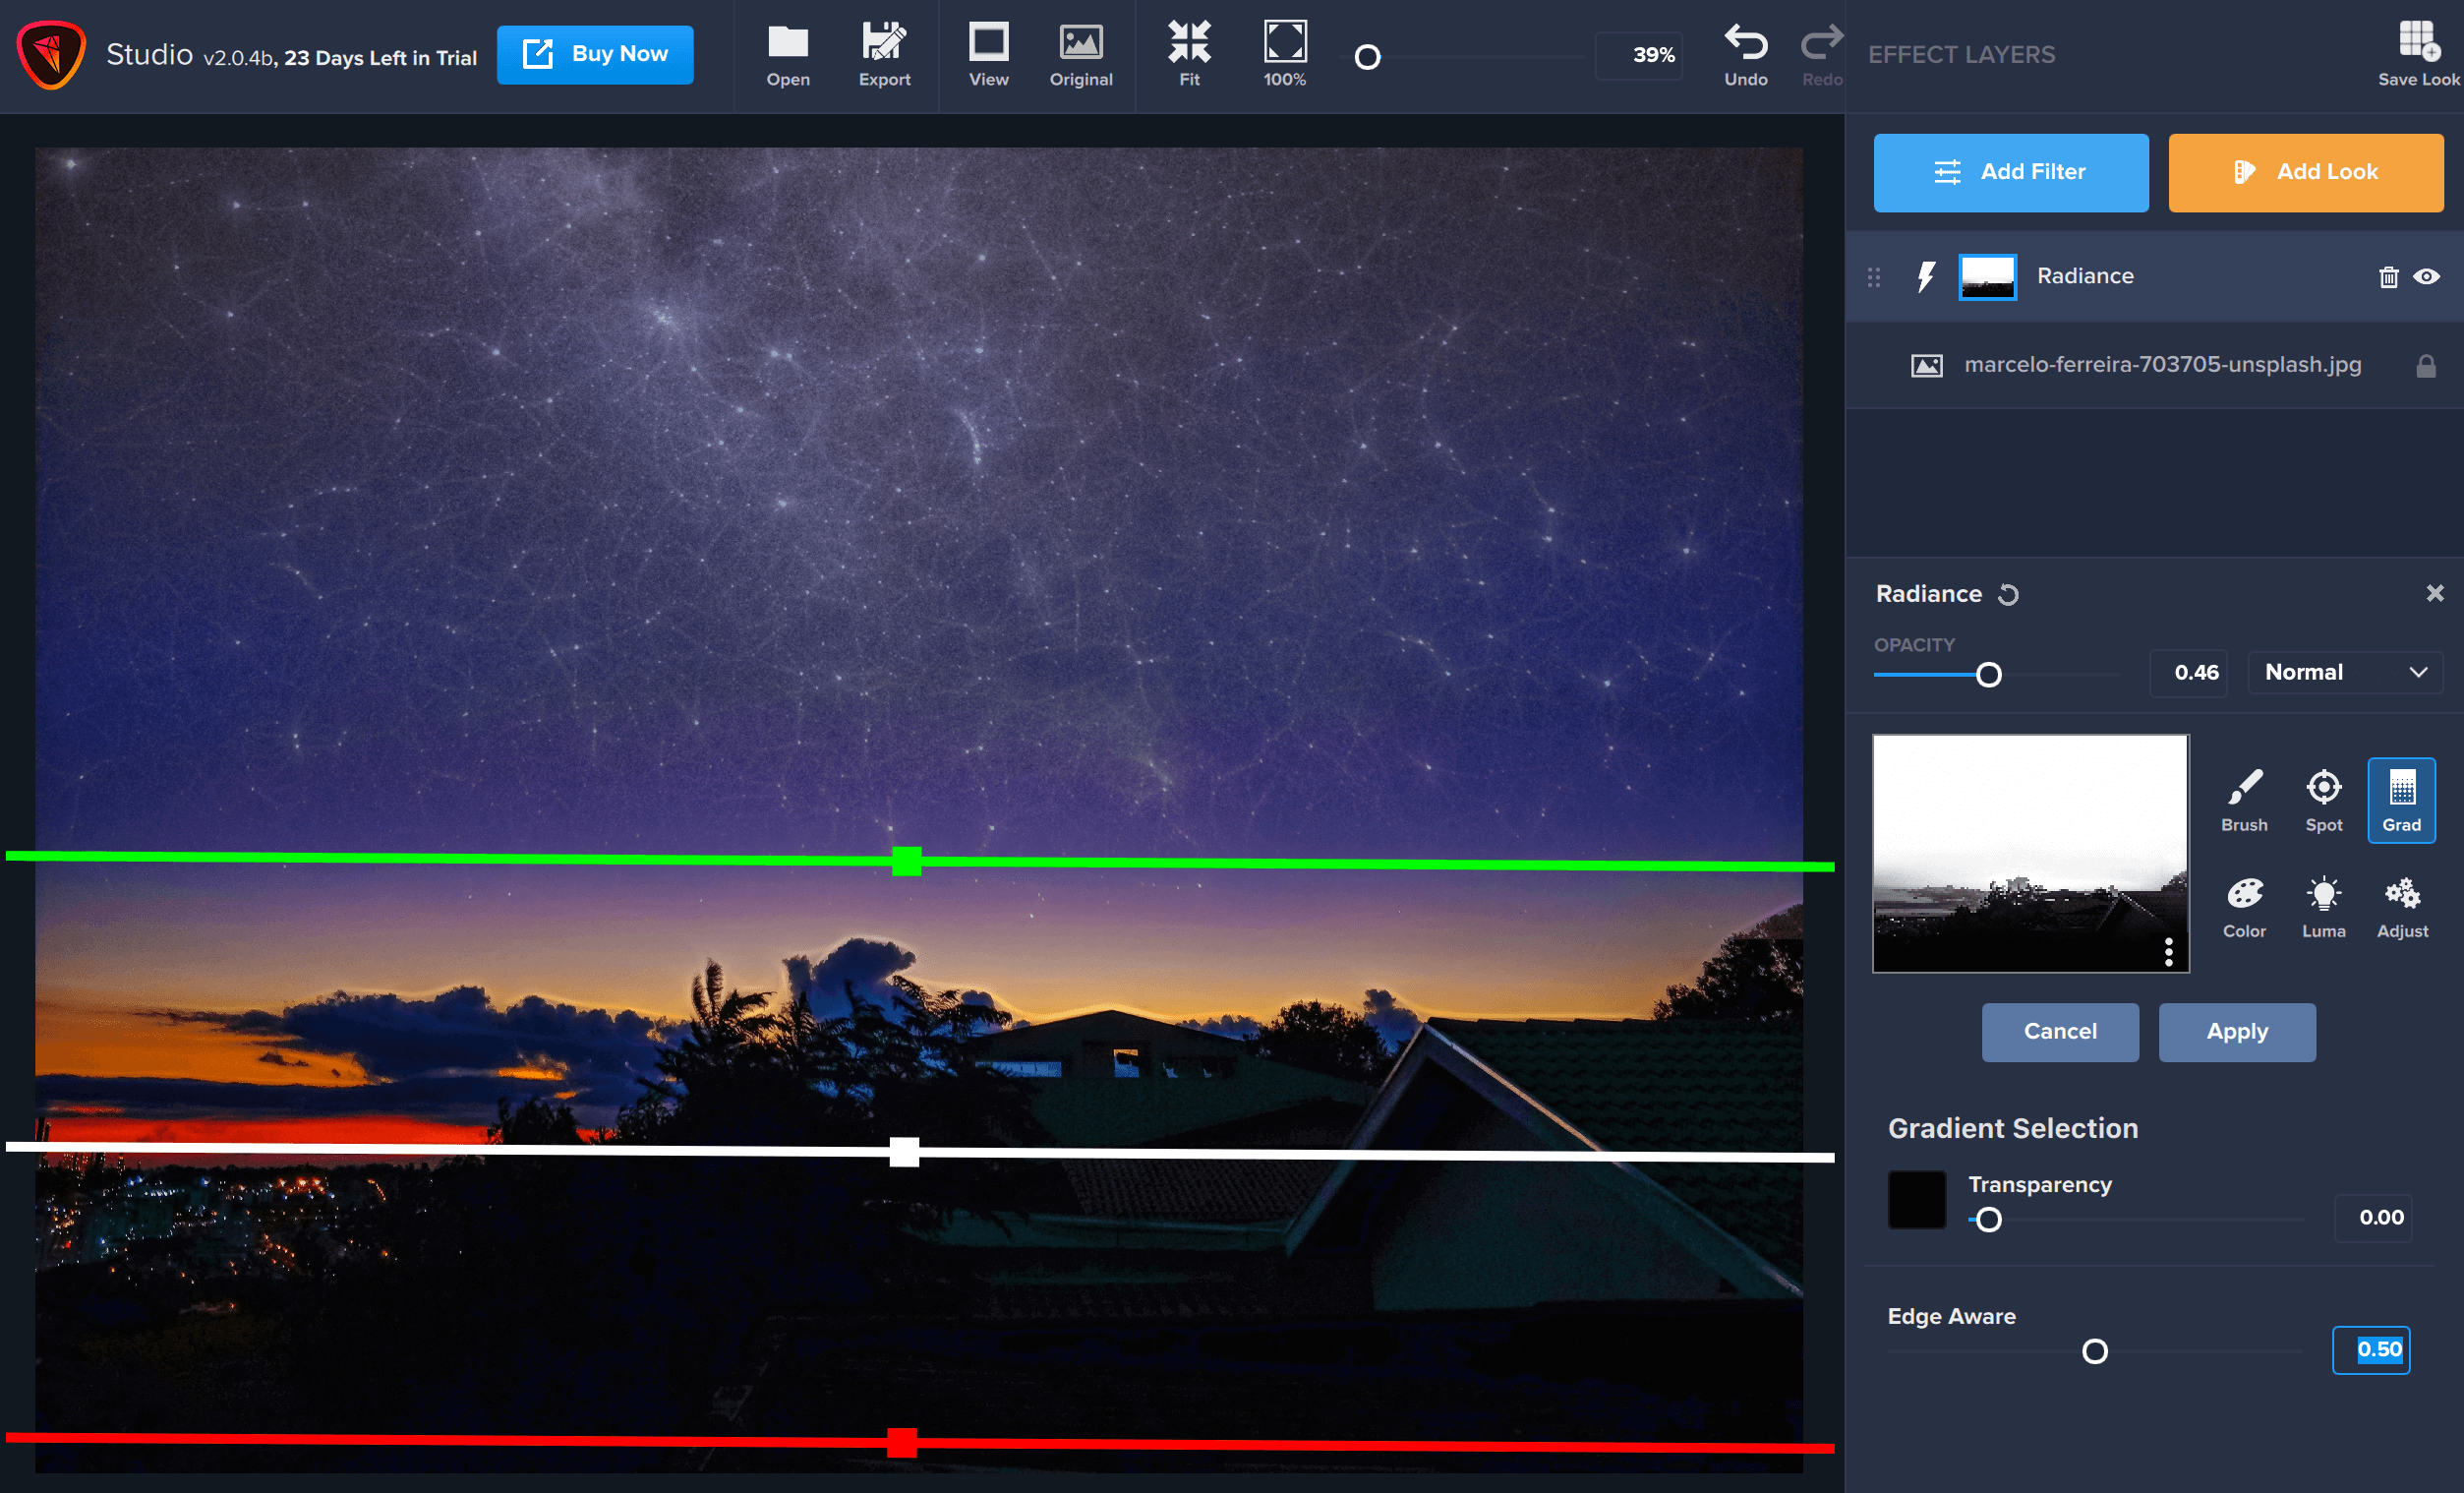
The effect above the red line will be removed and the effect below the green line will remain. You can also grab the handles and rotate them to manipulate the order of the gradient. The white handle will collectively move the gradient while moving the green or red handle can create longer and shorter transitions. You can also easily change the direction of the gradient mask to be applied vertically.
The color masking tool allows you to create masks based upon colors found in your image.
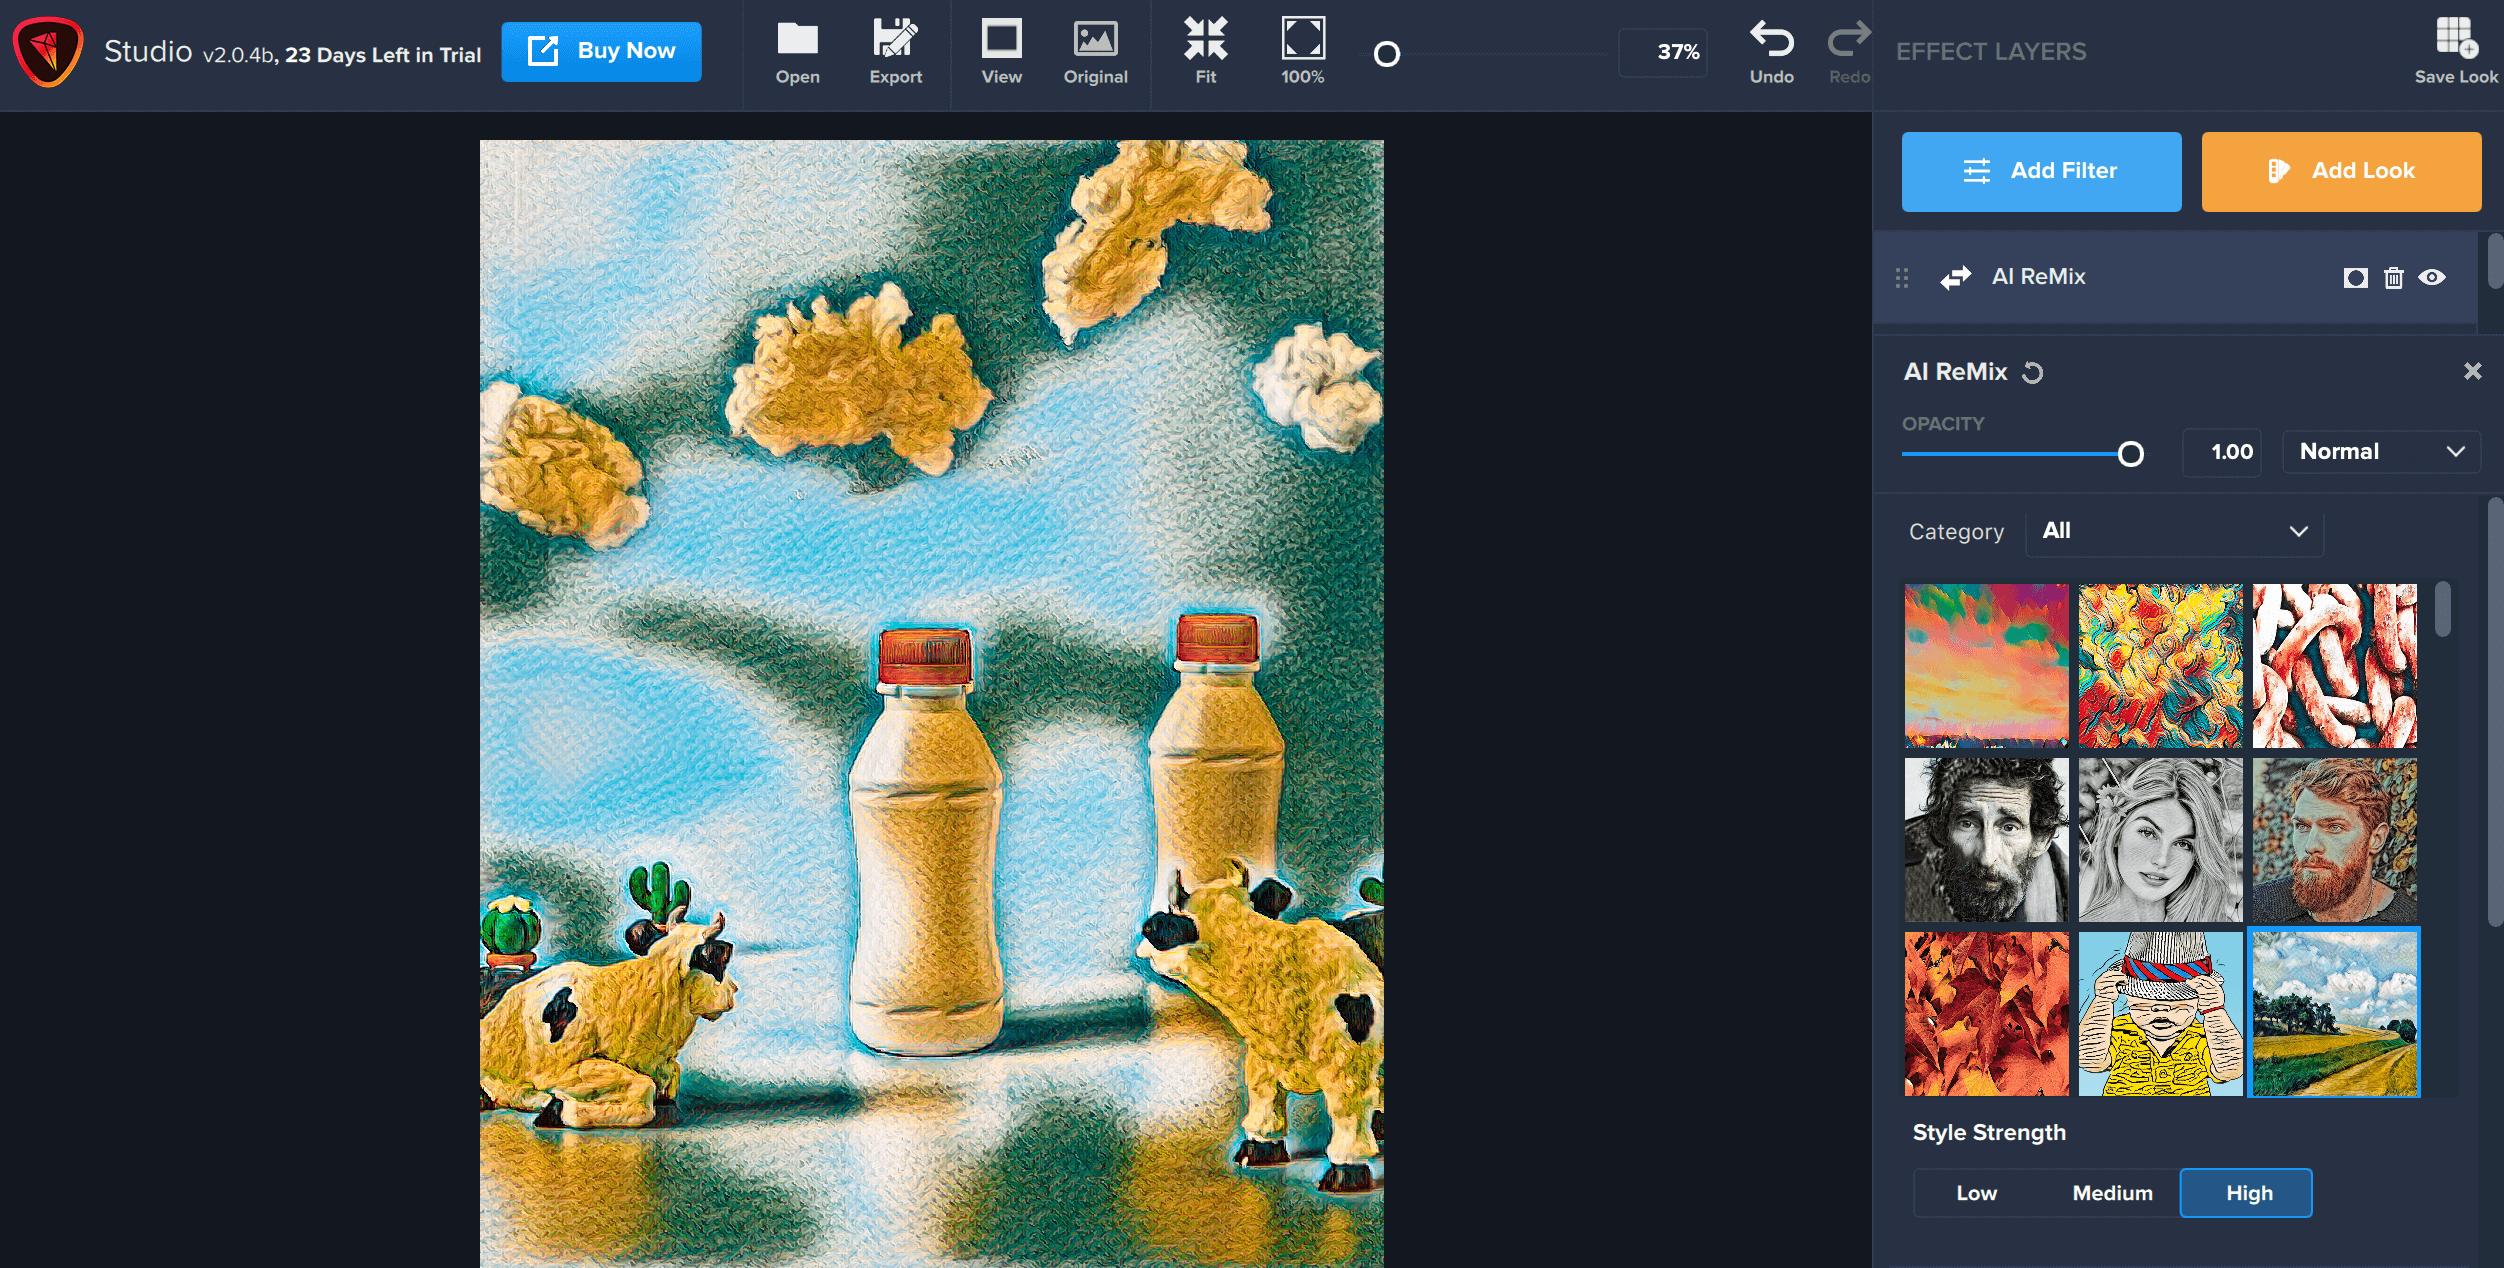
In this example image, I’ve applied AI ReMix to create an artistic product image. Let’s say I want to retain the photorealistic red caps on the milk bottles. With the color masking tool, I can place the dropper over the red to select it.
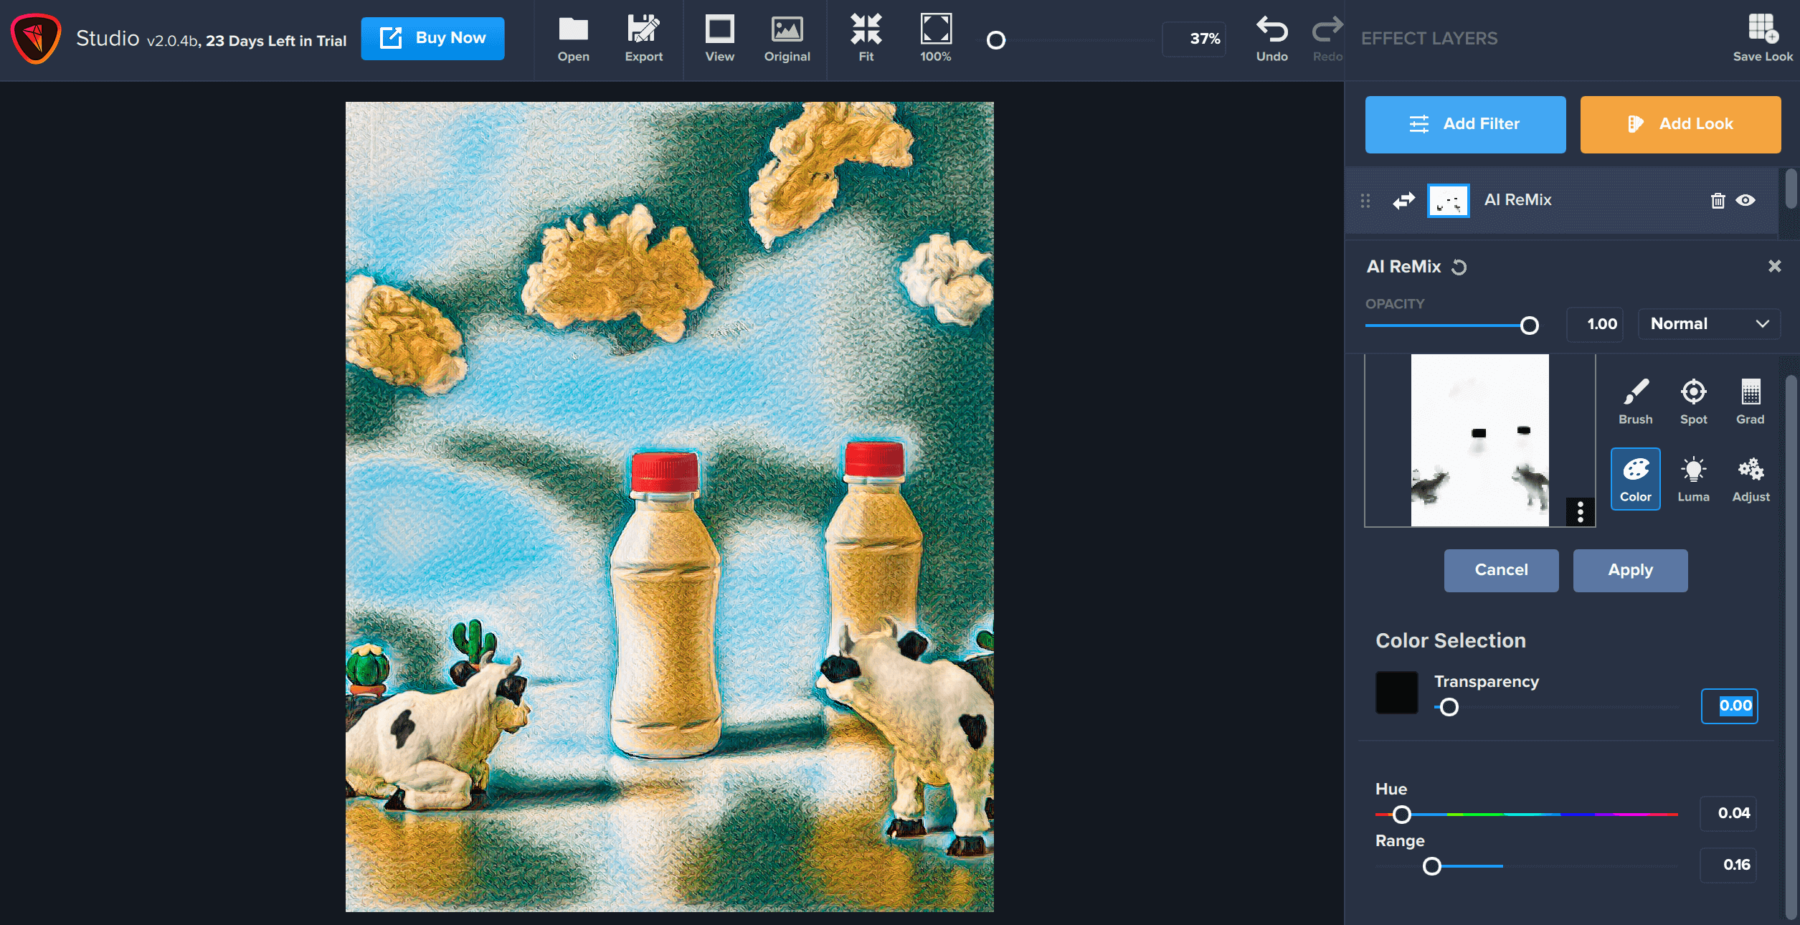
The Range slider allows you to adjust for a larger or smaller range of colors. Since I wanted a precise selection here, I opted for a smaller range of colors.
The luminosity masking tool allows you to create mask selections derived from the brightness in your image. In this example, I’ve applied an abstract swirl effect from AI ReMix.
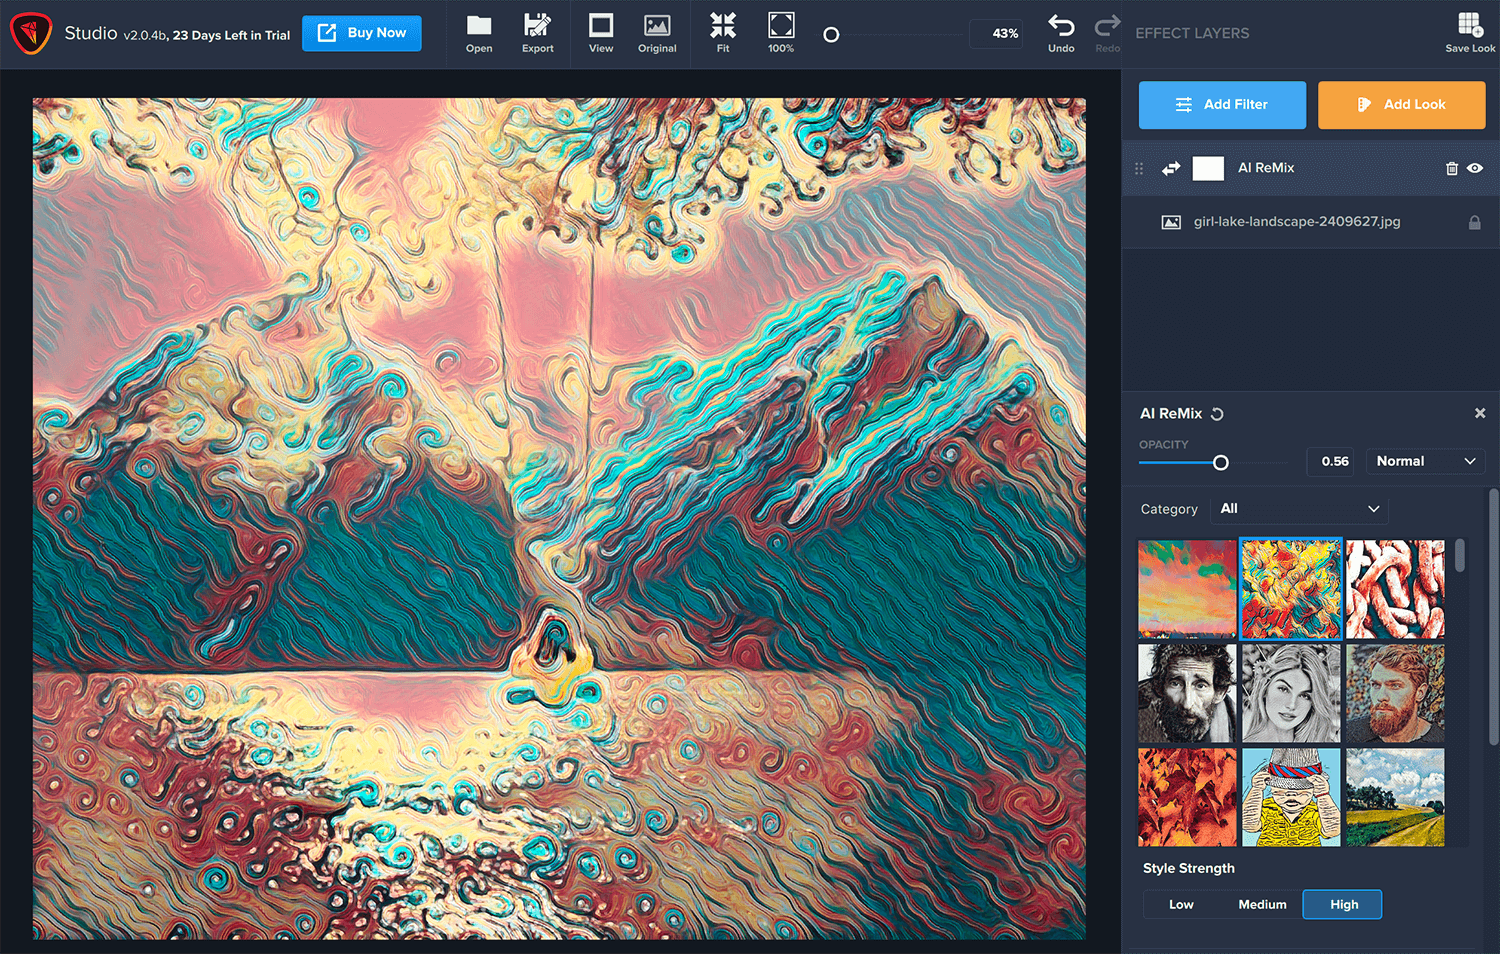
I only want the swirls to be applied to the luminous, bright highlights in the image. Luminosity masking is an ideal tool for this situation.
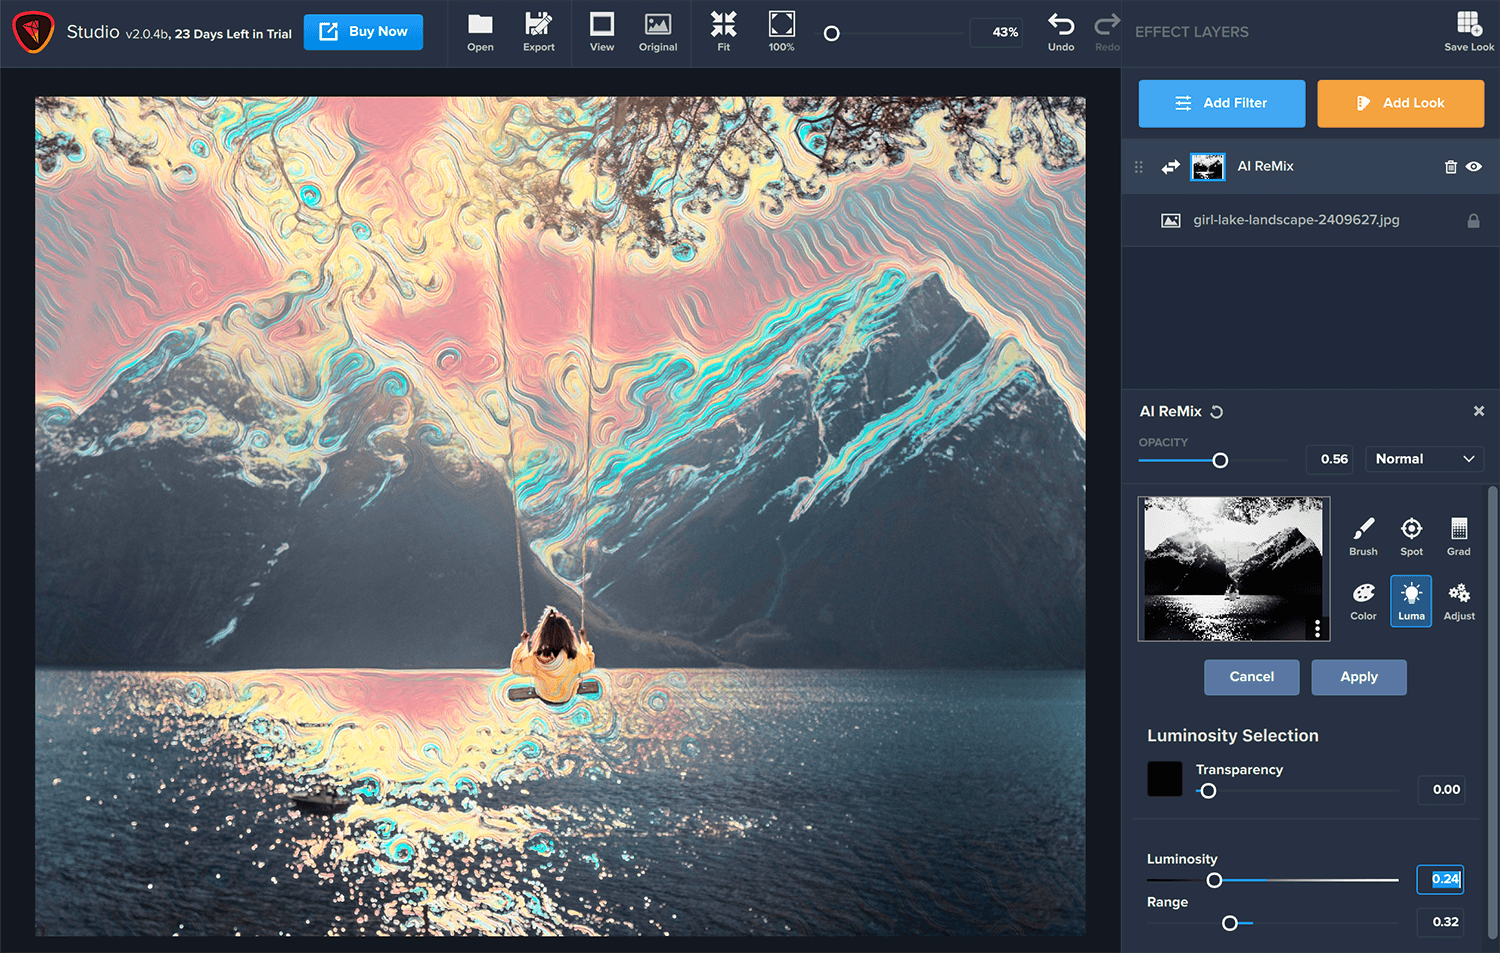
By placing the dropper over the bright part of your image, you’ll mask the brightness and apply the swirl effect to the dark part of the image. So, since we want to achieve the opposite, we’ll place the dropper in the darkest part of the image (the right-hand corner of the water). You can adjust the Range slider accordingly to capture various lengths of color. With just a few clicks, the luminosity mask achieves exactly the artistic effect I wanted and in just right the places. Other masking tools would be infinitely harder to mask such a difficult area to distinguish.
These five types of masking tools were created to power up your workflow, so you can find an ideal tool for your unique masking situation. But don’t forget, you can also combine multiple types of masks to achieve your desired look! All you’ll have to do hit “Apply” after you finish with one type of masking to move right on to the next.
We hope you’ll find Topaz Studio 2 an easy-to-use and intuitive tool for your creative and artistic digital images!
We have several other tutorials on Topaz Studio 2! Here are just a few you might be interested in:
You can find other answers by visiting our Help Center here. Still not finding the answer you’re looking for? Submit a support request for one of our Topaz experts to come to your rescue!
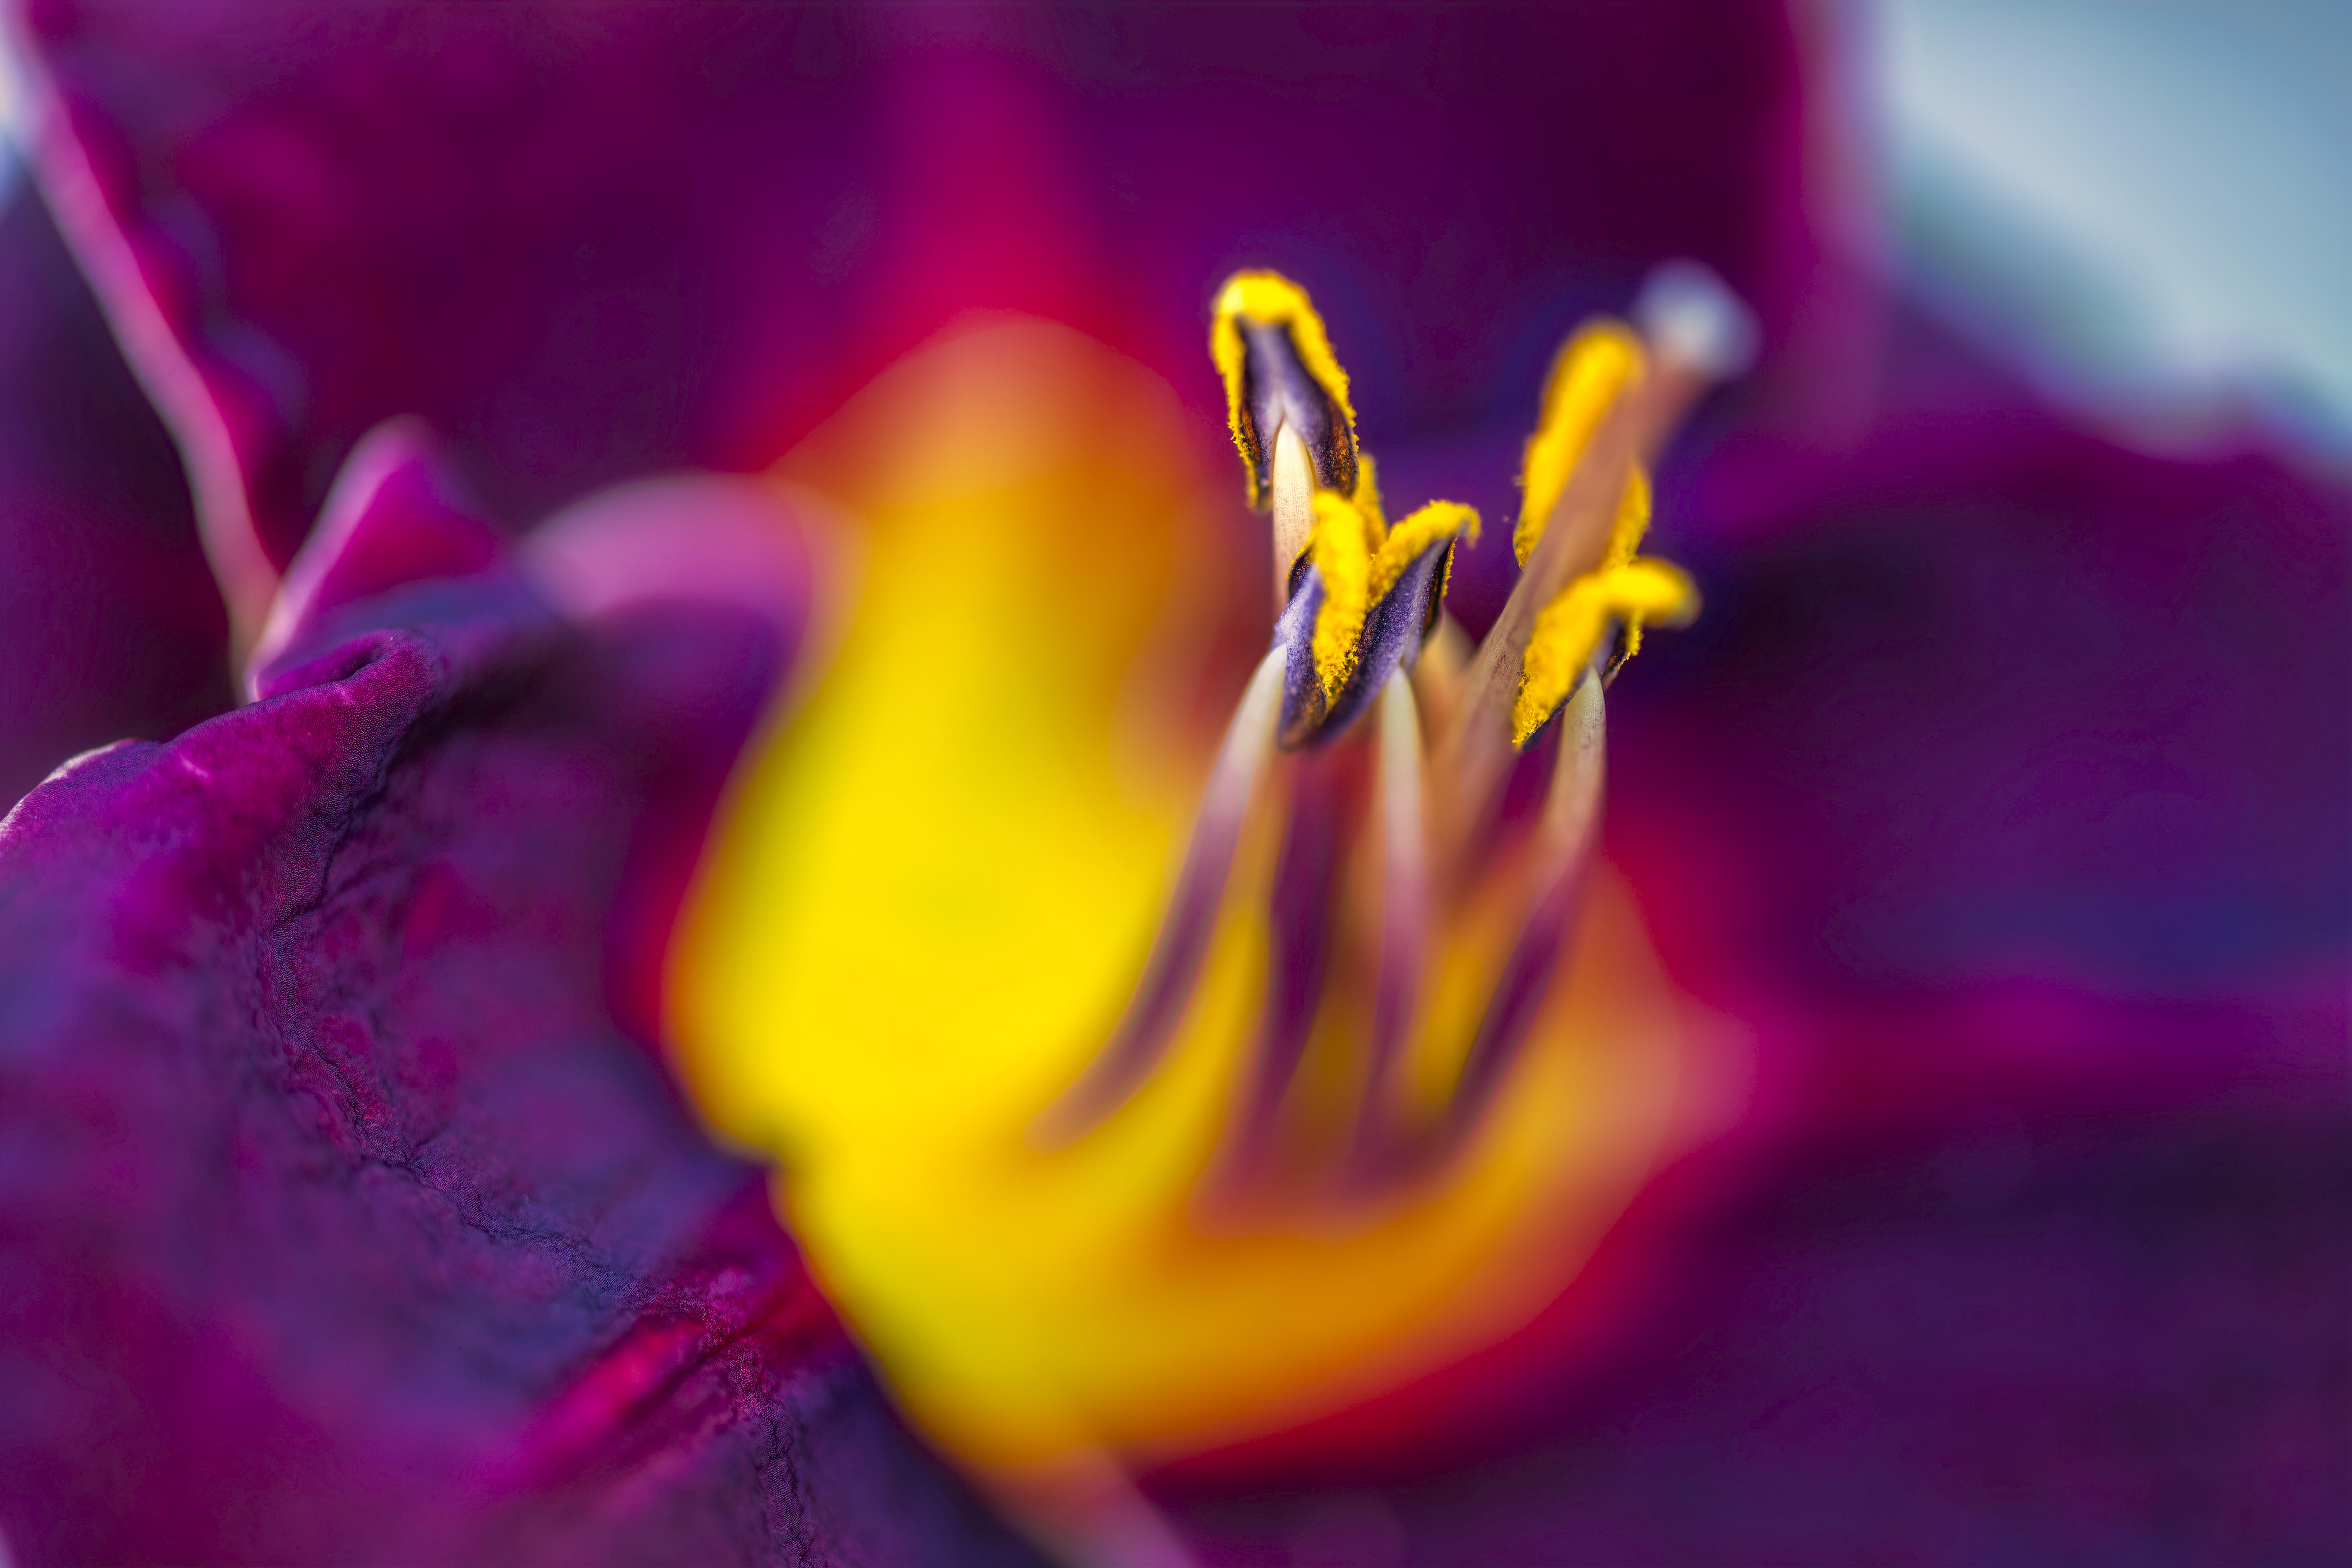
Masking allows you to selectively make adjustments on your image. Let’s say you want to bring out the details in your granddaughter’s hair, but don’t necessarily want to bring out all the details of her skin, like her pores. Masking is great for that. Masking allows you to enhance part of the image, without being forced to make that same edit to the overall image. You also have the choice of varying mask densities. A black (0.00) density mask will completely remove the effect, while a white (1.00) density mask will allow an effect to completely remain. You can tune the range in between those values to achieve your desired effect.
The Topaz Studio Integrated Masking is unlike anything you have seen before. We have included 5 masking types: Brush, Spot, Gradient, Color, and Luminosity, as well as a Mask Adjustments panel and an option to invert or completely reset your mask. Our brush masking includes intuitive, content-aware technology that was developed in house. Not only are the new masking features awe-inspiring, but you can combine masking types. After making adjustments with one type of mask, click apply or switch to another mask type and build upon that mask. It’s never been so easy!
In Topaz Studio, we wanted to give you full control, so we have included both Look Masking and Filter Level Masking. Each has the exact same functions, but Look Masking will effect the entire set of filters, or “Look” that have been applied to your image. Filter Level Masking will only effect that Filter that you use the mask on.
To edit your Look Mask, apply a look and then simply click mask icon next to the name of your look. To edit your filter mask, select the masking icon next to the Filter you wish to edit.
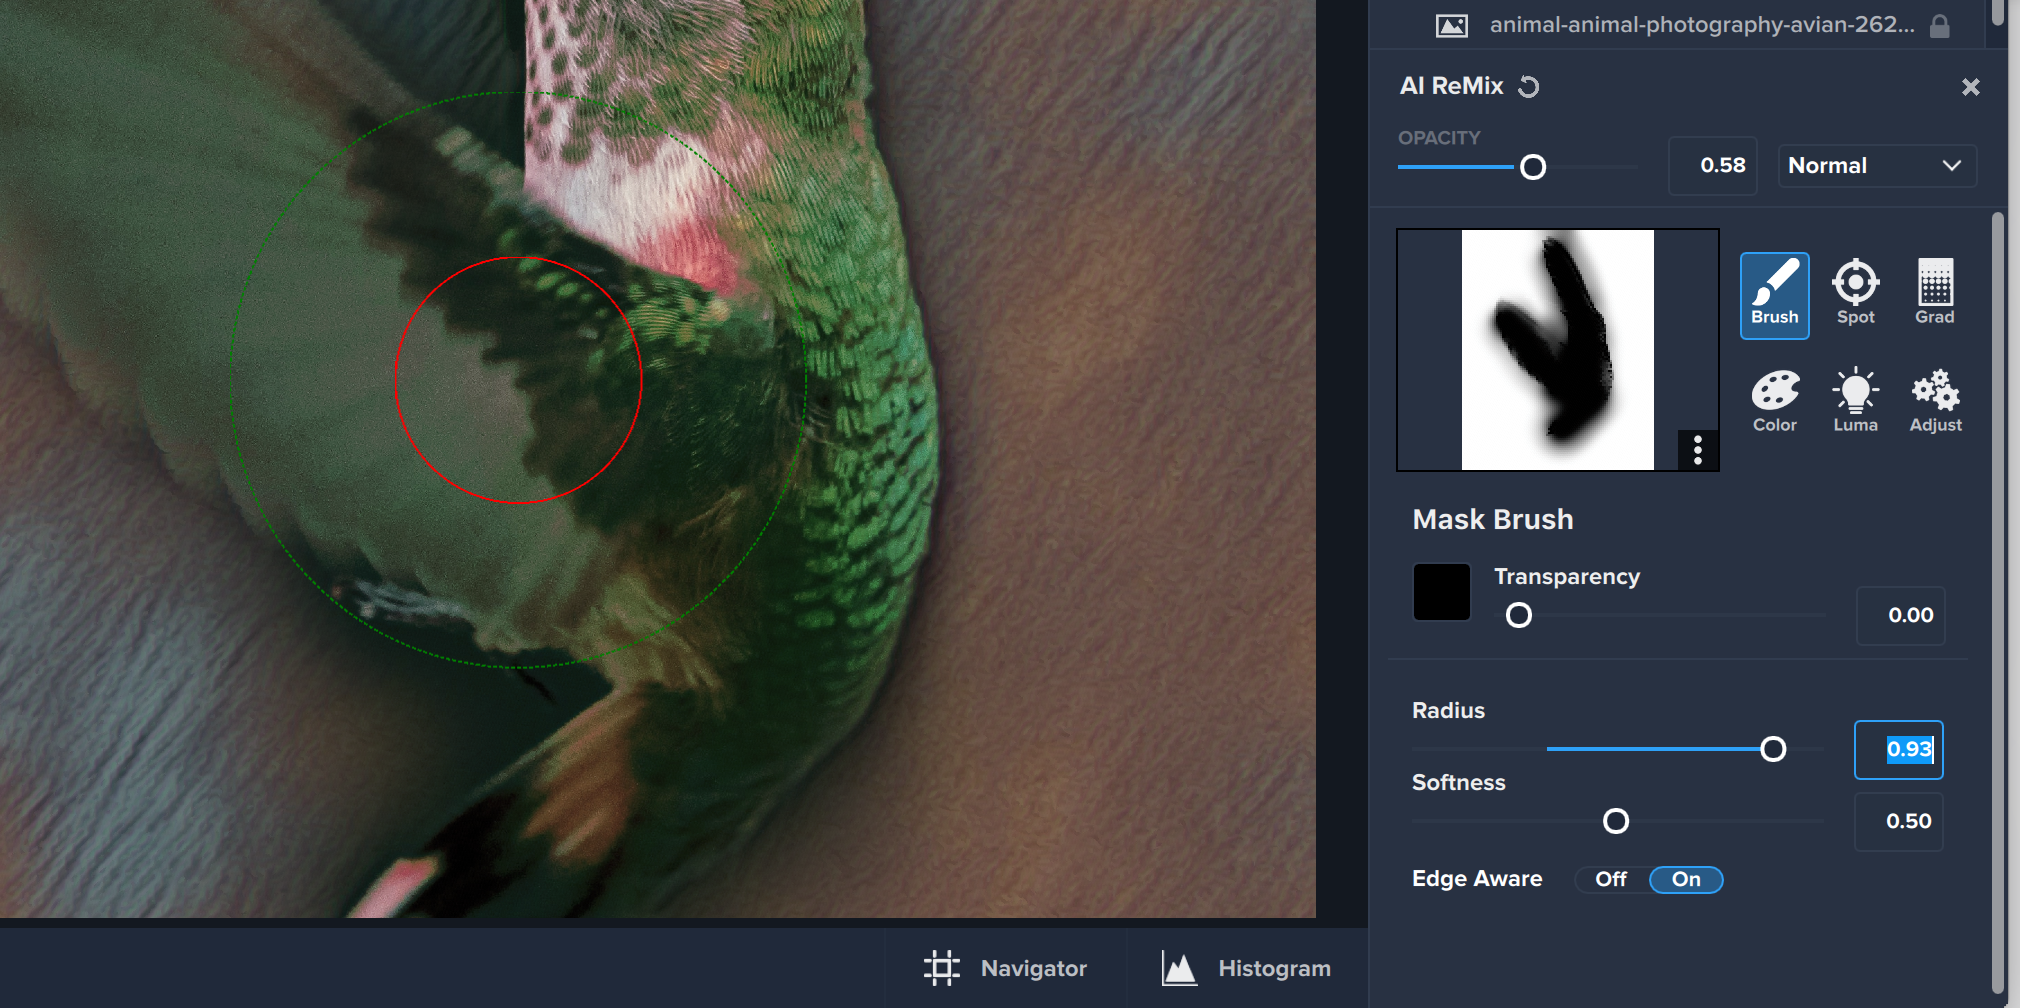
Brush Masking works great to apply effects exactly where you need them to be placed. You can paint in or paint out just one adjustment or entire effects with the global masking. In the Brush Mask Panel, you will find many easy to use controls. The Mask Density slider controls the opacity of your brush from 0.00 to 1.00. The Radius Slider controls the overall size, while the Softness Slider controls edge softness. The Edge Aware toggle allows you turn on or off our unique Edge Aware technology.
Our unique edge aware technology allows you to effortlessly perfect masks. Simply keep the edge that you wish to be detected between the red inner circle and the green outer circle. Our technology will automatically detect the edge. It’s that easy.
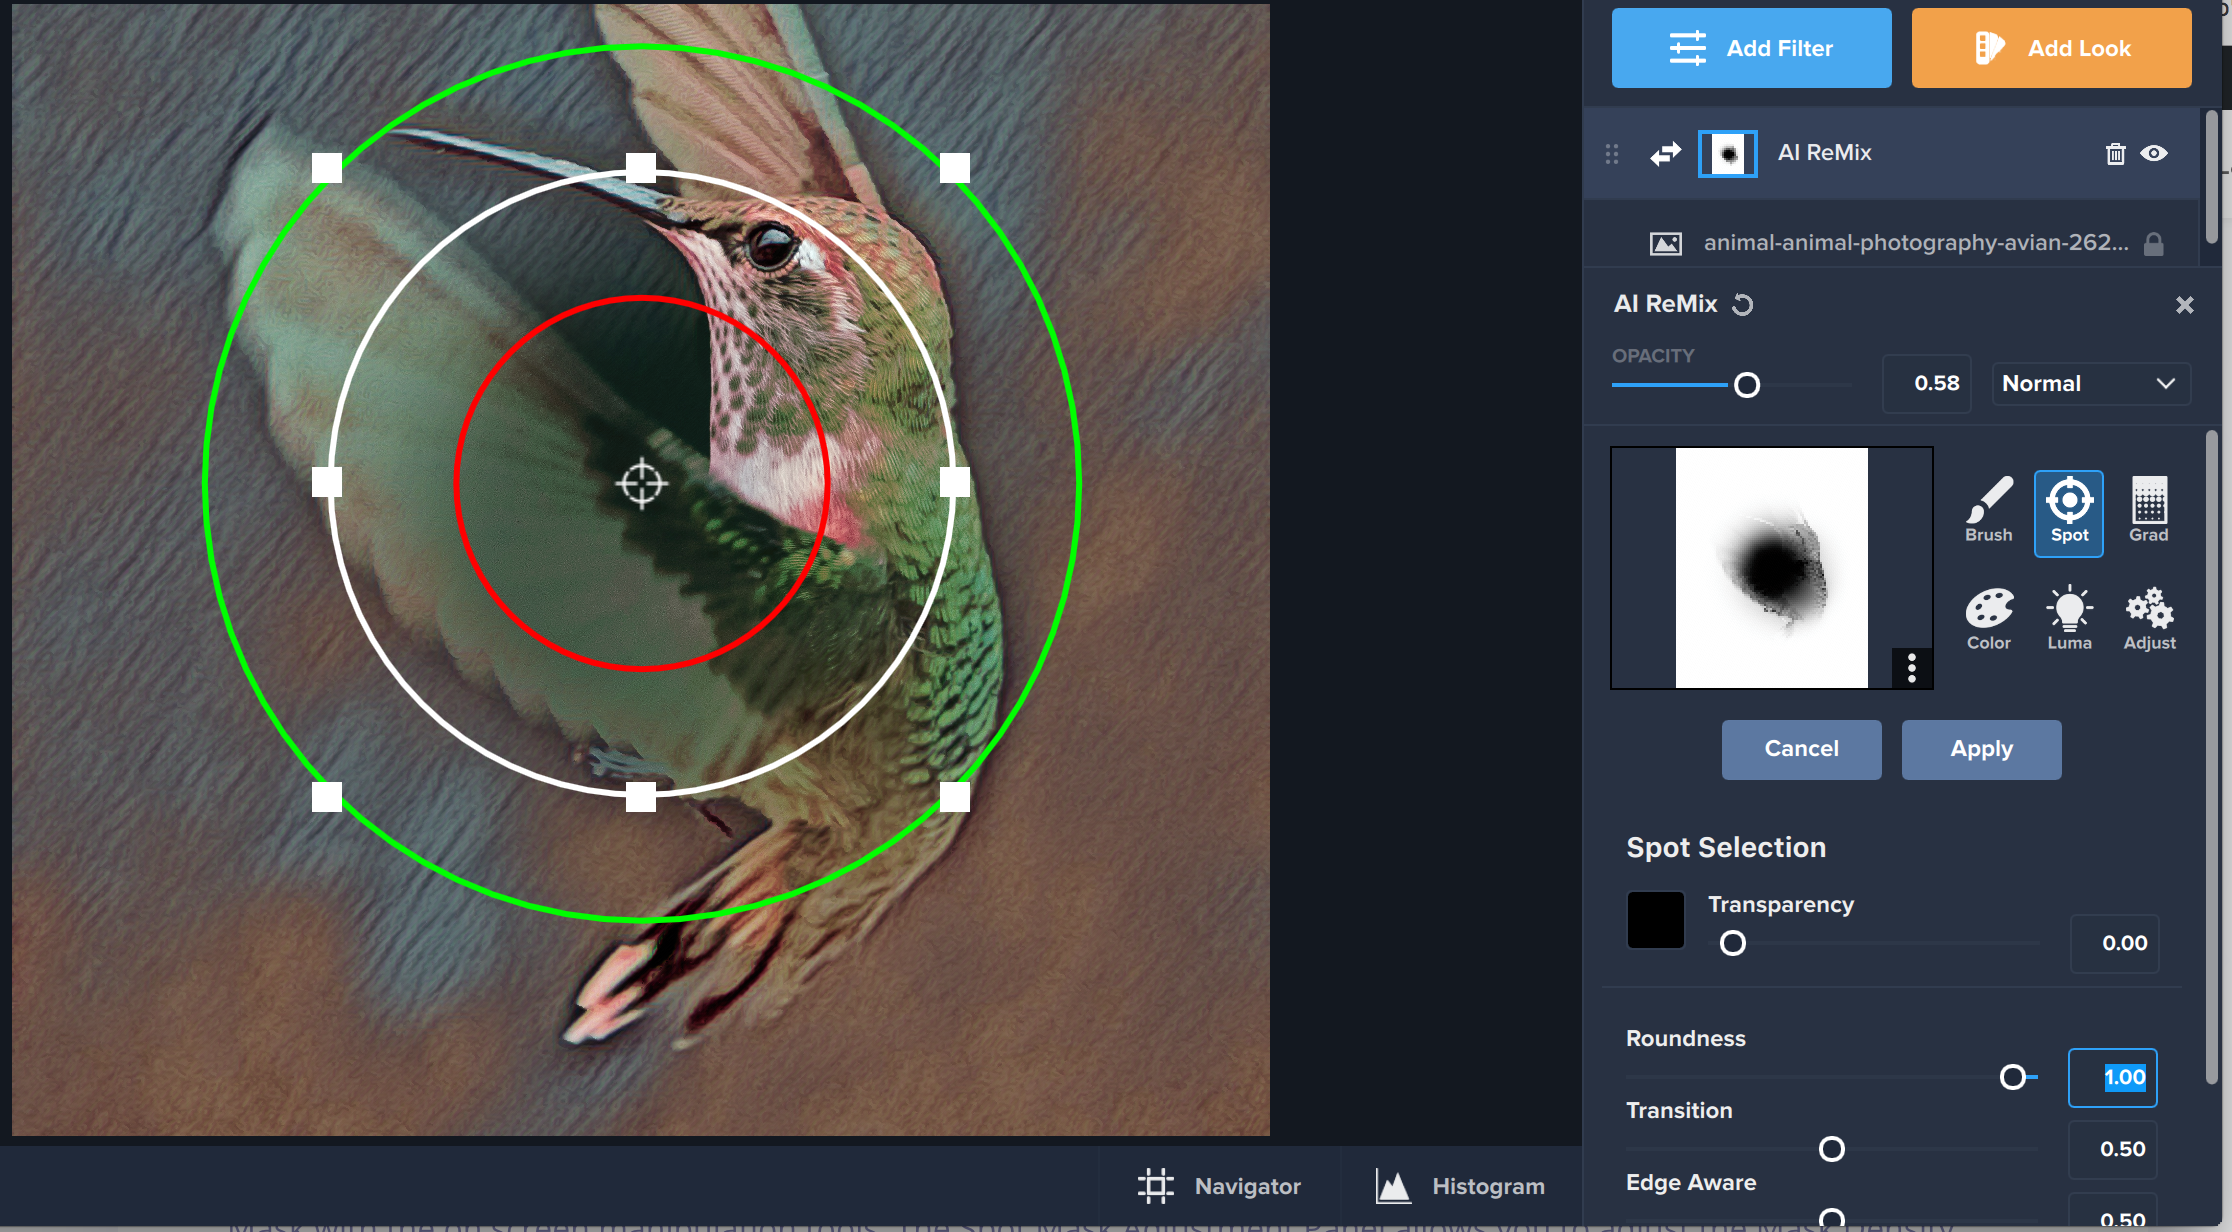
The Spot Mask tool allows you to add eclipse shaped masks to your image. Easily adjust the size and shape of your Spot Mask with the on screen manipulation tools. The Spot Mask Adjustment Panel allows you to adjust the Mask Density, Transition, and Color Aware with easy-to-use sliders. If you wish to add more than one Spot Mask to your image, simply click done and then click the spot mask again to add a second mask.
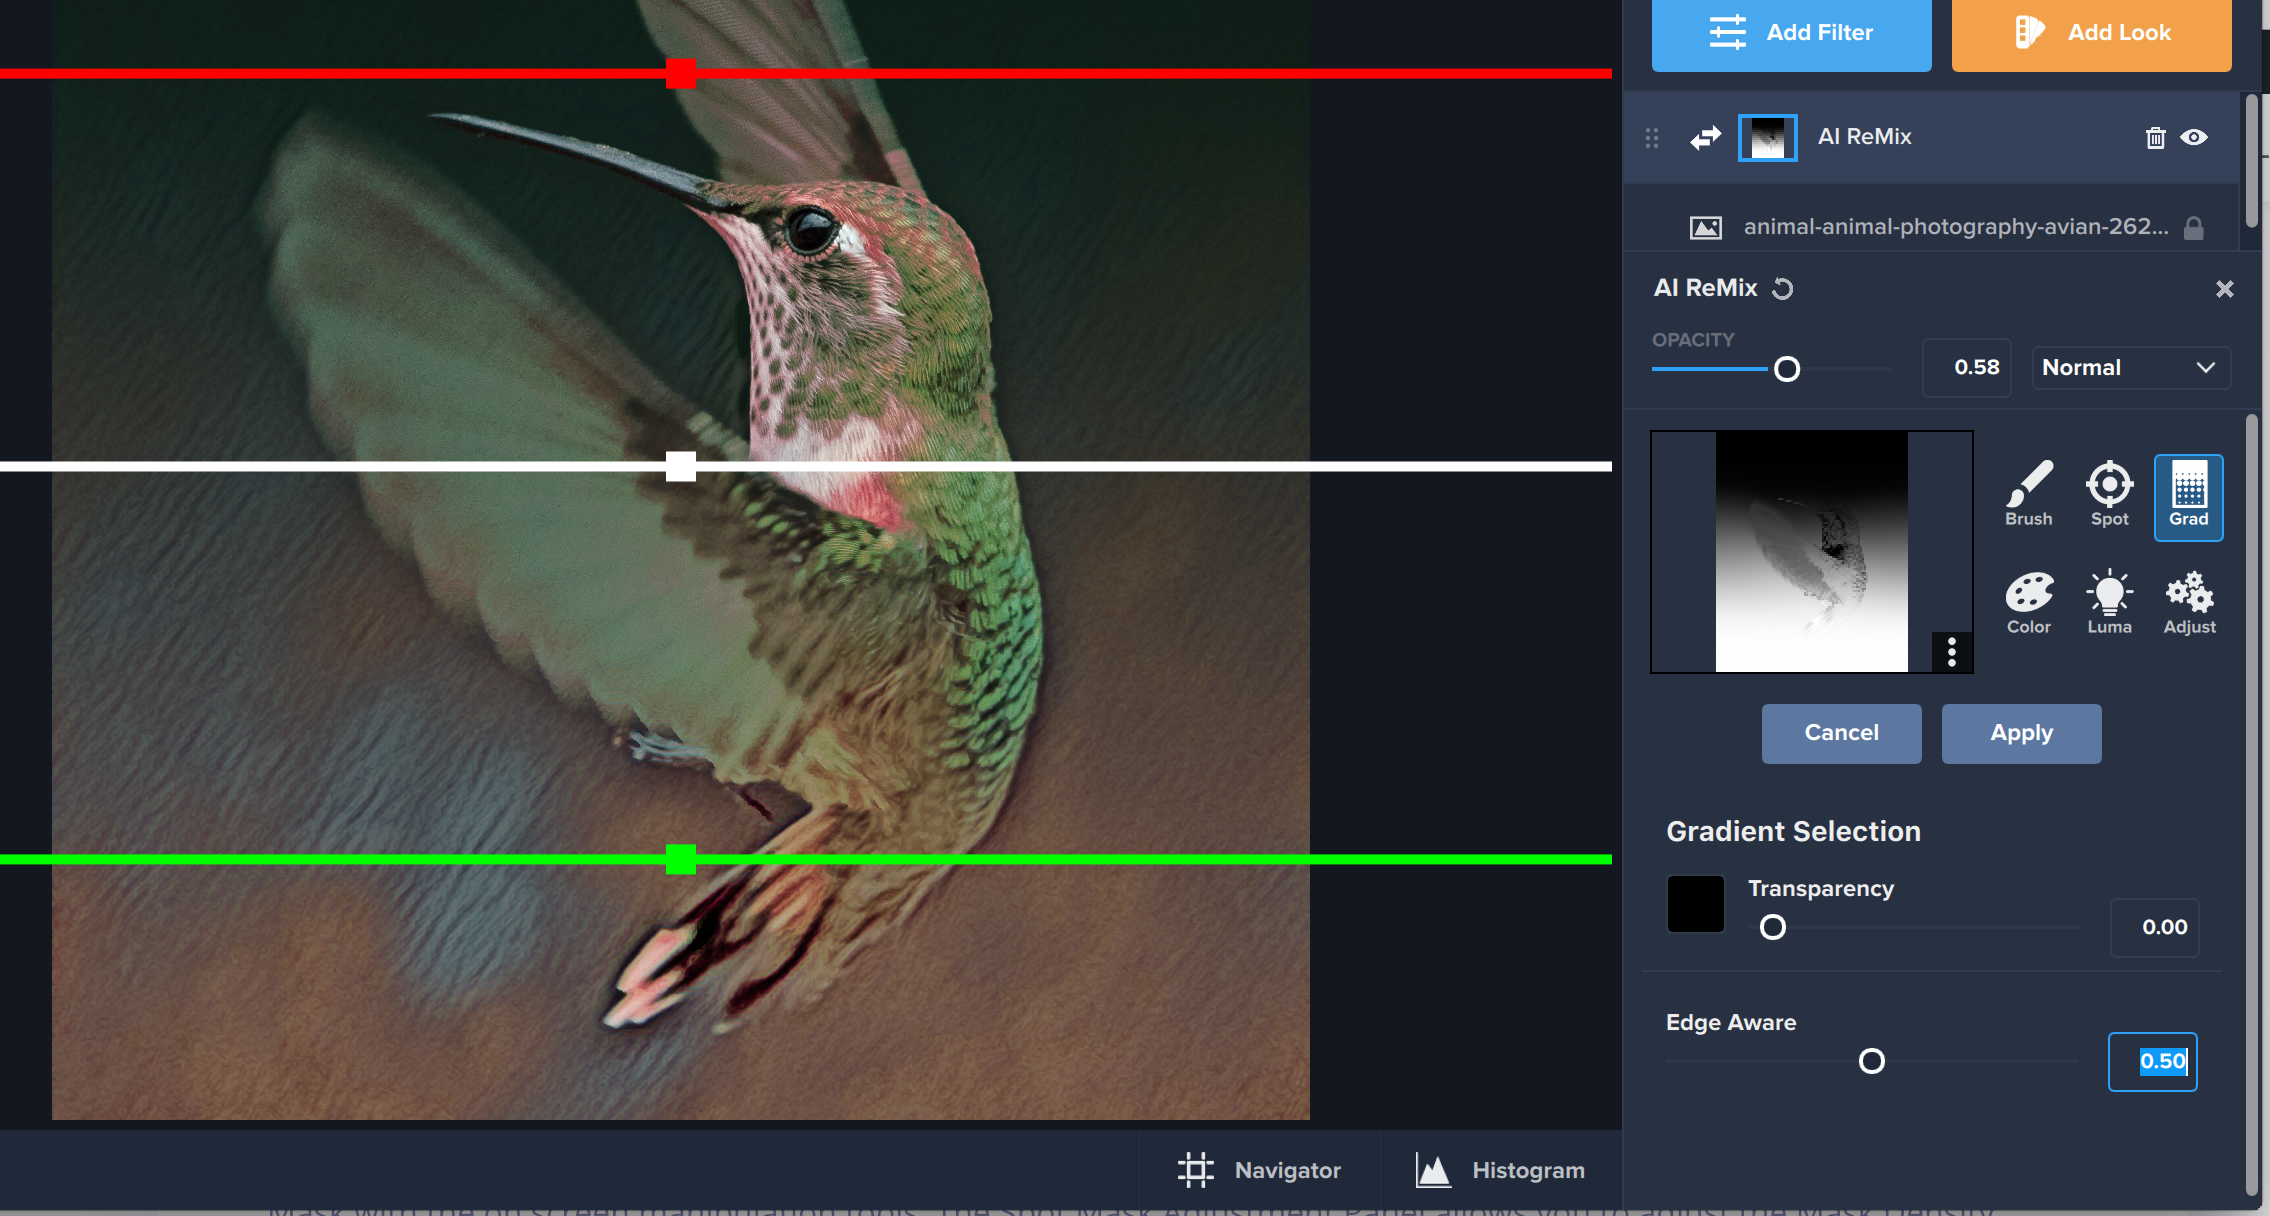
The Gradient Mask allows you to create natural transitions. To add a Gradient Mask, simply click the gradient icon. When the gradient mask is added you will see three lines – a red, white, and green. Anything above the red line will be completely removed and anything below the green line will completely remain. You can manipulate the gradient on screen by grabbing the handles. The white handle will move the entire gradient, while moving the green or red handle can create longer and shorter transitions. You also have the power to manipulate it to have it going any direction you wish, such as mirrored or vertical. You can increase the Content Aware Slider or add more than one Gradient Mask to create interesting effects.
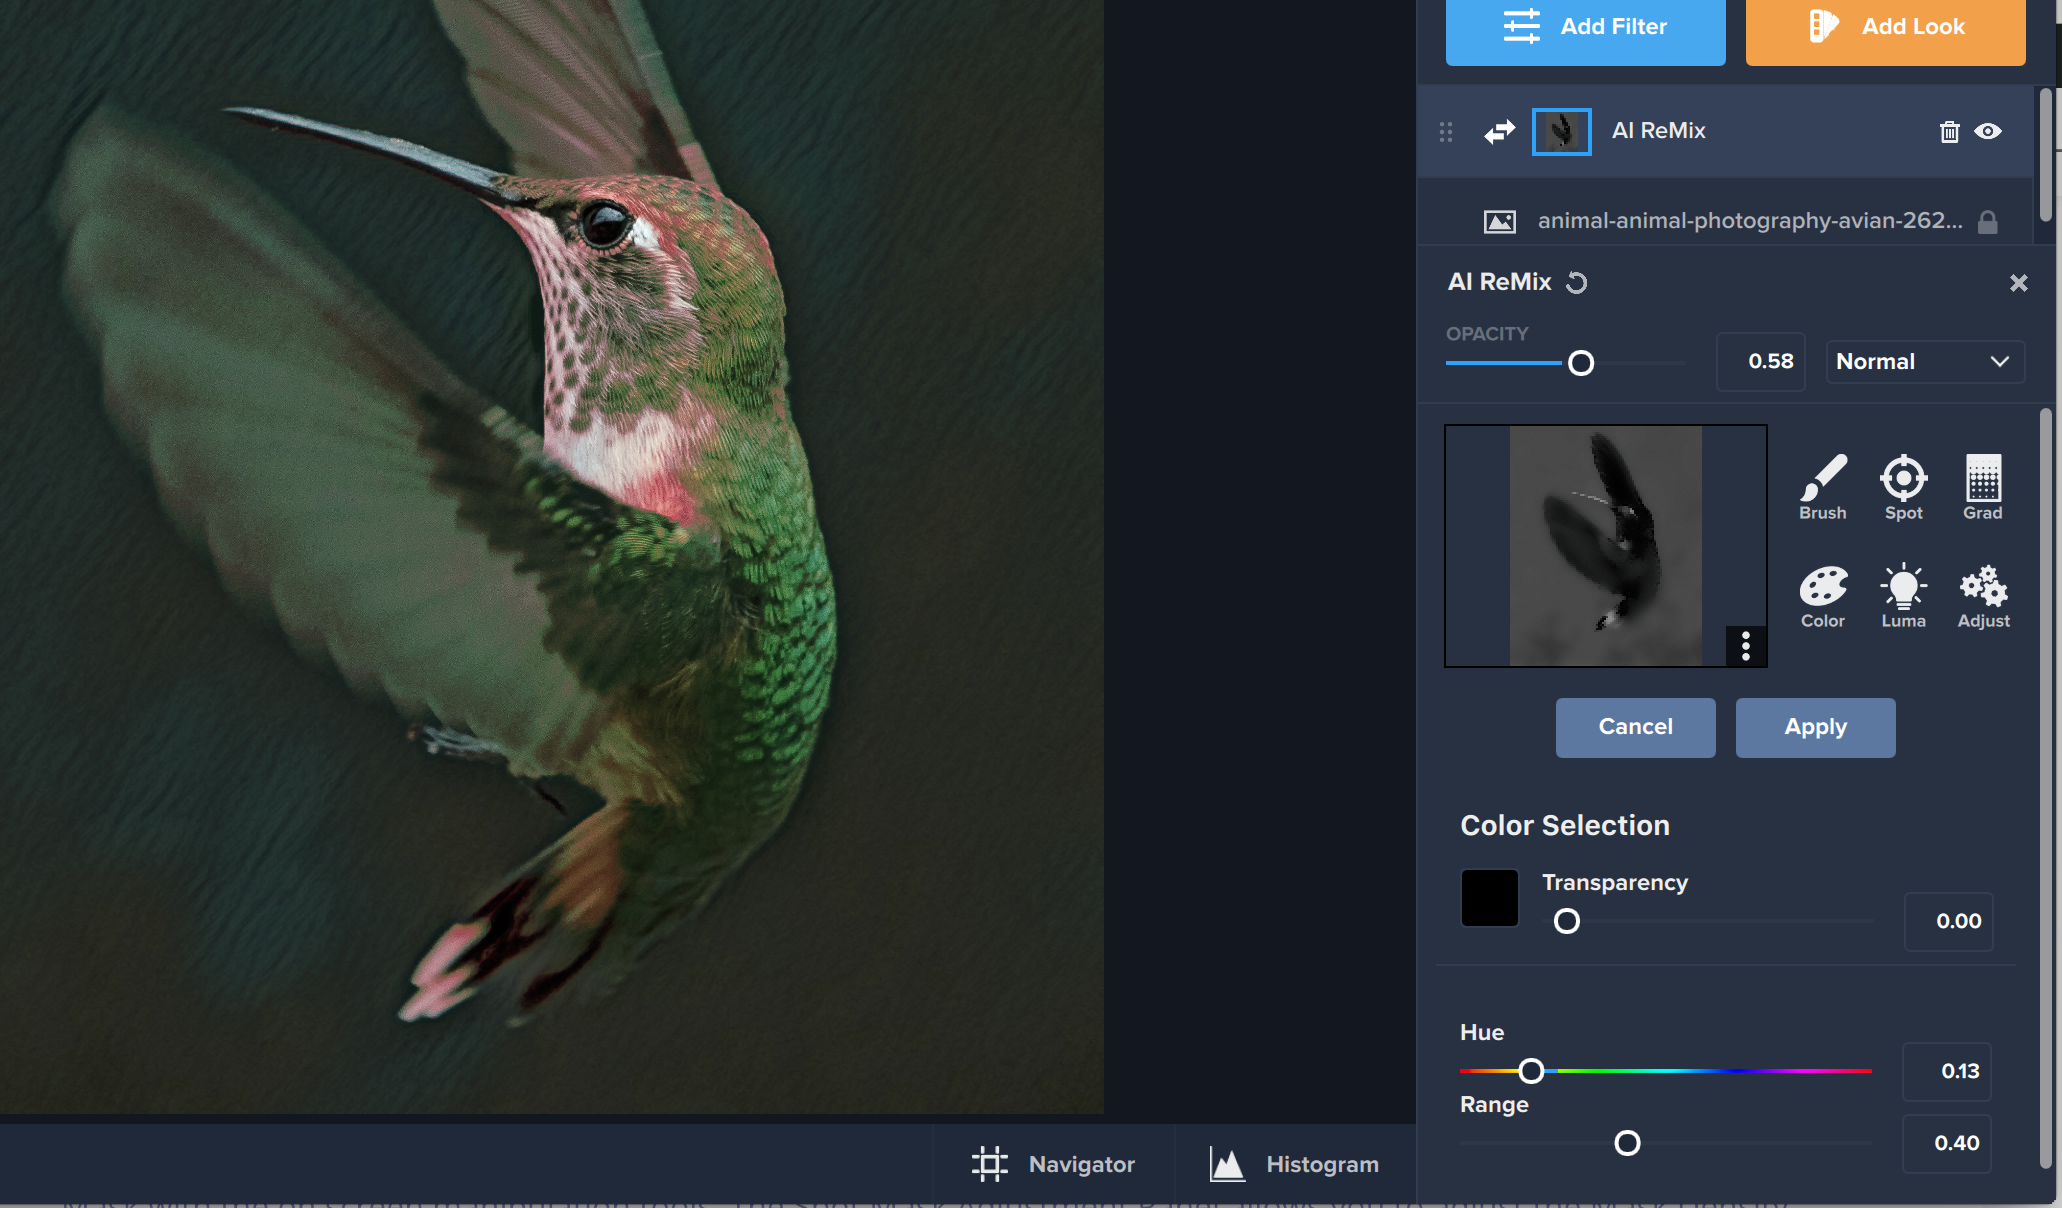
The Color Mask allows you to create masks based upon colors found in your image. You can select a color by moving the Hue Slider. Whatever hue you select, will be masked out. The Range Slider allows you to capture a larger range or smaller range of colors. If you wish to have a more natural selection, use a larger range, but if you wish for a more precise selection, use a smaller range. If you wish for the hue you selected to remain, simply invert the mask once you are satisfied with your edits.
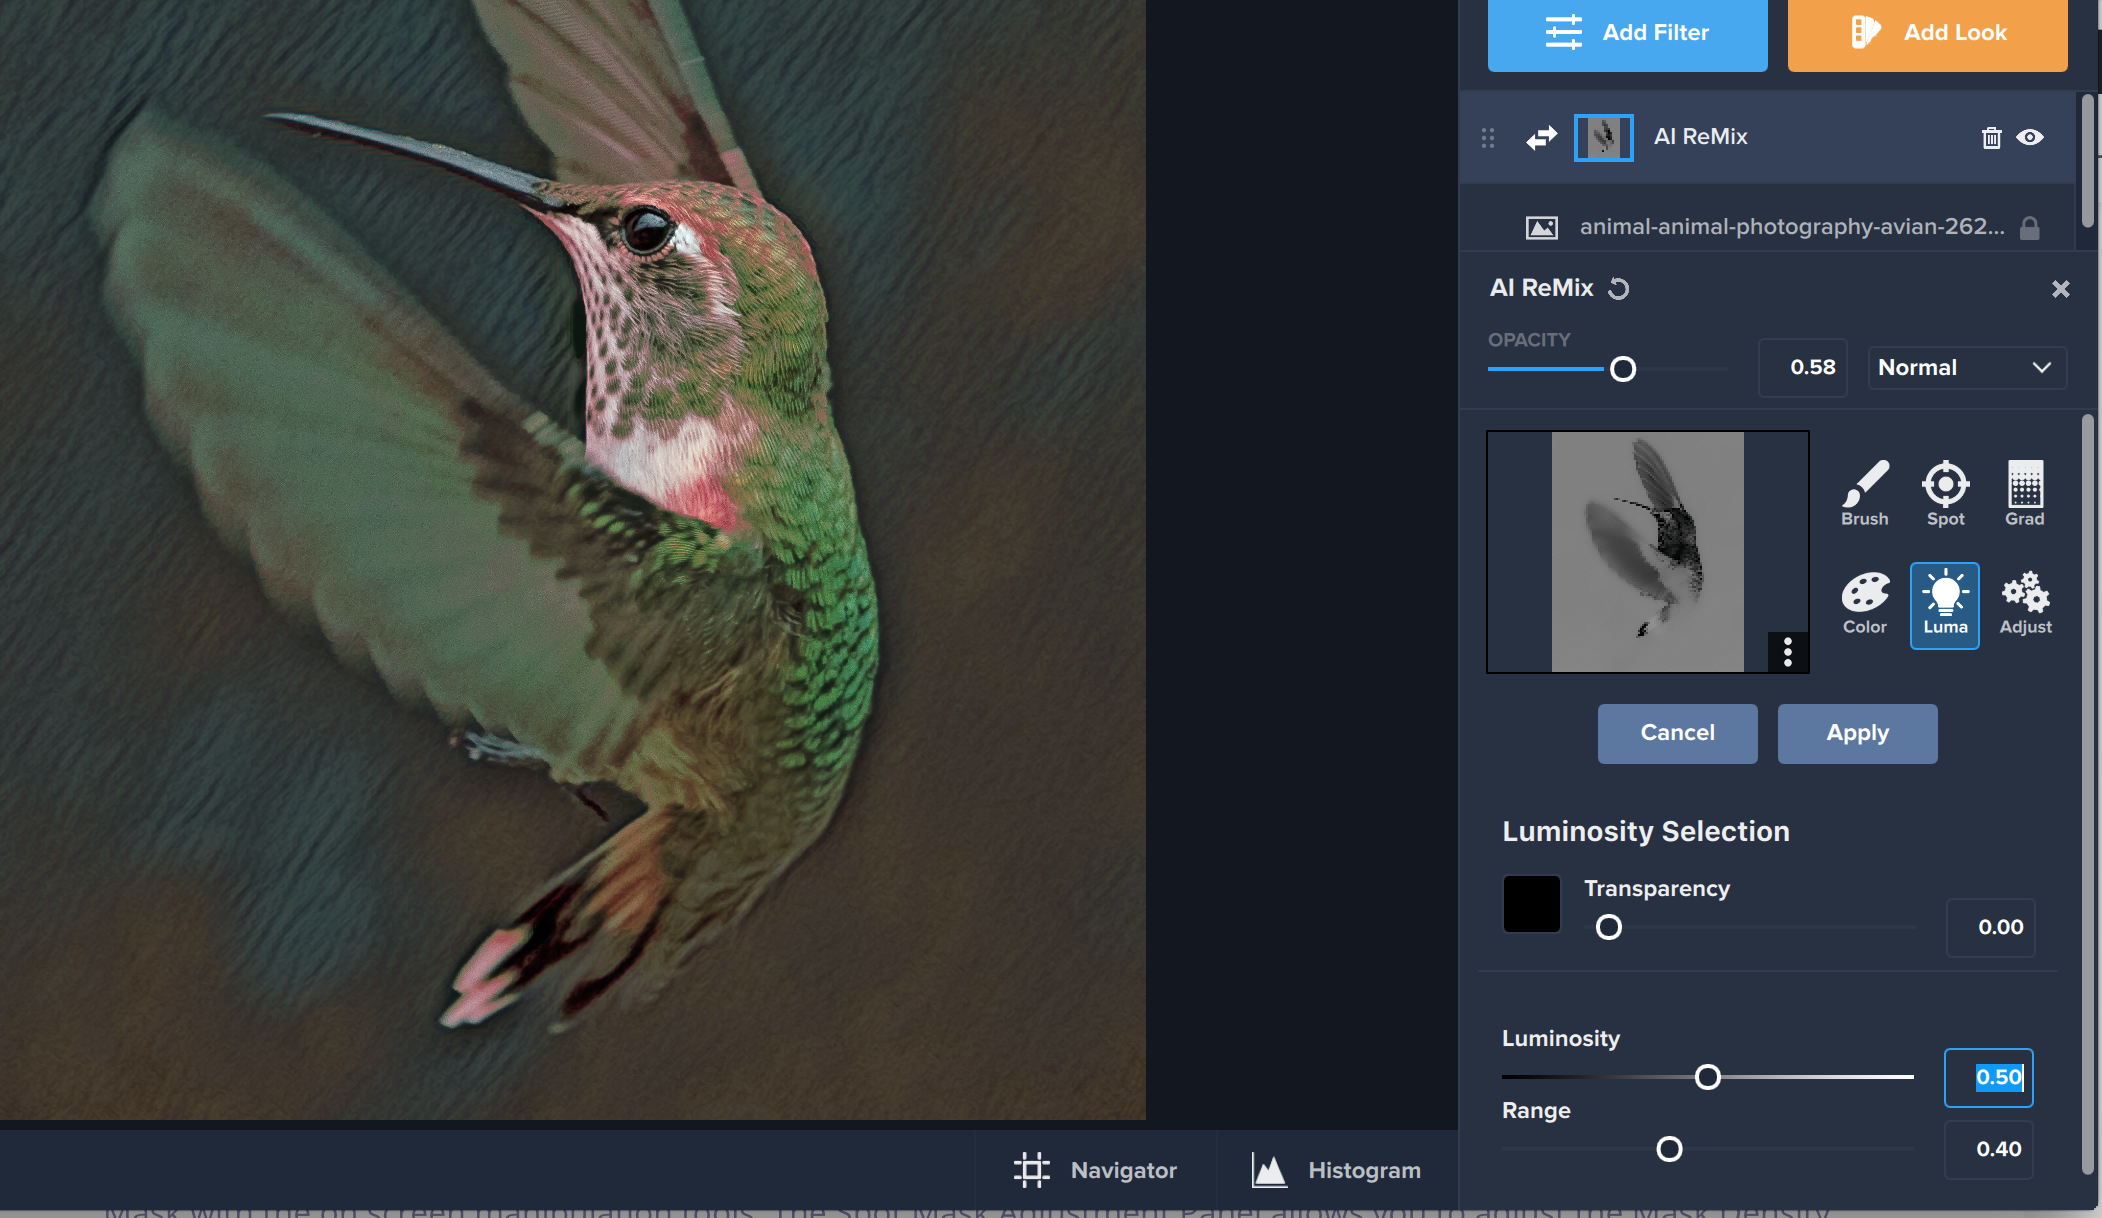
Luminosity Masking allows you to make masking selections based upon the brightness of you image. You can select the brightness you would wish to be masked using the Luminosity Slider. The range slider allows you to adjust if you would like smoother or more precise selection.
The Adjustment Panel is where you can modify the mask you just created. You can change the feathering to be a smoother transition, as well as the contrast and density to create more drastic or less drastic masking transitions. These are all dependent on the look you wish to achieve. When you are satisfied with your adjustments to your mask, all you have to do is click Apply to burn your mask in.
Invert, Clear, and Delete. You have the ability to completely invert, clear, and delete your mask all from the Masking Panel. These options are easily accessed by clicking the three dots in the lower right-hand corner of your mask preview screen. Inverting a mask can be great for creating unique effects or in the various ways stated earlier in section 2 & 4. If you’re not happy with your mask, you can always clear it and start fresh. If you’d like to get rid of it entirely, simply delete the mask from your filter or look.
Find written and video tutorials to guide you through creative processes in Topaz software. Start creating a masterpiece today!
Got a question? We’ve got answers. Find troubleshooting, tips, and more, or contact our Support Team.
 Adjust AI
 Gigapixel AI
 Annual Commitment Switch
$10,000.00
 Topaz B&W Effects
$59.99
 Topaz Lens Effects
$79.99
© 2005 - 2025 Topaz Labs. All rights reserved.
Each license is valid for a single seat. Receive a volume discount for 10+ seats.


