Posted on

Exporting in Mask AI

Users Guide

Exporting in Mask AI

Mask AI allows you to create tricky masks in record time thanks to our intuitive machine learning technology and trimap technique.

To export an image from Mask AI, you have two options. You can either hit the “Save” button in the bottom of your right-side navigation panel, or select “File” -> “Save As” to save your image to your computer. You can either select where to save your image, or it will save your image automatically to the place you opened it from. For instance, if you opened an image from your Pictures folder, the saved version would appear in your Pictures folder as well. 

You can save the Trimap you are working on to use it later. When you are ready to continue editing the mask on the image again, you bring the image back into Mask AI, then add the Trimap.

Here is a step by step on how to save the Trimap for later use:

  1. Save Trimap (png or jpeg is fine)
  2. Close Mask AI
  3. Open the same original image file in Mask AI
  4. Go to File -> Load Trimap
  5. Choose the Trimap you saved previously
  6. Click Compute Mask and you will be able to pick up where you left off.
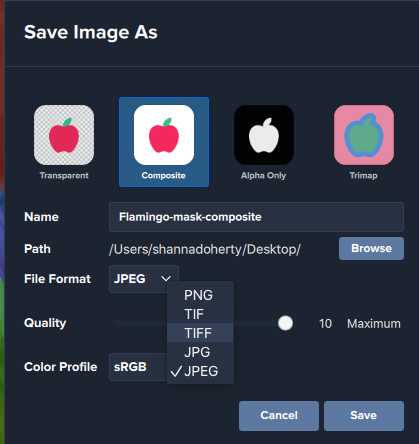
When you click save, you have four options: Transparent, Composite, Alpha Only, or Trimap.

If you left the background of your image blank, you will be able to select the Transparent option. Save your image as a .png to preserve the transparent background. If you chose to blur your background or add color or image, you will be able to select the Composite option, which will export your entire image. You can also save your Mask or Trimap for future purposes that are able to be opened up again in Mask AI.

Topaz Labs Blog

Find written and video tutorials to guide you through creative processes in Topaz software. Start creating a masterpiece today!

Topaz Help Center

Got a question? We’ve got answers. Find troubleshooting, tips, and more, or contact our Support Team.

Posted on

Importing and Exporting

Detail in Topaz Studio, Topaz Labs

Importing and Exporting

Topaz Studio 2 can be used as both a standalone application and plugin for Photoshop, Lightroom, etc. Learn how to import and export images using Studio 2, or Studio 2 as a plugin from Photoshop or Lightroom.

To import an image into Studio 2, Click the blue “Open” button in the center of the screen after launching the program. From here, you’ll locate the image you wish to open on your computer and then import it into Topaz Studio 2. If you find that you already have an open image and wish to open a new image, click the “Open” icon in the top left corner of the screen, or click File -> Open Image. 

  • To launch Topaz Studio 2 as a plugin from Photoshop, select the “Filter” dropdown menu at the top of your Photoshop screen, then select “Topaz Labs” -> Topaz Studio 2. 

Compatibility:

  • Lightroom 4-6
  • Lightroom CC 2015-2016
  • Lightroom CC 2019

* Lightroom CC 2018 does not support any external editors.

Launch Topaz Studio 2 as a plugin from Lightroom to edit your image in Topaz Studio 2.

To export an image from Studio 2, you have two options. You can either hit the “Export” button in the left hand side of your top navigation panel, or select “File” -> “Export” to save your image to your computer. You can either select where to save your image, or it will save your image automatically to the place you opened it from. For instance, if you opened an image from your Pictures folder, the saved version would appear in your Pictures folder as well. By default, the file will be the same name with “-studio” added to the end of the file. You can change this setting in the Preferences menu.

Topaz Labs Blog

Find written and video tutorials to guide you through creative processes in Topaz software. Start creating a masterpiece today!

Topaz Help Center

Got a question? We’ve got answers. Find troubleshooting, tips, and more, or contact our Support Team.