Posted on 9 Comments

The Beginner’s Guide to Topaz Studio 2

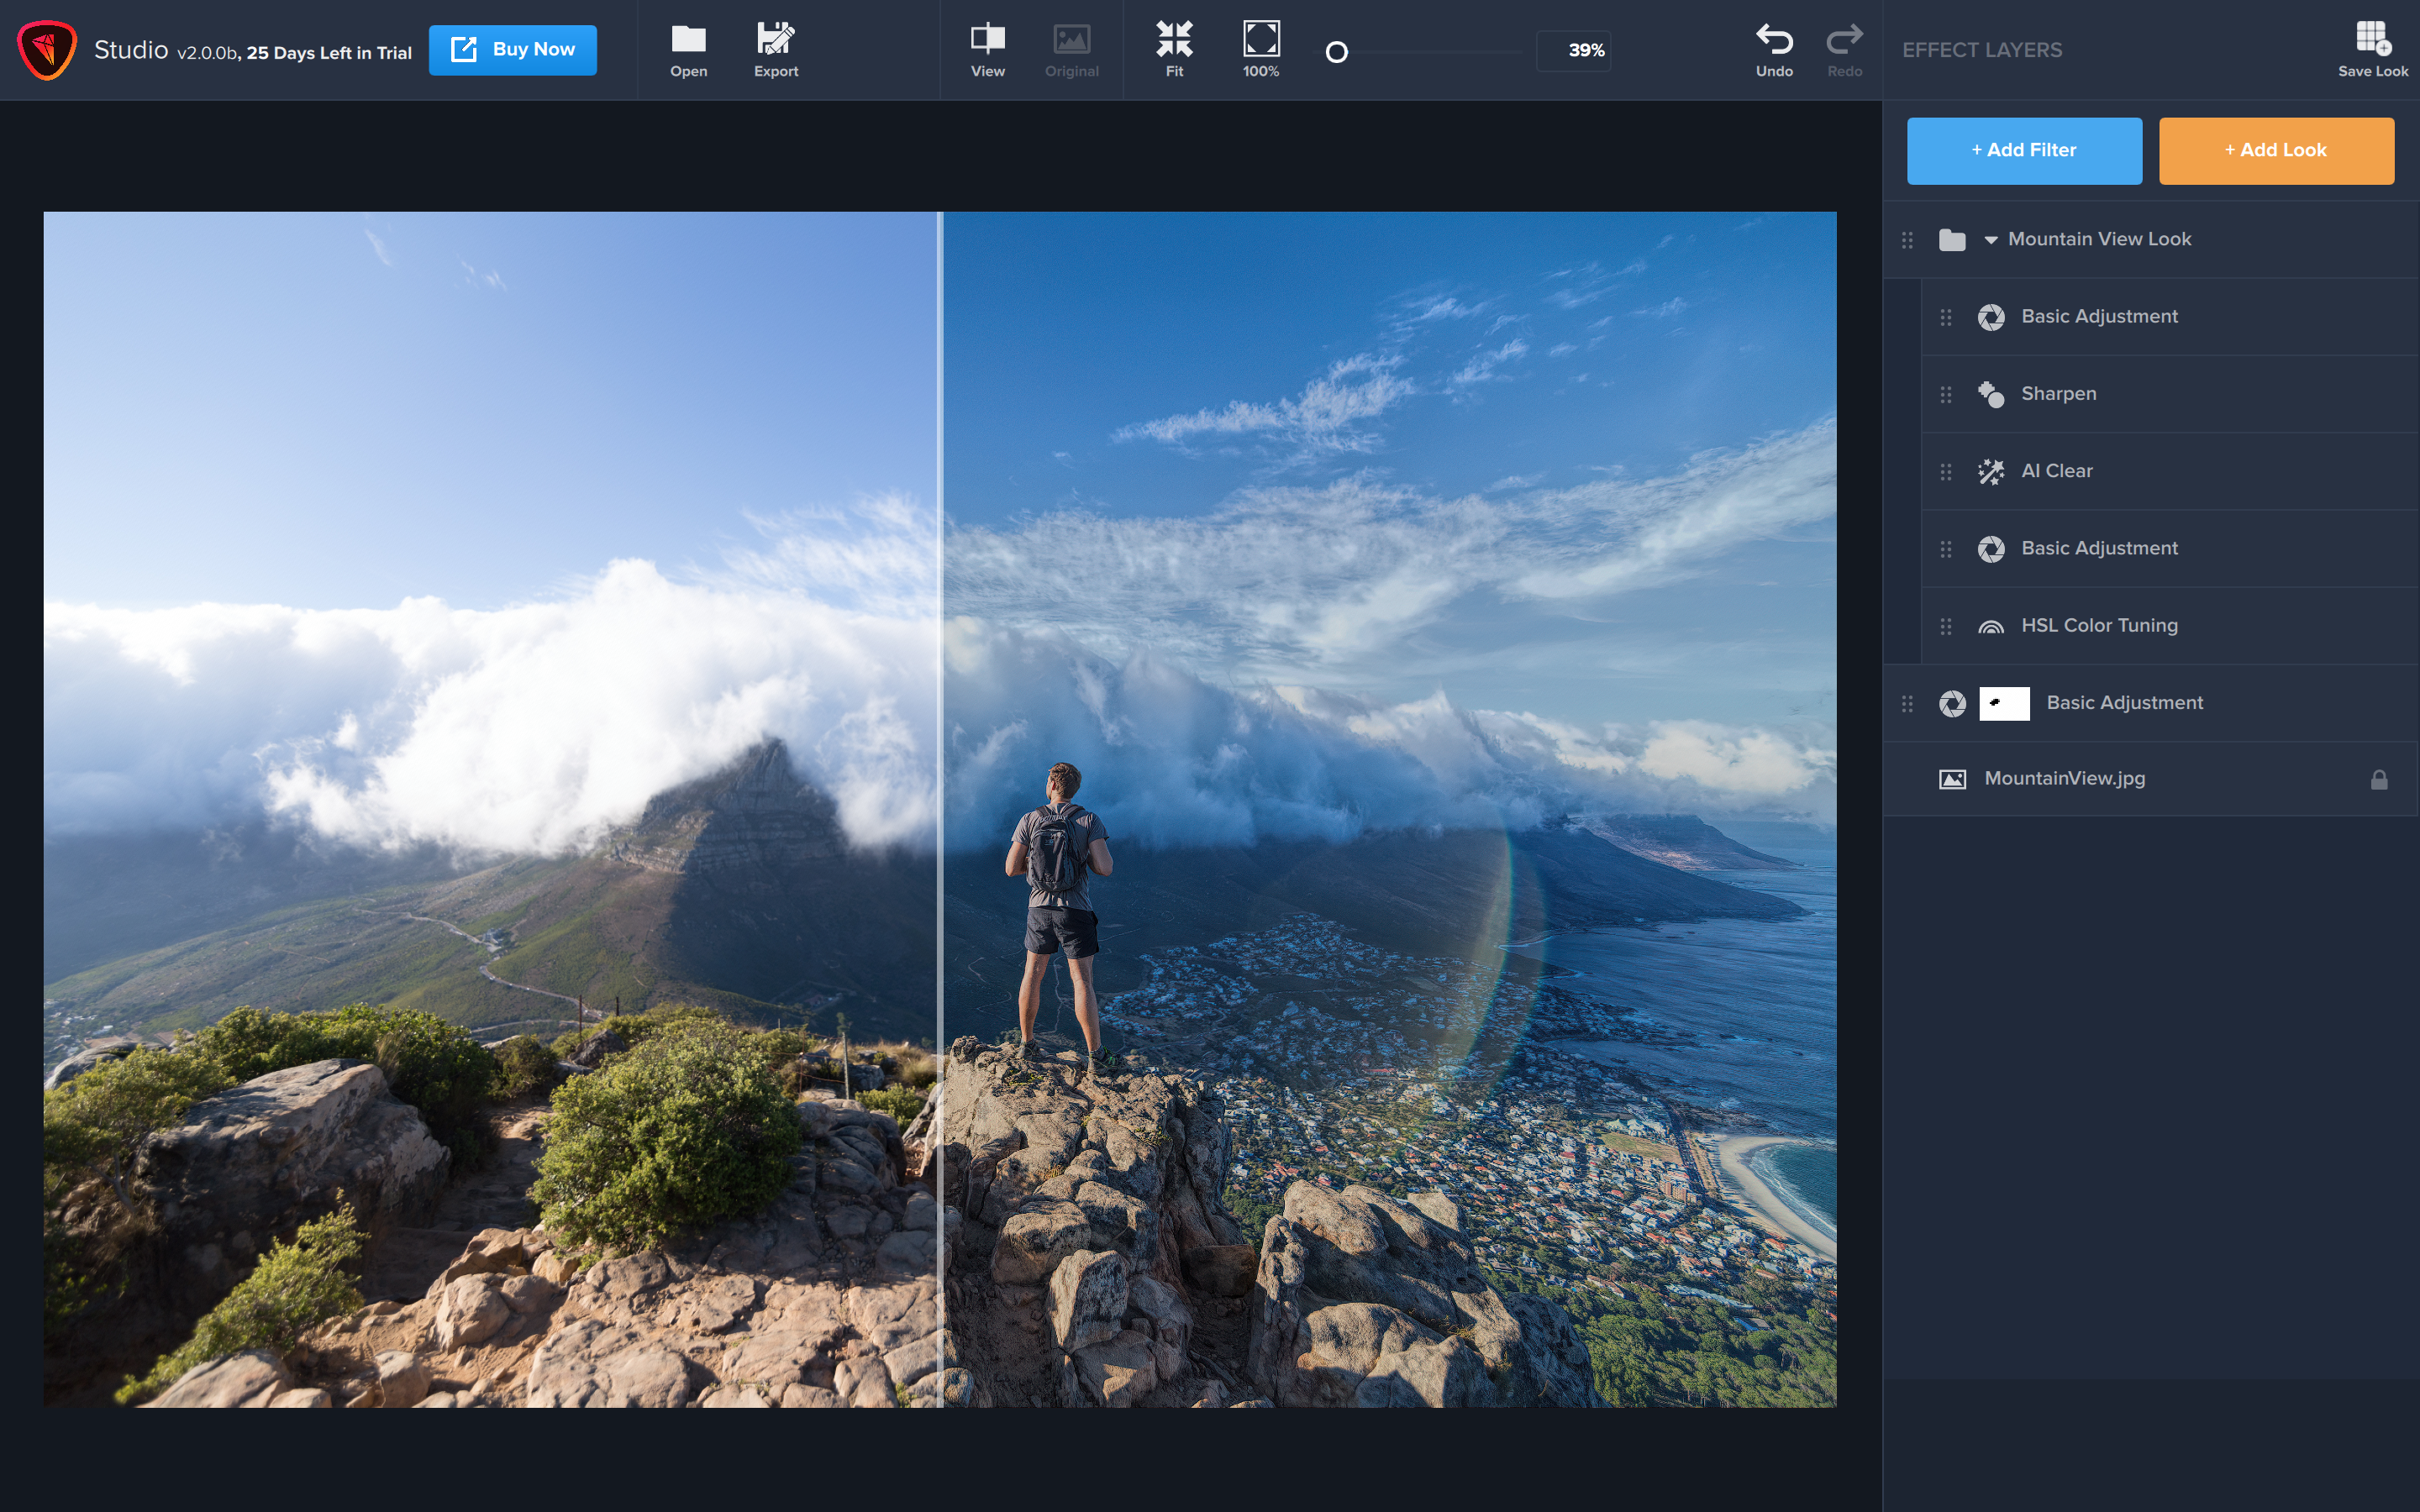
Want a fresh look for your photos? Topaz Labs, the leader in AI technology for your photography post-processing workflow, has launched Topaz Studio 2Whether you’re looking to edit photos or make stunning digital art, Topaz Studio 2 will help you achieve infinite photo effects that are as unique as your photography.

Read on for an overview of Studio 2 or check out our complete Studio 2 User Guide

Topaz Studio 2

Effect Filters Will Make Your Photos Pop

From basic adjustments to intelligent AI-powered effects, filters help make your photos pop by adjusting color, adding styles, and implementing a variety of fixes.
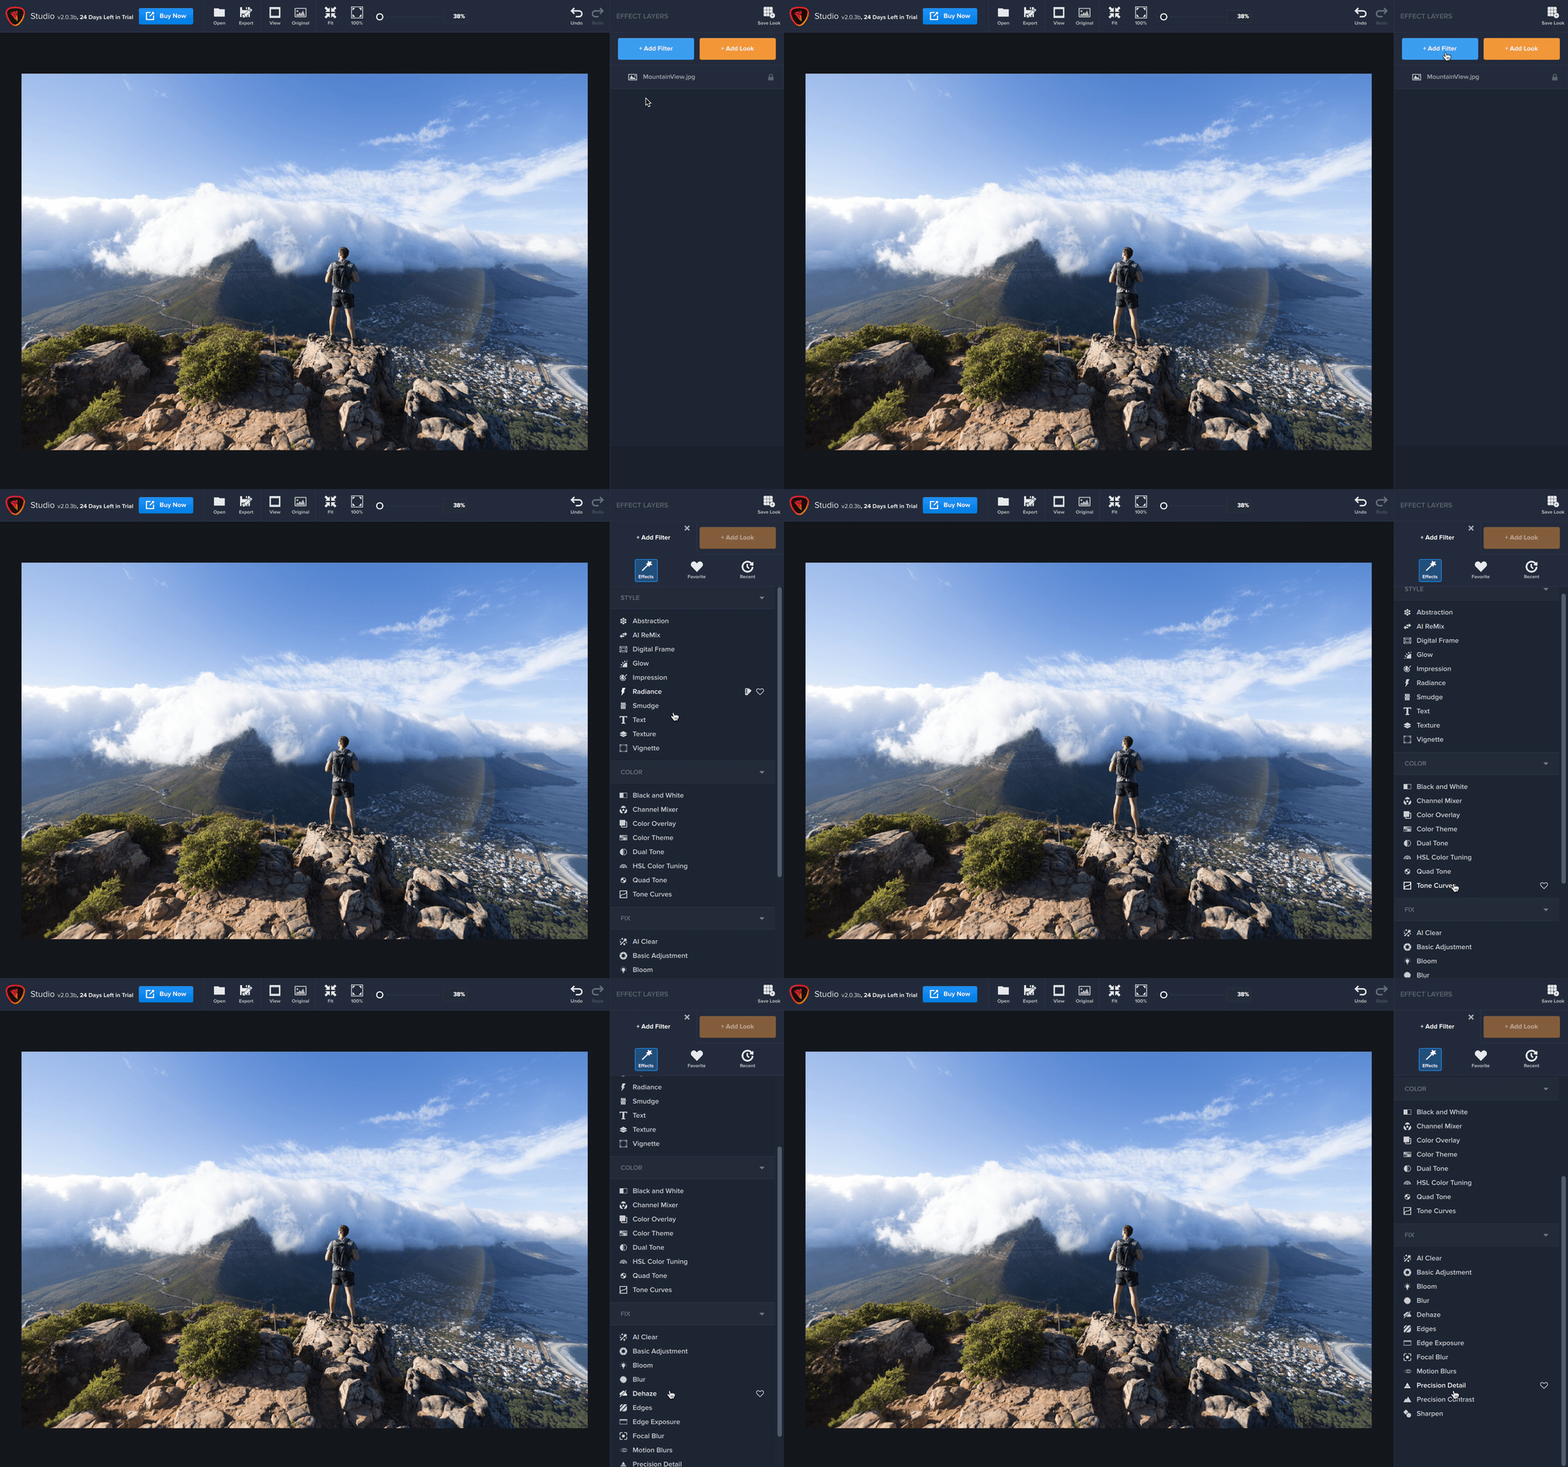
Topaz Studio 2 Filter Effects Panel

Getting started with photo filters is as easy as clicking the “Add Filter” button and browsing the different options. 

Looks Can Help You Achieve Anything

Within the Looks panel, you can choose from a variety of creative looks. You’ll find effects for artistic, grungy, abstract, vintage, dramatic looks and more. 
Topaz Studio 2 Looks Panel

Simply click any Look to preview and apply to your image.

Layers Let You Control Everything

Looks and effects appear in layers which you can stack and rearrange with blending modes and opacities to achieve the aesthetic that works for your image. 
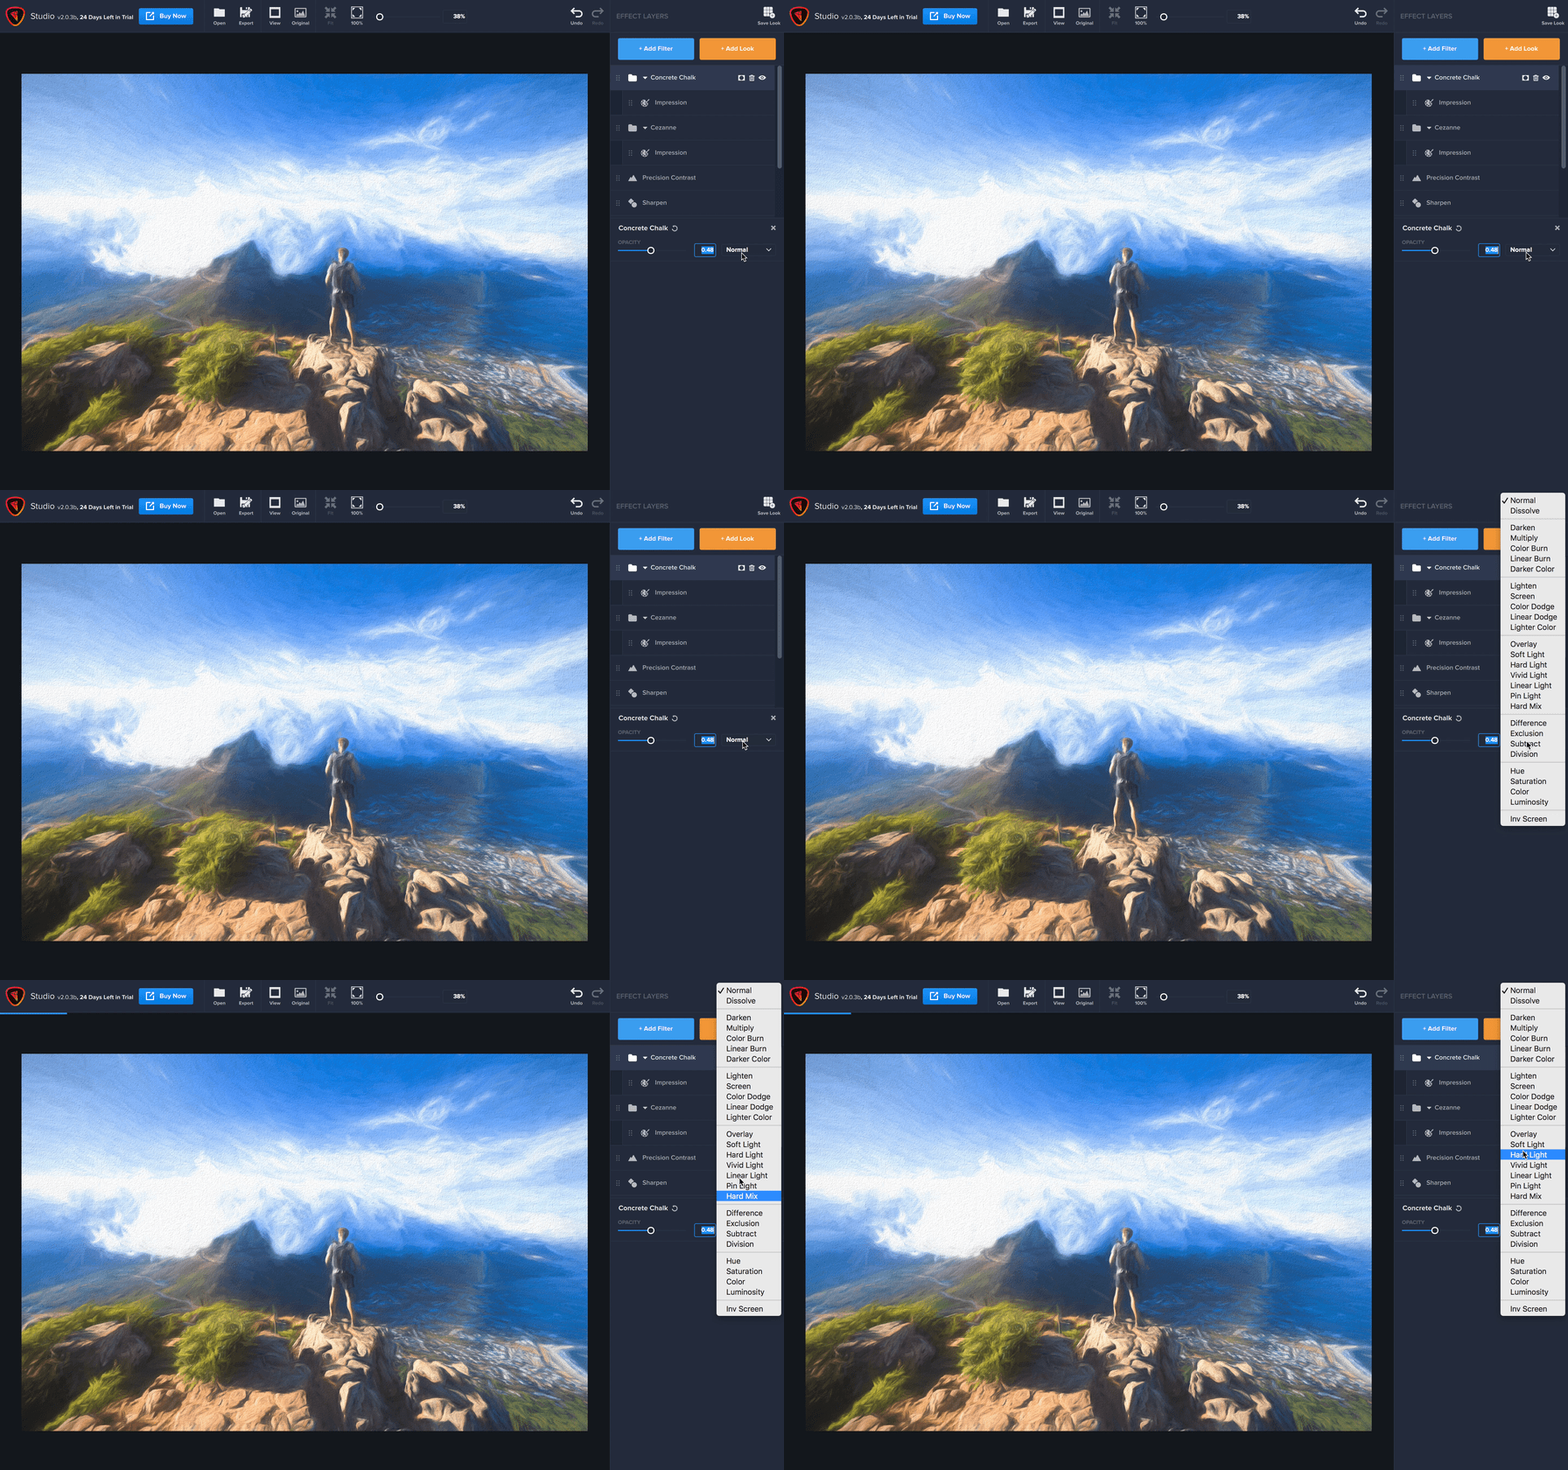
Working with layers in Topaz Studio 2

You can stack and blend multiple looks and effect filters. The results are infinite and limited only by your imagination.
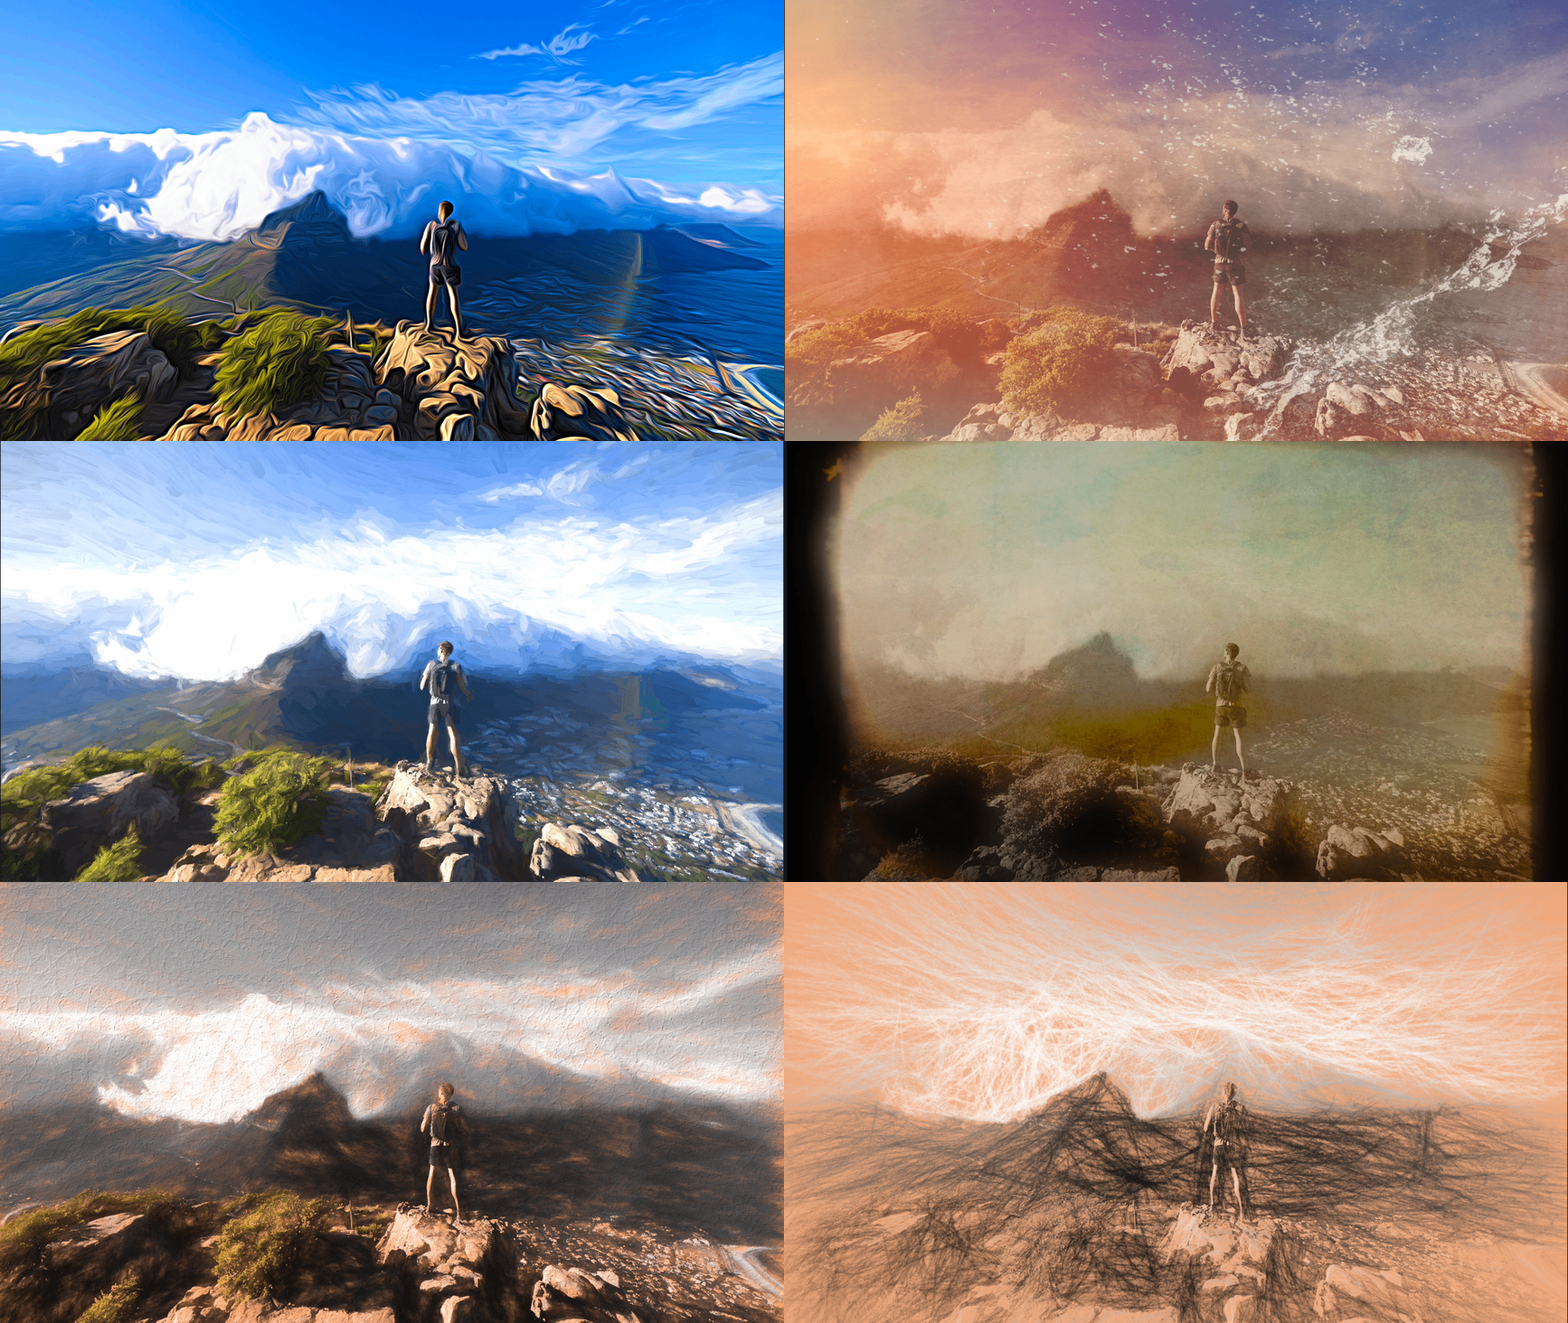
Topaz Studio 2 Looks


Download Topaz Studio 2 today and try it free for 30 days.

Be sure to check out the Studio 2 Guide to help you get started!
Posted on

Topaz Tutorial: Editing Landscapes with Miroslav Petrasko

Landscape photos are quite different from cityscape photos. If you are not shooting right into the sun, you usually have much less local contrast and extreme differences in brightness in the photos. You can’t just take one and be done with it, so some editing is always required–even if it’s only to fix lens problems.

Sharpness is really important in landscape photos. Together with a bigger depth of field, it makes landscape photos stand out more. Here is where Topaz Sharpen AI can come in handy.

A Stunning View

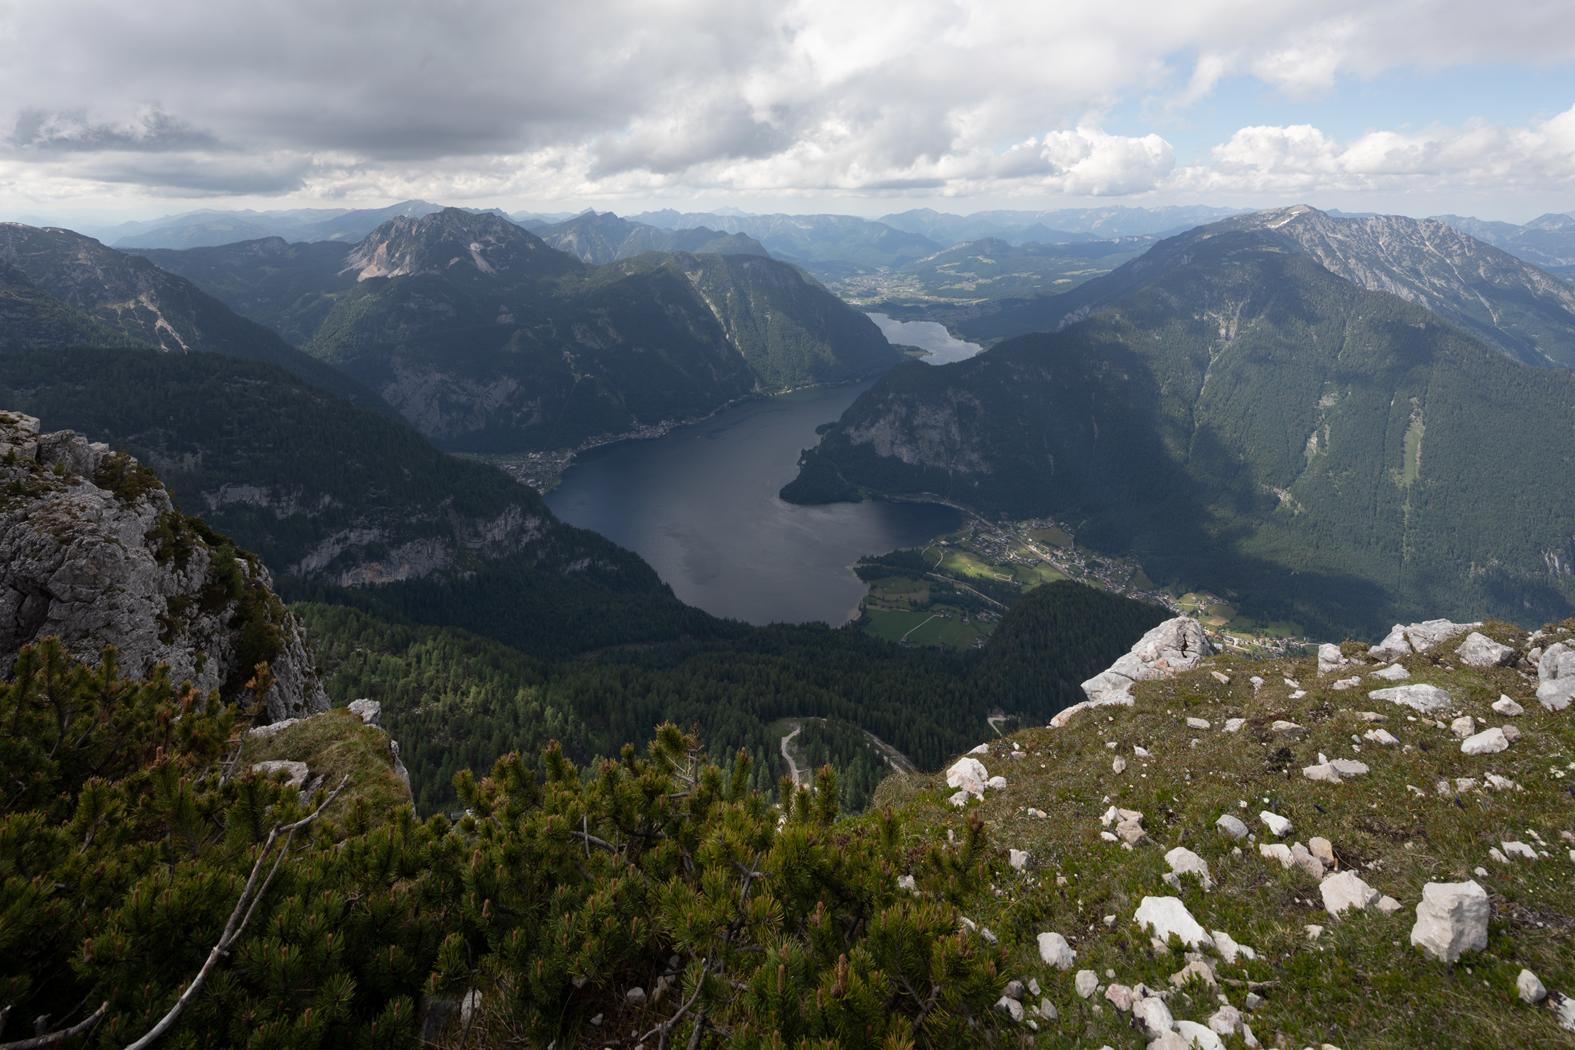
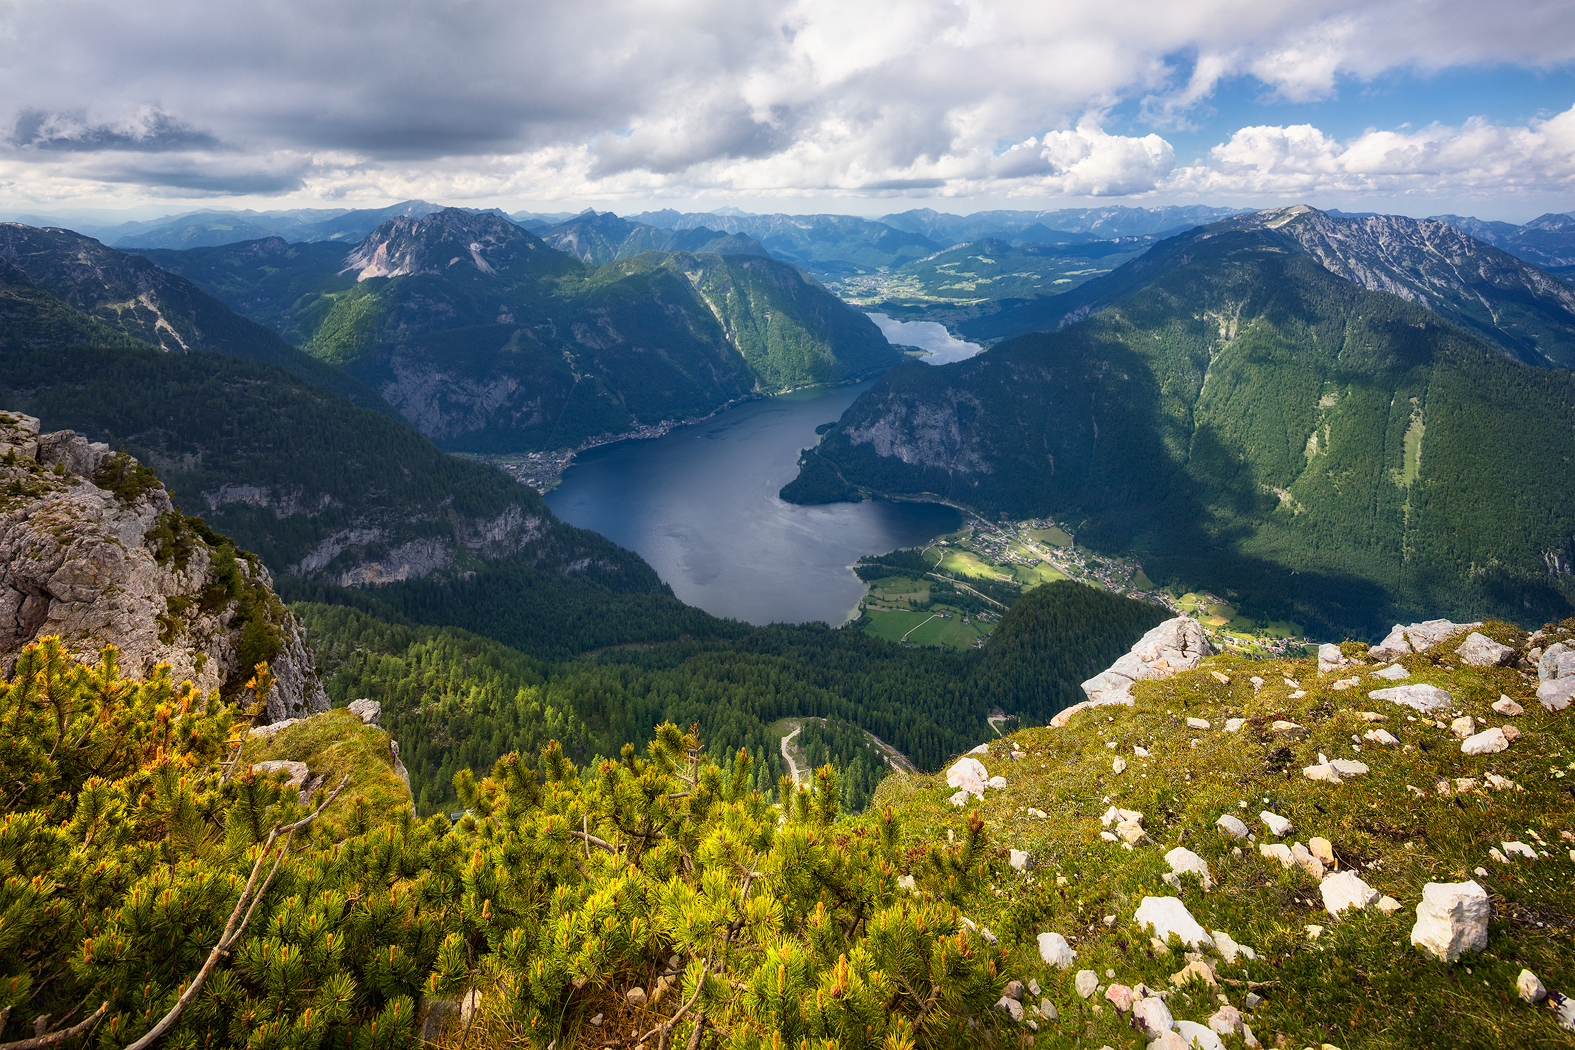
This is a view from the Five Fingers lookout platform in the Austrian Alps, high above the town of Hallstatt. It was taken during an overcast day, so while it’s properly exposed, it’s a bit dark, hazy and bland. I won’t go through every edit I did on these photos, but will point out some of the most important techniques to help you get more from your landscape photos.

Original Image (Click to view at 100%)

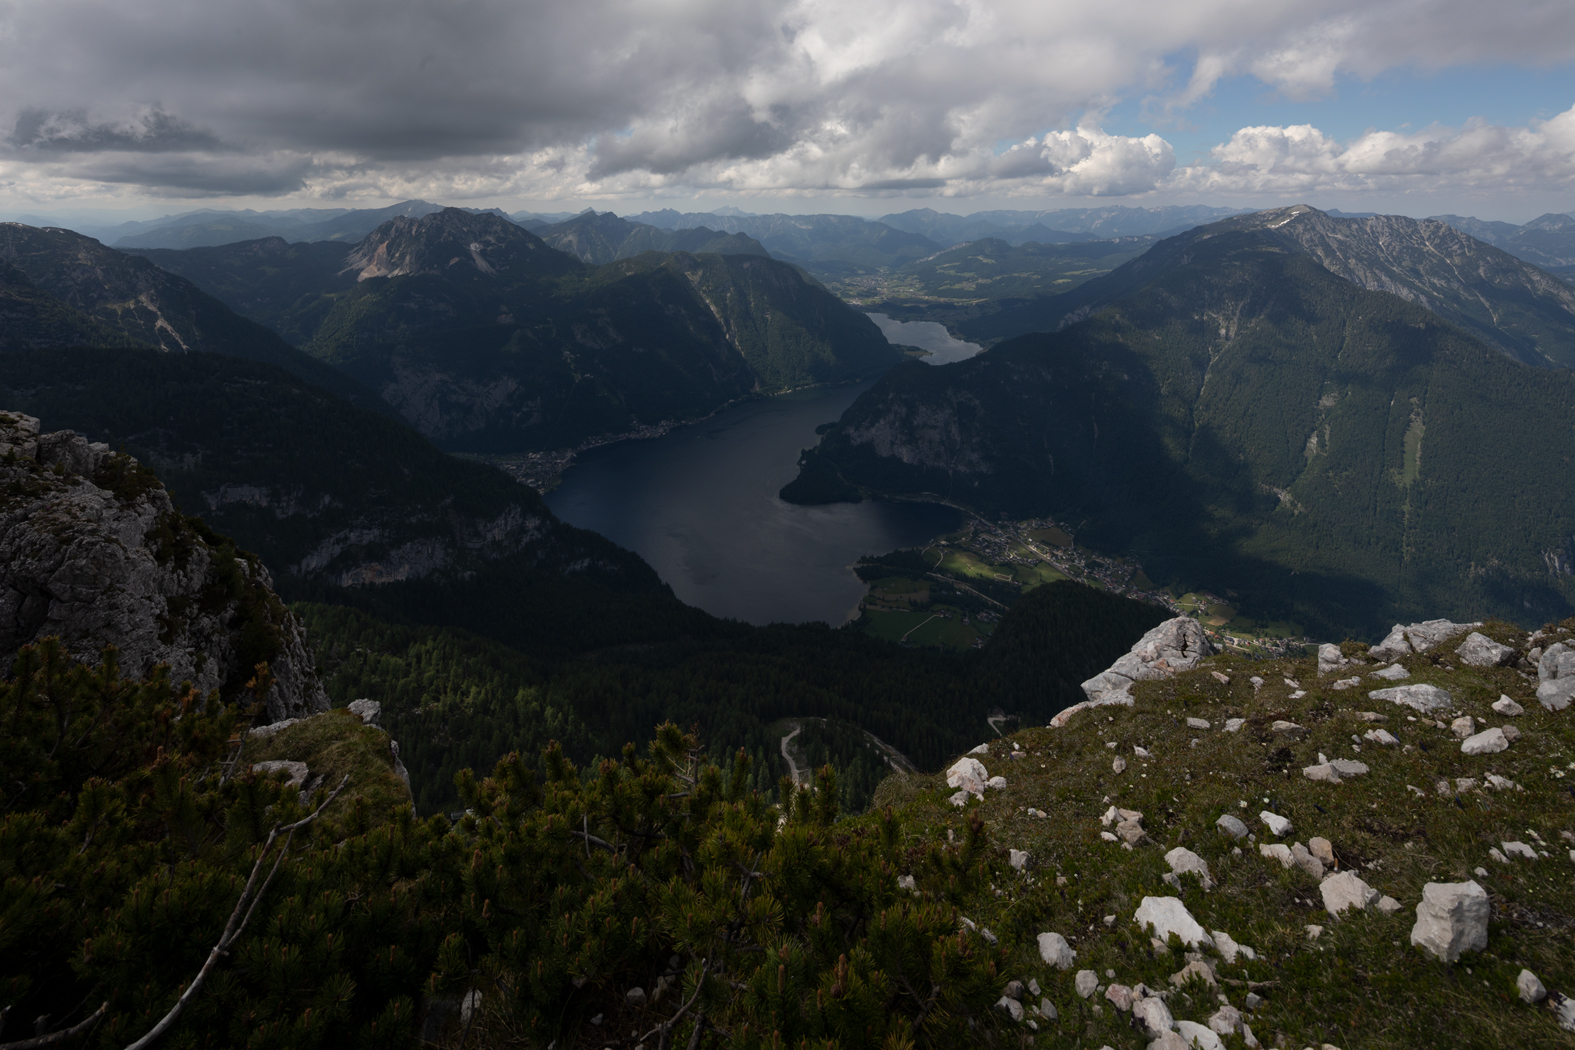
I took three exposures for this photo in 1EV increments. I could have gotten away with just using a single exposure, but I knew I would want to lighten and darken certain areas. So, having a proper exposure of every area makes for a cleaner photo than one that was over or underexposed in post-processing. Here are the two additional exposures.

(Click to view at 100%)

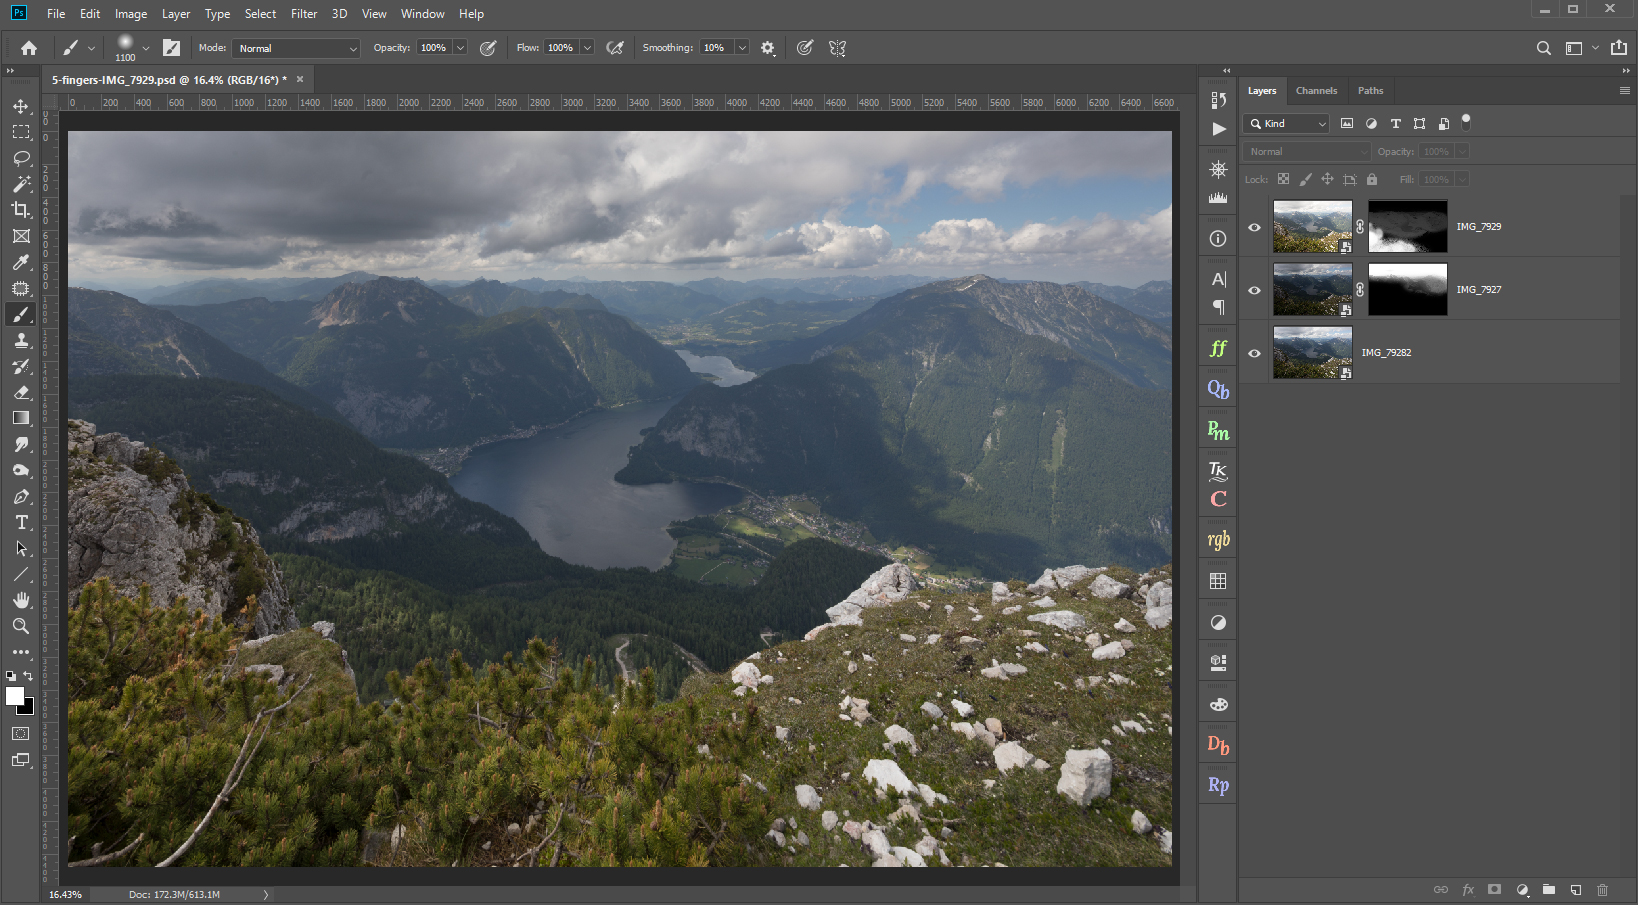
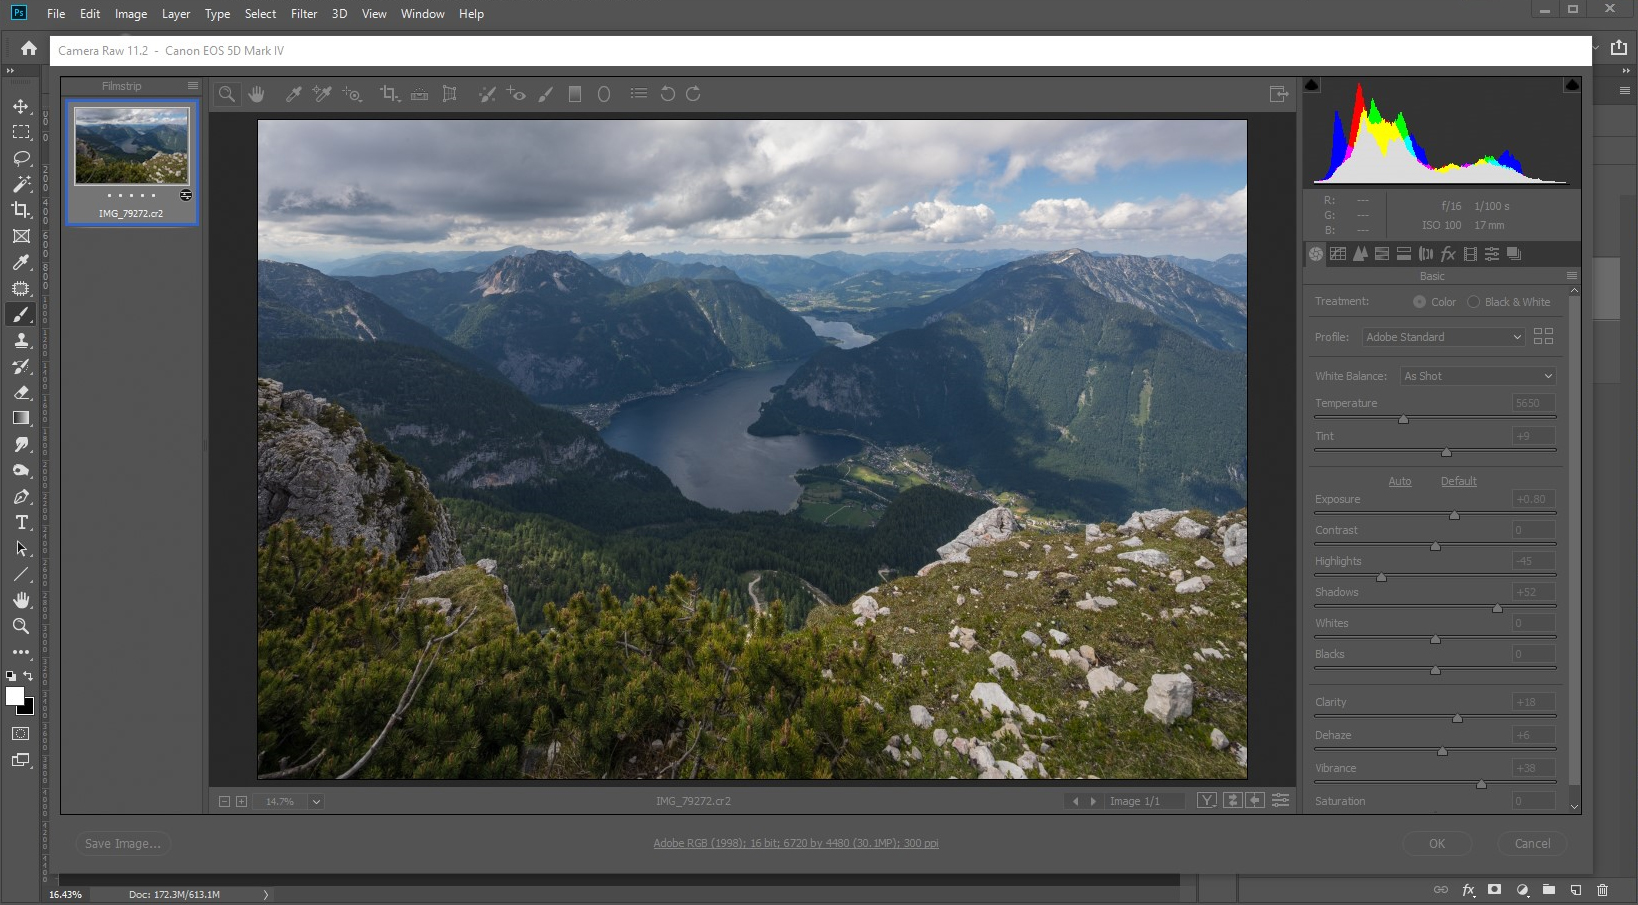
There is a photo post-processing technique called matching, which I’ll show you below. By doing so, you end up with a nice even blend that looks like one seamless photo. The idea behind it is to take the RAW files as smart objects into Photoshop and blend them together to get the desired exposure everywhere. 

(Click to view at 100%)

Once this is done, you go back into the RAW editor and tweak the RAW files, to create a similar look for each one. You do this by mostly tweaking the exposure, highlights, and shadows. You can also add enhancements like vibrance, dehaze and clarity to the RAWs, to make further editing even easier.

(Click to view at 100%)

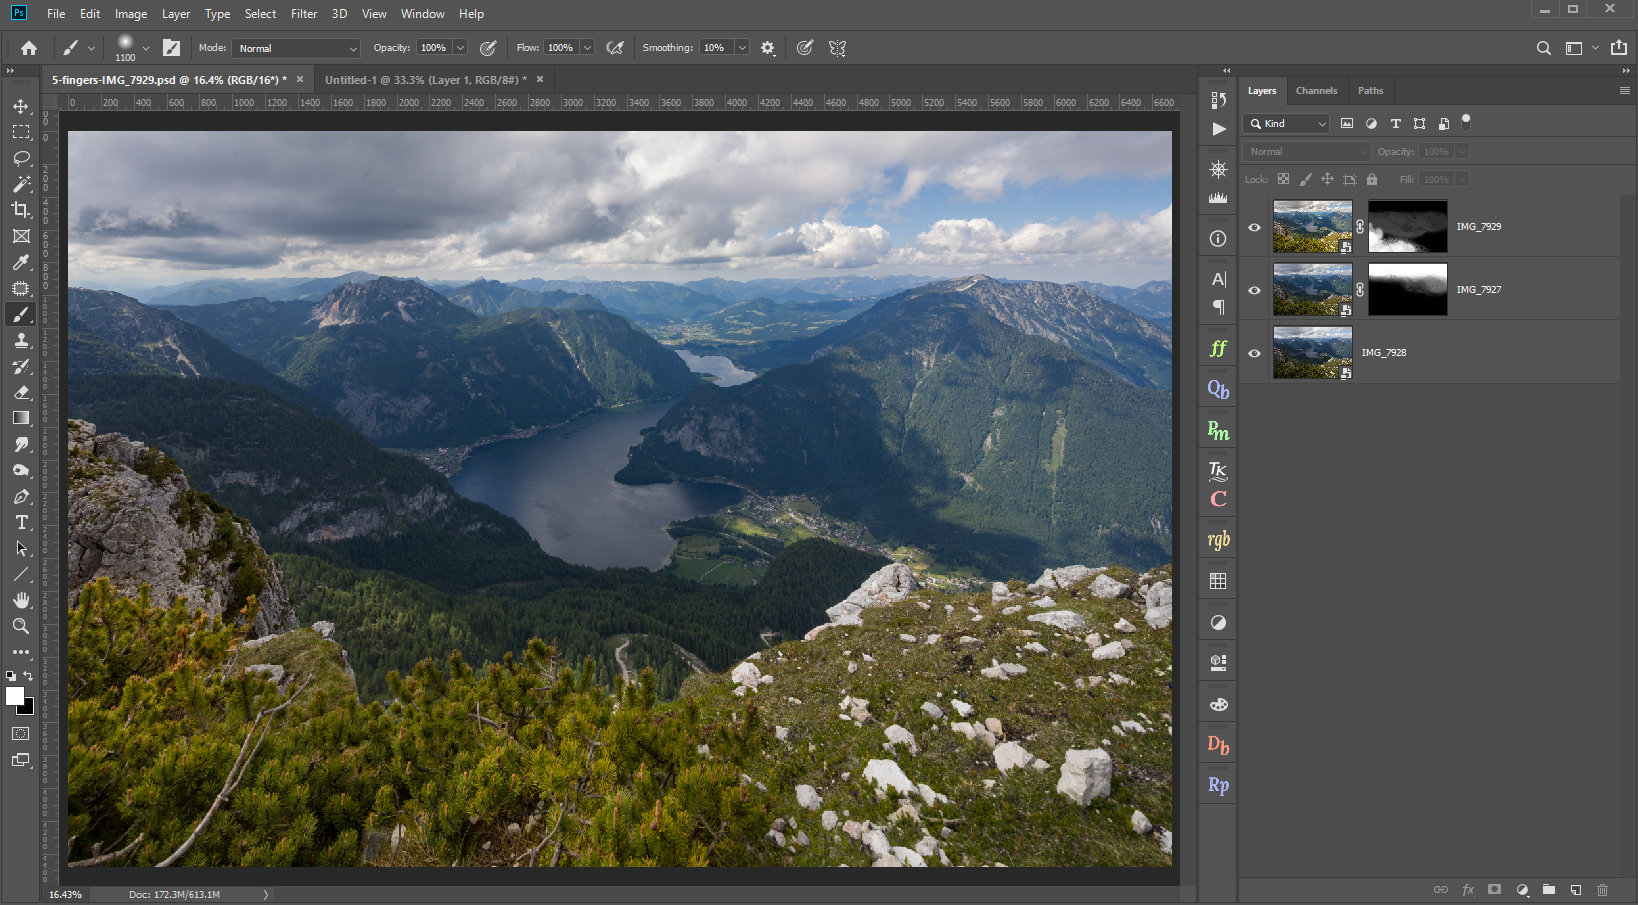
I blended the photos into one by using layer masks and luminosity selections. Once done, I matched the exposures and added vibrance, clarity, and dehaze to them. Above is a screenshot of the blended, tweaked underexposed RAW and below is how it looked afterward. You can see that the blend has almost no contrast to it. That is normal because when you remove highlights and shadows, you also remove contrast. 

(Click to view at 100%)

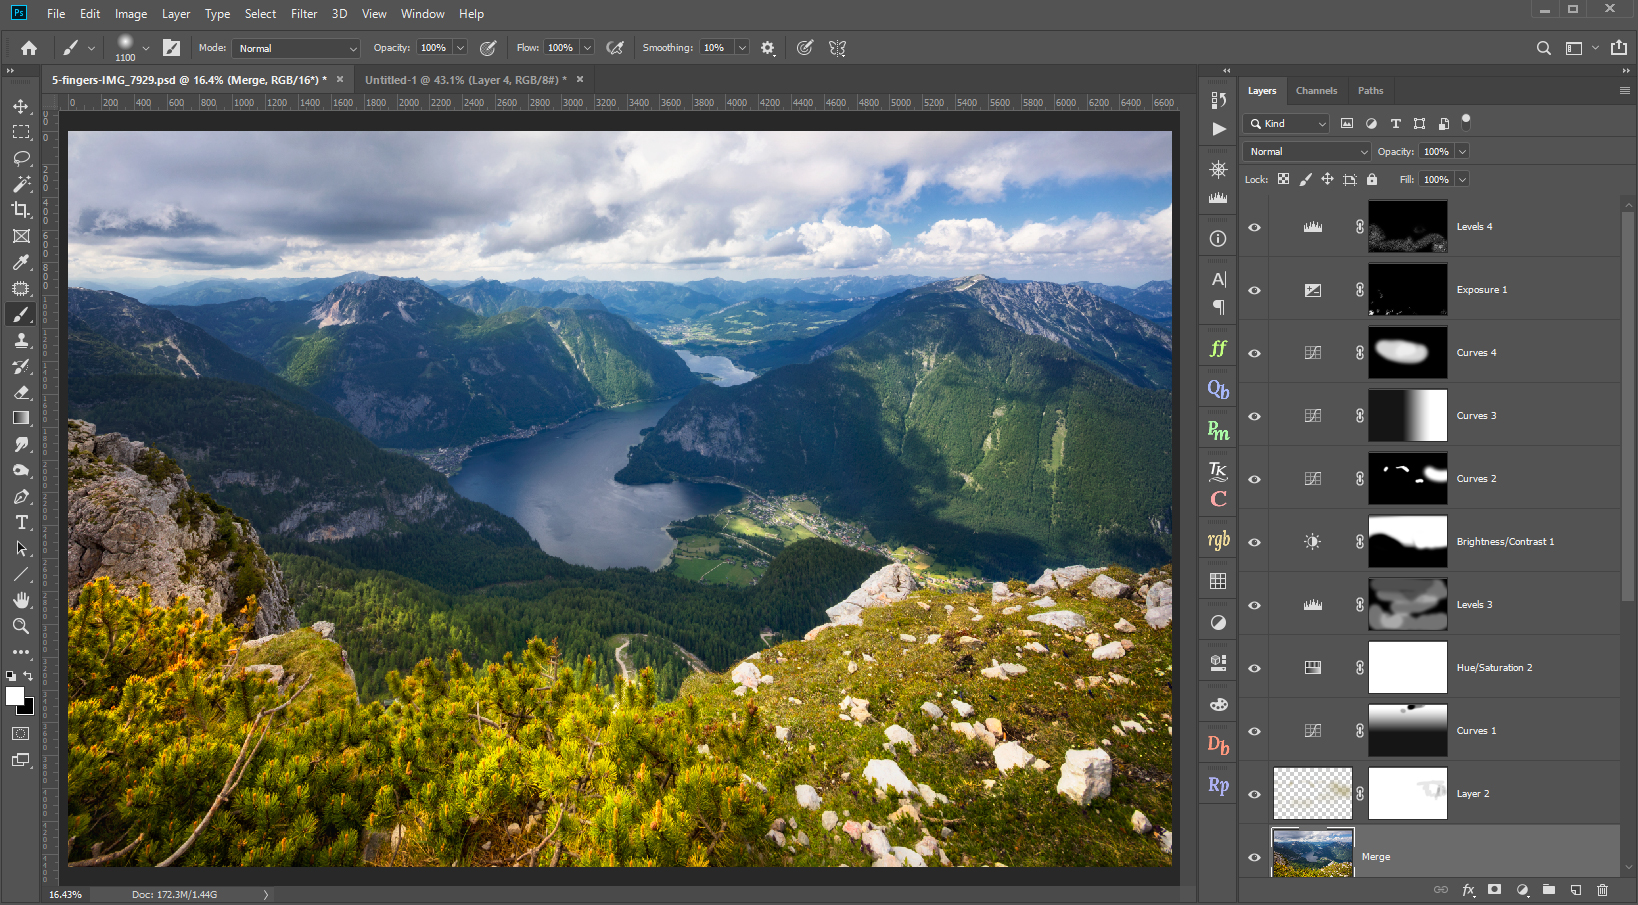
From this point on, all of my edits are just tweaking brightness and contrast, maybe a bit of saturation here and there. Usually, you don’t need to edit saturation at all, as adding contrast makes the photo more saturated on its own. But as this was very overcast, I wanted the foreground color to stand more.

(Click to view at 100%)

You can see in this Photoshop screenshot all the layers I used and how I only painted them by hand to the areas I needed them in.

Best Practices for Sharpening

With this done, we’ll move on to sharpening. There are three things to consider here. Firstly, the whole photo should not be of the same sharpness. Our eyes are drawn towards sharper (and brighter) areas so you can use that to draw it towards your main subject. In this photo, that would mostly be the foreground and the middle area around the lake.

Secondly, not everything should be sharp. For instance, you would not expect the peaks in the further background to be as sharp as the closer ones. And you wouldn’t expect to have much darker clouds than the rest of the scenery.

Thirdly, it is good practice to resize the photo to your final desired resolution and only afterwards sharpen it. 

Topaz Sharpen AI

Let’s sharpen this photo now. We need to merge all the layers into a new one, and then use Topaz Sharpen AI from the plugin menu. There are multiple processing modes available in Sharpen AI to target specific problems–Sharpen, Stabilize, and Focus.

With a landscape photo, you can use all of them. For instance, if you got your focus a tiny bit off, you can try the focus mode to return some sharpness to the out of focus areas. Or perhaps you had a bit of wind come through and the foliage moved. In that case, you can try the stabilize mode.

Sharpening in Topaz Sharpen AI (Click to view at 100%)

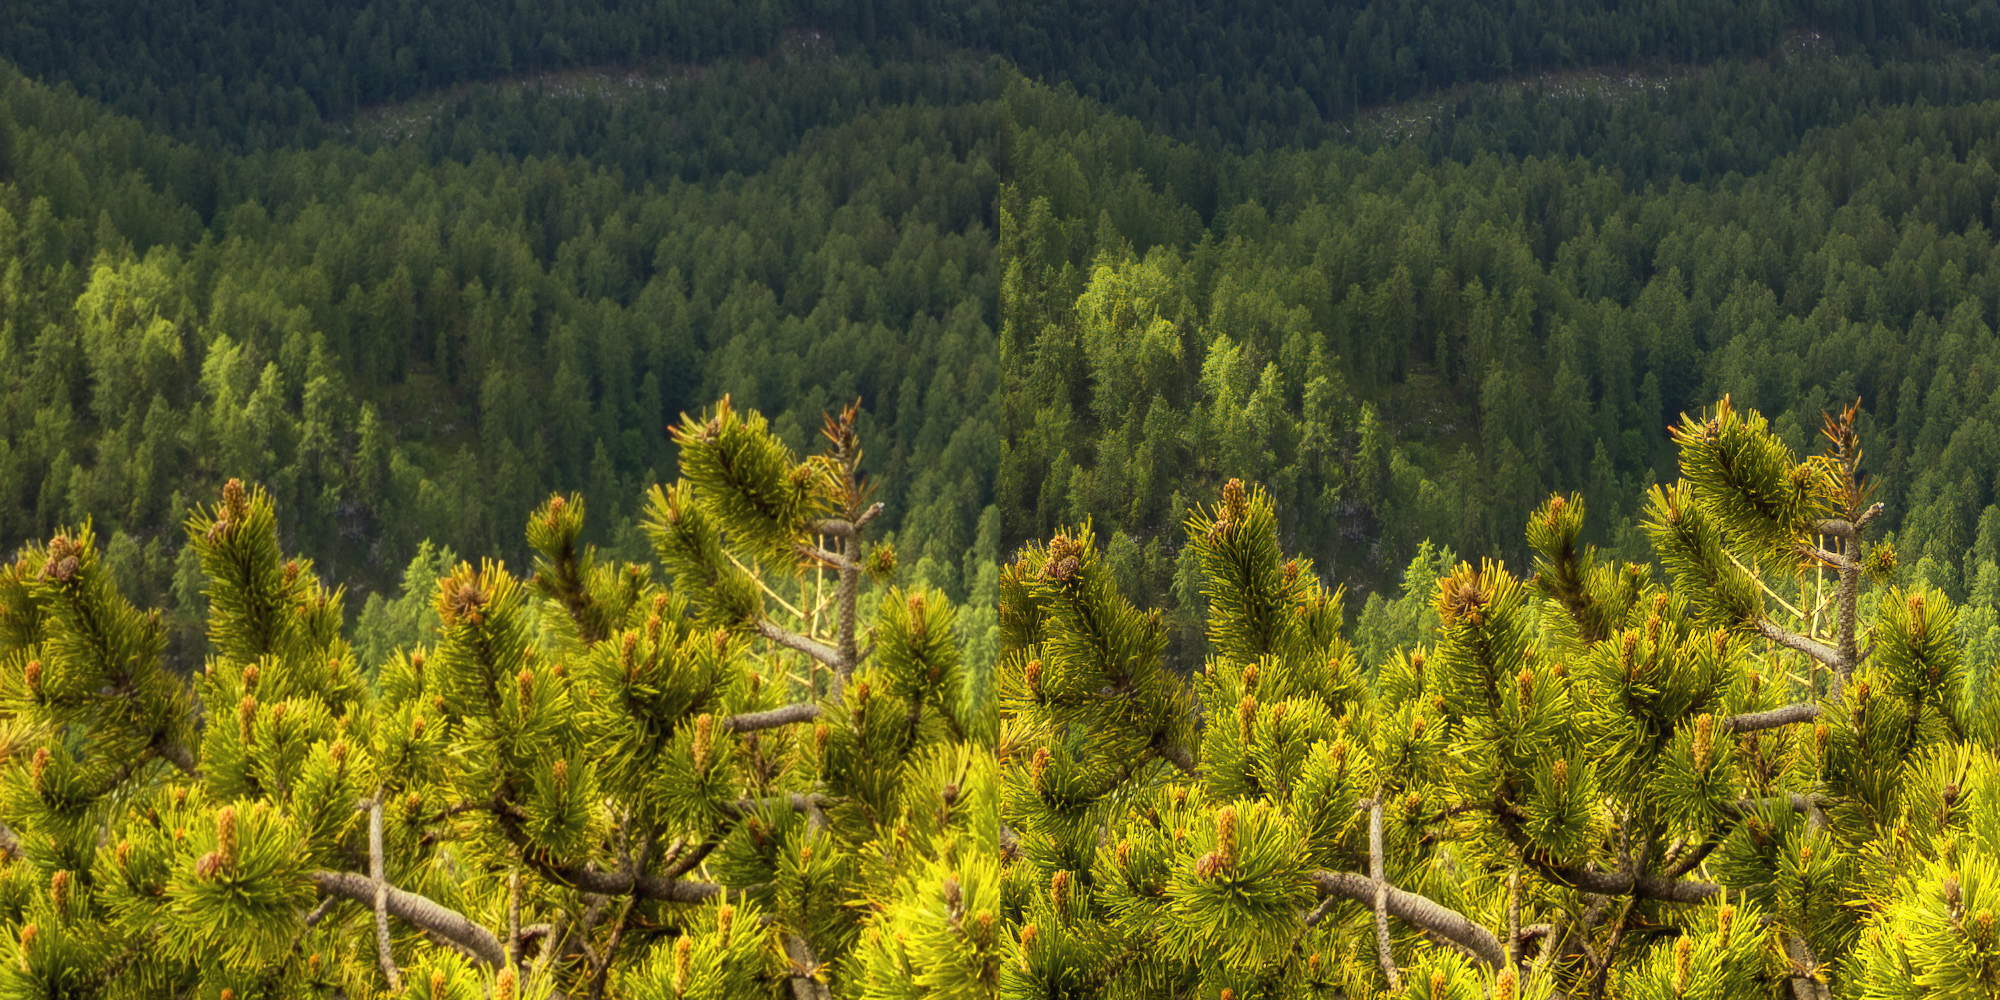
For this photo, let’s go for the standard Sharpen mode. The standard settings look a bit strong for this photo, so let’s move the Remove Blur slider to 0.4. You can see a few areas in comparison below, all are at 100% zoom.

(Click to view at 100%)

We can remove the sharpness from the areas where it’s not needed, and tone it down in others. You can choose to go back to Photoshop and remove the sharpness from the clouds, if you want them to be a bit blurry and soft. I also removed the sharpness from the peaks in the distance and toned it down on the peaks that are close. Like this, there is a nice progression, with the sharpest things close to you, losing the sharpness the further away you look.

The Final Result

Final Result (Click to view at 100%)

About Miroslav Petrasko

While I started as a game designer, I switched to photography around 10 years ago. Since then I have been working with different luxury travel brands and almost daily, stubbornly updating my blog at hdrshooter.com with new photos, articles, and guides. It really is not an easy task.

Below are a few other landscape photos from my travels. The first three are from Austria: the view from Dürnstein Castle, Grossglockner High Alpine Road and the reflection at Altaussee. The last two are from Switzerland: the peaks over Zermatt and Matterhorn.

Previous slide
Next slide

Get the Topaz Application Featured

Topaz Sharpen AI

Sharpen AI is the first sharpening and shake reduction software that can tell difference between real detail and noise. Create tack-sharp images even when you’re shooting handheld, at night, or with a shallow depth of field.
TRY IT NOW
Posted on

Getting Started with Topaz JPEG to RAW AI

This article is to introduce you to and provide you with some helpful resources to using Topaz JPEG to RAW AI!

Why You’d Want to Use JPEG to RAW AI

Topaz JPEG to RAW AI allows you to edit JPEGs as if you originally shot them in RAW.

This machine-learning powered software will:

  • Recover a portion of the lost dynamic range. This will help bring back lost shadow and highlight details.

  • Expand bit depth from 8-bit to 16-bit. This will prevent posterization and banding when you adjust the contrast in your images.

  • Expand color space from sRGB to ProPhoto. The larger resulting color space allows you to better edit saturation and vibrance without any visible artifacting!

  • Remove JPEG compression artifacts. Artifacts won’t be easily visible in high-quality JPEGs, but they can completely ruin an image if they are. JPEG to RAW AI is exceptional at removing these artifacts while preserving natural image features.

  • Recover fine detail removed during the conversion process. JPEGs will often feature smoothed details due to a small sensor or heavy processing. JPEG to RAW AI can enhance image details.

    So, let’s get into JPEG to RAW AI and how you get more out of your photos!

When to Use JPEG to RAW AI in Your Workflow

We recommend using JPEG to RAW AI at the very beginning of your workflow. Whenever you would edit a JPEG, put it through JPEG to RAW AI first for best editing results. JPEG to RAW AI also allows batch processing, to speed up your workflow.

How JPEG to RAW AI Works

There’s normally no way of recovering lost detail. Artificial intelligence is allowing us to change that.

The easiest way to explain it is that AI approaches this problem from a very different angle. Instead of trying to reverse the information loss, which is impossible, we train a neural network to “remember” what the RAW image should look like before it’s converted to a JPEG image.

We train the neural network on a large number of high-quality RAW images together with their corresponding JPEG version so that it learns and remembers the correspondence. After training the network on enough images, the neural network will “remember” to output a higher quality image even when given a new “unseen” JPEG image as input.

It’s just like when you see a friend from far away. Though they are too far away for you to make out the details with your eyes, you can imagine or remember what your friend looks like in vivid detail!

We’re continually training our JPEG to RAW conversion model with more data, which makes it better the more time passes. You’ll get the latest and greatest when the model improves.

JPEG to RAW AI is currently the only machine-learning powered software capable of doing this.

Installation Tips

Here’s a quick rundown to get you up and running with Topaz JPEG to RAW AI!

BEFORE YOU DOWNLOAD, please check out the system requirements of JPEG to RAW AI and see what kind of performance to expect:

After meeting the requirements, simply follow the directions below:

  • Download JPEG to RAW AI from the Topaz Labs Downloads Page.
  • Log in with your Topaz Labs account or the email address that you used to purchase.

To start a free, 30-day trial, please follow the directions below:

Extra Tip: Started a trial, bought the product, and still seeing “trial” on the application? No worries. Simply click “Help” in the top toolbar and then click “Update Product Ownership.” And with just those few clicks, your product will be updated.

Using JPEG to RAW AI

For a quick demo of JPEG to RAW AI, you can check out this video from one of our affiliates, Don with Road Runner Photography, as he takes a JPEG from 2004 and enhances it to its intended look.

In another quick walkthrough, our affiliate, Travis Hale, explains some of the benefits of JPEG to RAW AI and how he uses it to convert photos from his smartphone. Like he says, the best camera is the one you have on you. JPEG to RAW AI allows you to get more editing capabilities from those smartphone photos and your JPEG file library.

Other Resources for JPEG to RAW AI

Still have some questions on JPEG to RAW AI? No worries. We’ve added some JPEG to RAW AI articles in our Help Center and gathered some examples on our product page. You can also reach us by submitting a support ticket!